Green Life QWIK EGG Folheto de instruções - Página 4
Procurar online ou descarregar pdf Folheto de instruções para Cozedor de ovos Green Life QWIK EGG. Green Life QWIK EGG 8 páginas.
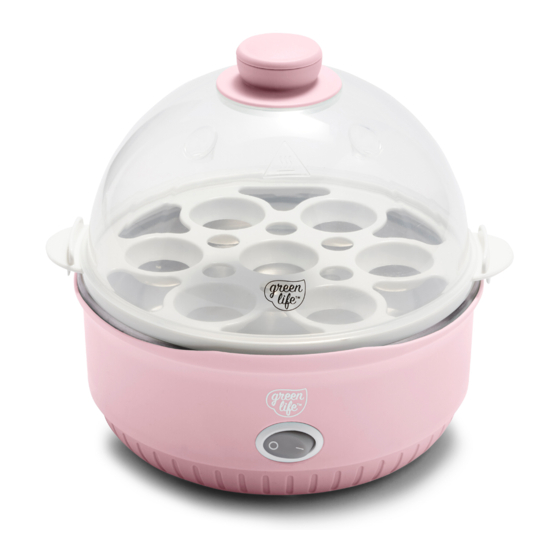
PARTS
Handle
A.
Steam Holes
B.
Lid
C.
D. Egg Tray
E. Bottom Cover
F. Base
G. Power
Switch with
Indicator Light
USING YOUR EGG COOKER
SOFT, MEDIUM, AND HARD-BOILED EGGS
Suggested Timing
The following time guidelines are for
medium to large eggs. Extra large or jumbo
eggs may require additional time and water
to achieve the desired results.
For firm eggs, let your eggs sit covered in
the Egg Cooker for a few minutes before
removing them.
For completely hard-boiled eggs, leave your
eggs in the Qwik Egg for an extra minute
after the buzzer sounds.
4
A.
B.
C.
D.
E.
F.
G.
H.
I.
J.
K.
H. Omelet Tray
I. Measuring Cup
J. Needle (on the
bottom of cup)
K. Poaching Tray
Note: Parts are
BPA-free
Egg Consistency
Soft Boiled
Medium Boiled
Hard Boiled
Timer Auto-Off
This Qwik Egg's thermal sensor will
automatically turn the machine off when the
water has fully evaporated from the Heating
Plate and when the buzzer sounds.
ATTENTION: Do not unplug the unit while
cooking. Should you unplug the unit while
cooking, your Qwik Egg will still be turned
on when you plug it back in. If the unit does
not detect water on the Heating Plate, it will
automatically shut off and reset itself in
a few seconds.
BOILING EGGS
ATTENTION: Unplug your Qwik Egg
before starting.
1. Pierce the large end of each egg with
the pin attached to the bottom of the
Measuring Cup.
2. Pour the corresponding amount of cold
water into the Heating Plate using the
Measuring Cup.
3. Attach the Egg Tray Handle to the Egg Tray,
and place the Egg Tray on the Heating Plate.
Place each egg, end with the hole pointed
upward, in each designated spot.
4. Cover the Tray with the Lid and plug in your
Qwik Egg. Simply press the Power Button
to start cooking. The Indicator Light
will turn on.
5. A buzzer will sound when the eggs are
finished cooking. Silence the buzzer by
pressing the power switch. Cooking time
will depend on number of eggs and desired
style. Lift the Lid using the Lid Handle and
use heat-resistant tongs to remove
eggs. Parts will be hot: do not touch
with bare hands.
POACHING EGGS
1. Locate the "Omelet/Poached" marking on
the Measuring Cup and fill to that level. Pour
water into the Heating Plate. Place the Egg
Tray on top of the Heating Plate.
2. Lightly grease the Poaching Tray with
Cook Time
1-3 eggs 7 minutes
4-7 eggs 10 minutes
1-3 eggs 9 minutes
4-7 eggs 12 minutes
1-3 eggs 12 minutes
4-7 eggs 16 minutes