Garmin FORETREX 601 BALLISTIC EDITION Manual do Proprietário - Página 6
Procurar online ou descarregar pdf Manual do Proprietário para Ver Garmin FORETREX 601 BALLISTIC EDITION. Garmin FORETREX 601 BALLISTIC EDITION 18 páginas. Ballistic edition
Também para Garmin FORETREX 601 BALLISTIC EDITION: Manual do Proprietário (30 páginas)
- 1. Table of Contents
- 1. Introduction
- 1. Status Icons
- 2. Waypoints, Routes, and Tracks
- 2. Creating a Waypoint
- 2. Viewing Track Details
- 2. Customizing the Range Card Fields
- 2. Editing the Muzzle Velocity and Temperature Table
- 2. Jumpmaster
- 3. Device Information
- 3. Viewing Device Information
- 4. Troubleshooting
- 5. Appendix
- 6. Appendix
- 6. Applied Ballistics Glossary of Terms
- 7. Index
travel, and a direction arrow in the compass ring. You can
follow the arrow to navigate.
Elevation page: The elevation page shows your elevation.
Trip computer: The trip computer displays your current speed,
average speed, maximum speed, trip odometer, and other
helpful statistics.
Menu page: The menu contains settings for waypoints, tracks,
and routes, as well as other setup options.
The menu page also displays the current time and date at the
top of the screen.
Applied Ballistics
®
page: This feature offers customized aiming
solutions for long-range shooting
page
2).
NOTE: This feature is available only on the Foretrex 701
device.
Status Icons
Status icons appear on the main pages. A flashing icon means
the device is searching for a signal. A solid icon means the
signal was found or the sensor is connected.
GPS status
Battery level
Heart rate monitor status
Speed and cadence sensor status
tempe
sensor status
™
Bluetooth
®
technology status
Map Page
Displays your position on the map.
Displays the direction you are heading.
Displays your track log.
About the Compass
The electronic compass is similar to a magnetic compass when
you are stationary or walking. If you maintain a higher speed,
such as traveling in an automobile, the compass uses GPS
signals to determine your direction.
NOTE: When navigating, you should hold the compass level to
ensure maximum accuracy.
Applied Ballistics
NOTE: This feature is available only on the Foretrex 701 device.
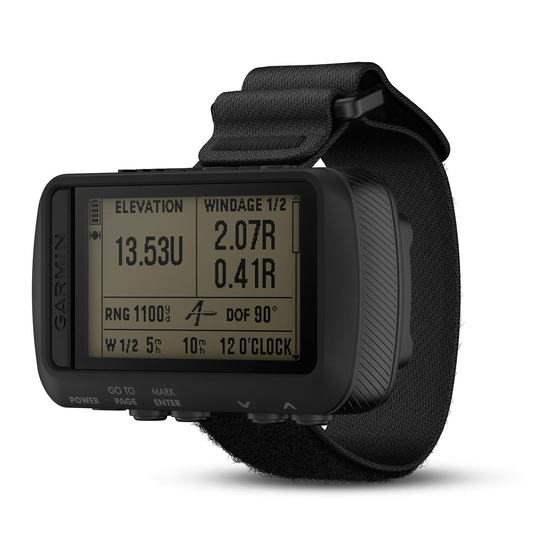
The Applied Ballistics feature offers customized aiming solutions
for long-range shooting based on your rifle characteristics, bullet
caliber, and various environmental conditions. You can enter
parameters including wind, temperature, humidity, range, and
firing direction.
This feature provides the information you need to fire long-range
projectiles, including elevation holdover, windage, velocity, and
time of flight. It also includes custom drag models for your bullet
type. Go to
appliedballisticsllc.com
feature.
Quickly Editing Shooting Conditions
You can edit the range, direction of fire, and wind information.
2
(Applied Ballistics,
for more details about this
1
From the Applied Ballistics page, select ENTER > QUICK
EDIT.
TIP: You can select
or
ENTER to move to the next field.
2
Look directly into the wind to accurately set the DOF and
wind direction.
3
Set the DOF using the compass value.
When you edit the DOF field, the wind direction updates
automatically. You can manually edit the wind direction if
needed.
4
Set the wind direction to 12 O'CLOCK.
5
Set the DOF to your actual direction of fire (either manually or
by using the compass).
The device automatically updates the wind direction based
on your new DOF.
6
Select PAGE to save your settings.
Using the Countdown Timer
Before you can start the countdown timer, you must enable the
timer page
(Device Settings, page
preferences
(Timer Settings, page
1
From the timer page, select ENTER to start the countdown
timer.
NOTE: You can select
2
Select ENTER to stop the countdown timer.
NOTE: When the time reaches 00:00, you can select ENTER
to use the timer as a stopwatch and start counting up.
3
If necessary, select
to reset the countdown timer to the
original time interval.
VIRB
Remote
®
The VIRB remote function allows you to control your VIRB
action camera using your device. Go to
to purchase a VIRB action camera.
Controlling a VIRB Action Camera
Before you can use the VIRB remote function, you must enable
the remote setting on your VIRB camera. See the VIRB Series
Owner's Manual for more information.
1
Turn on your VIRB camera.
2
From the menu page on your Foretrex device, select
CONNECT > VIRB REMOTE PAGE > ON to enable the
remote control page.
3
Select PAGE to scroll to the remote control page.
4
Wait while the device connects to your VIRB camera.
5
Select an option:
• To take a photo, select TAKE PHOTO.
• To record video, select START RECORDING.
The video counter appears on the Foretrex screen.
• To stop recording video, select STOP RECORDING.
Waypoints, Routes, and Tracks
Waypoints
Waypoints are locations you record and store in the device.
Waypoints can mark where you are, where you are going, or
where you have been. You can add details about the location,
such as name, elevation, and depth.
You can add a .gpx file that contains waypoints by transferring
the file to the GPX folder
(Transferring Files to Your Device,
page
8).
to edit each value, and select
6), and set timer
6).
or
to change the time interval.
www.garmin.com/VIRB
Waypoints, Routes, and Tracks