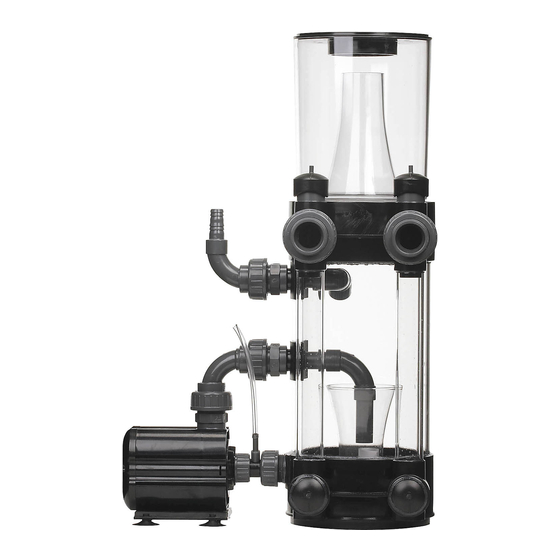
Aqua Medic Turboflotor 5000 Shorty II Manual de operação - Página 6
Procurar online ou descarregar pdf Manual de operação para Aquários Aqua Medic Turboflotor 5000 Shorty II. Aqua Medic Turboflotor 5000 Shorty II 16 páginas. Protein skimmer for aquaria up to 1,500 litres
Também para Aqua Medic Turboflotor 5000 Shorty II: Manual de operação (20 páginas), Manual de operação (12 páginas)

Type
Outlet height
Turboflotor
39 cm
5000 Shorty II
4. Principle of operation
The aquarium water is pumped to the skimmer using a separate pump (not supplied) which should have a
capacity of approx. 2,000 - 4,000 litres/hour. The relative positions of the inlet and outlet ports ensure the
maximum contact time of air bubbles in the counter-current. If the Shorty is mounted in a cabinet, it can be
supplied with water directly from the overflow of the aquarium. In this case, a bypass should be installed so the
volume of water can be adjusted.
The venturi pump draws the water from the skimmer and mixes it with air. Within the pump housing, the bubbles
are cut into very fine pieces by the Aqua Medic Power Wheel. The air/water mixture is pumped back into the
skimmer. The treated water flows out of the bottom of the skimmer and is pumped through the two transparent
pipes positioned outside the skimmer back into the aquarium or filter sump.
5. Installation
Check that the sealing rings for the unions are in place.
•
Put the holding plate for the venturi pump to one side of the skimmer. Push the pump on to the holding plate
•
and connect the pump to its union.
The PVC air tube should be fed so that the end is higher than the water level in the skimmer. This air tube
•
must not hang down. It should only be out 5 cm at the top.
Connect the bottom end of the tube to the air intake of the pump.
•
The water inlet is located at the opposite side of the outlet pipes. Attach the union and hose tail (20 mm).
•
We recommend a pump with a capacity of 2,000 to 4,000 litres/hour for the water supply or direct connection
•
to the aquarium overflow.
Fit the rubber sealing ring for the bayonet socket of the reaction pipe. Push the foam cup into its seating and
•
turn it to lock.
The drain from the skimmer has to run freely into the aquarium. A PVC pipe (40 mm diameter) can be glued
into the drain ports. It is possible to let both drains flow into one pipe but the diameter of the pipe must not be
reduced. If the drains are left separate, a reduction in pipe size to 32 mm is possible.
The skimmer can now be filled by pumping water directly from the aquarium. Ensure that the water level of the
aquarium is not lowered too much. As soon as the water level in the skimmer reaches the height of the venturi
pumps, these pumps should be started. Top up with sea water as necessary.
After first use or after cleaning of the skimmer, it takes some time for the initial foam to build up in the reaction
pipe of the collection cup. This is because the cleaned acrylic initially reacts with the water until a build up of
fatty acids naturally takes place.
After approx. 24 hours, the foam should be pushed slowly and evenly into the collection cup. The quantity of
liquid and organic substances depends on the pollution of the aquarium.
6. Maintenance
Collection cup: Depending on the organic load, the cup should be cleaned daily to weekly.
•
Reaction pipe: This needs only an occasional cleaning, we recommend intervals of 6 to 12 months.
•
Venturi pump: The maintenance of the pump should be done at the same time as that of the reaction pipe:
•
Drain the water out and dismantle the pump. Flush the pump housing and and Power Wheel with clean water.
The same should be done with the air injection nozzle.
6
Total
Venturi
height
pump
73 cm
DC Runner
Power
Capacity
consumption
65 Watts
up to 1,500 l
400 gallons
