AccuTherm ACCSL2021 Manual - Página 4
Procurar online ou descarregar pdf Manual para Registadores de dados AccuTherm ACCSL2021. AccuTherm ACCSL2021 12 páginas.
Também para AccuTherm ACCSL2021: Manual (15 páginas)

SmartLOG Overview
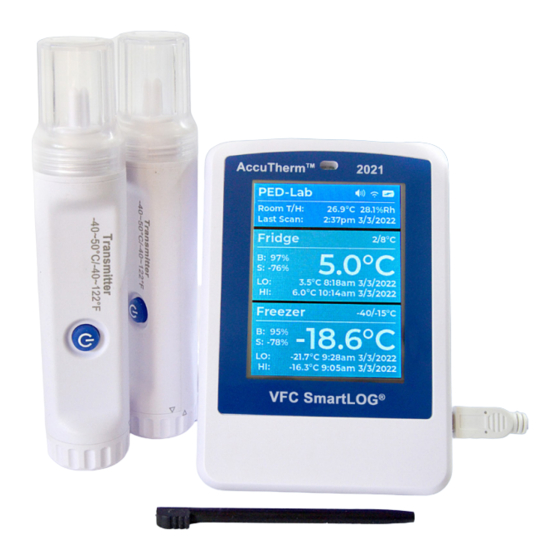
The Accutherm SmartLOG 2021 is a wifi digital data logger (DDL) that monitors and records temperature and sensor battery
status for up to two wireless sensors. SmartLOG also logs the ambient room temperature/humidity and backup battery voltage.
The DDL scans for the wireless sensor in 1 minute intervals retrieving temperature, battery and signal data. This data is
evaluated for, temperature excursions, low battery condition or no data which indicates signal loss from the wireless sensor.
If any of these conditions are true the SmartLOG will send alerts via email and text message to contacts listed in the settings
page of the dashboard. The SmartLOG then refreshes the Main DDL display screen and Dashboard with all updated values.
The SmartLOG Dashboard can be viewed using a PC or Smart Phone web browser. Monitor all DDL conditions, generate PDF
reports, and modify settings. SmartLOG and PC or Smart Phone must be connected to same local network.
NOTE: If main power is lost, after approximately 4 hours the DDL will turn off the display and wifi radio. This is to
conserve energy allowing logging to continue until main power resumes. The display can still be viewed with a
tap, and will show for ~1 minute and then go back off . The Web Dashboard will not be accessible until main power
resumes
(connect DDL to a 5v battery bank with usb and this will activate wifi radio alowing Dashboard access
while on battery backup. If Temperature Excursion, alarm LED will flash ~10 seconds each min.
The LED for the wireless temperature sensor(s) blinks every 10 seconds indicating the wireless Sensor sent the temperature,
battery power, and signal strength.
SmartLOG SETUP
Wireless Temperature Sensor(s)
1. Install quantity 2 AAA batteries by twisting clip cap counterclockwise 1/8 turn to open.
2. Place batteries negative end in first.
3. Align printed arrows on clip cap and sensor to each other, push in and twist 1/8 turn clockwise to close.
4. To power on wireless sensor, press power button until blue LED flashes 5 times. LED should flash once every 10 seconds.
To power off sensor, press power button until led flashes two times, then release button.
5. Note the four digit serial number on the backside of the sensor(s) and note intended location for Fridge, Freezer, other.
E.g. Fridge SN: 0010
6. Place wireless sensor in storage unit to be monitored. Allow the sensor temperature to stabilize before setting up DDL.
(wait approx. 60 min)
SmartLOG Digital Data Logger (DDL)
NOTE: Following instructions are only necessary on the initial Start-up of SmartLOG All configuration settings are retained in DDL memory.
1. Install quantity 3 AA batteries in compartment behind DDL. Slide cover down to open.
Batteries are for backup ONLY! Use wall 110VAC adapter as primary source of power.
2. Attach wall 110VAC adapter to DDL using USB cable and plug in AC adapter to wall outlet.
3. Push and hold Power Button on back of SmartLOG DDL until beep sounds... then release.
4. Screen will show "Scanning For Networks"
5. Then will change to "Select Network" when scan completes.
6. Tap using provided plastic stylus on "Select Network"
7. A drop-down selection of "SSID's" (wi-fi network names) will appear in location nearest/farthest order.
8. Tap on your desired network name.
9. A Password field and Keyboard will appear, enter the wi-fi network password.
Tap eye icon to see typed text if needed.
10. Tap return key
11. If SmartLOG is able to make connection, a message will be displayed instructing to complete remaining setup using a
fig. 5
web browser.
12. SmartLOG will automatically start scanning for temperature sensors then display Main Screen.
13. Tapping "Main" screen anywhere opens the "Options" screen.
For instructions on options go to SmartLOG Options section.
Dashboard using Web-Browser
1. In Address Bar of a web browser
Note: Host Name "SmartLOG" can be change in settings page if desired.
2. In SmartLOG dashboard, click on "Settings" (cog icon).
3. Settings page Access Pop-up, leave PIN empty and click "Open".
4. Complete the form fields, NOTE: Access Pin field requires a 5 digit PIN number in order to save the form.
This PIN will be required for future access to settings page.
5. Click Save button. Return to "SmartLOG Digital Data Logger (DDL)" 13 above.
fig. 1
on keyboard (lower right corner) to enter values. DDL will now attempt to connect to network.
Follow "Dashboard using Web-Browser" section to complete settings.
fig. 6
enter "SmartLOG/" or the IP Address displayed on DDL.
). Alerts will continue to be sent
fig. 2
fig. 4
fig. 8
fig. 3
fig. 7
fig. 5
