Cloud CDI-S100 Manual de instalação e configuração - Página 4
Procurar online ou descarregar pdf Manual de instalação e configuração para Equipamento de gravação Cloud CDI-S100. Cloud CDI-S100 11 páginas. Interface card
Também para Cloud CDI-S100: Manual de instalação (12 páginas)
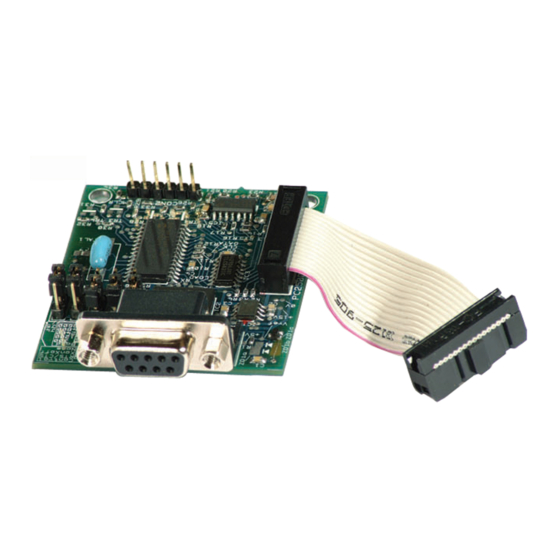
CDI-S100 Serial Interface Card
CLOUD ELECTRONICS LIMITED
1
Introduction
The CDI-S100 is an optional module that fits inside the CX462 Audio System Controller to allow serial
control of:
M
M
M
2
Installation
The CDI-S100 should be configured before being installed (see section 3 for configuration details). The
CDI-S100 is supplied with two 25mm hex spacers and a 9-pin sub-D plug. The module is connected to
the CX462 main board via a connector located at the rear of the mixer, close to the output terminals. The
connector is marked 'CON 7'.
Instructions:
1.
Disconnect mains supply from CX462.
2.
Remove top panel from CX462.
3.
Remove the panel that blocks the serial interface
terminal space when no interface module is installed.
4.
Locate connector CON7 (16-pin box header)
5.
Remove M3 screw adjacent to CON7 and M3 screw
next to C96. Keep to one side.
6.
Remove hex spacers from 9-pin sub-D socket.
7.
Screw 25mm hex spacers into screw holes in step 5.
8.
Connect ribbon cable attached to module to CON7
terminal.
9.
Place module in an inverted position over the spacers,
making sure to line up the interface socket and
spacers with their respective holes.
10.
Use M3 screws, saved from step 5, to firmly affix the module to spacers.
11.
Reattach hex spacers to the 9-pin sub-D socket through holes in rear panel.
12.
Check and set internal jumpers J7-10 to configure the modules effect on music signals (see
section 4.2).
13.
Check and set the internal jumpers J1-4 to configure the modules effect on microphone muting
(see section 4.1).
14.
Fit the top panel back on to the CX462, using the original screws.
15.
Set rear panel 'REMOTE TYPE' switch to 'DIGITAL' position.
16.
Set front panel 'LOCAL/REMOTE' switch to 'REMOTE'.
Setup And Installation Guide
Music Source select, Level control and Muting
Individual Microphone Muting
Master Microphone Level and Muting
Location of CON7 on CX462
CROSS SECTION VIEW FROM FRONT OF CX462 TOWARDS REAR PANEL
VCA MODULE
1
SPACERS
CX462 MAIN PCB
RIBBON CABLE