4ms Company Matthias Puech Ensemble Oscillator Руководство пользователя - Страница 18
Просмотреть онлайн или скачать pdf Руководство пользователя для Оборудование для звукозаписи 4ms Company Matthias Puech Ensemble Oscillator. 4ms Company Matthias Puech Ensemble Oscillator 19 страниц.

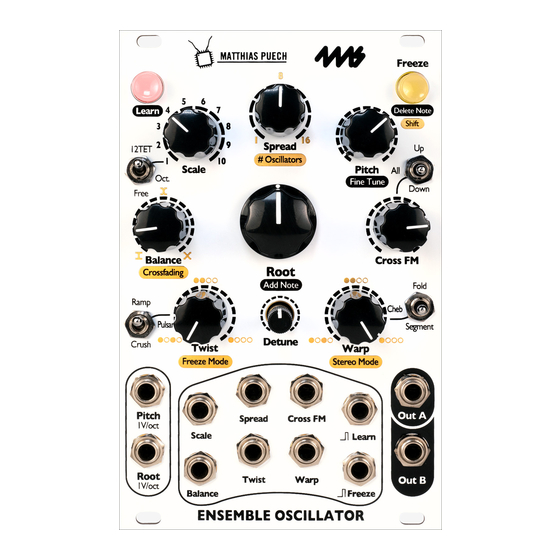
Calibrating 1V/oct jacks
For maximum accuracy, it's recommended to calibrate the Pitch and Root jacks to your keyboard or sequencer. There are
many factors that could cause incorrect tuning when using external equipment even if all the equipment is nominally 1V/oct.
You also can calibrate your jacks if you want to use an external device that runs on 1.2V/octave. Calibration is fast and easy.
1) Unpatch all cables, except Out A and Out B.
2) Hold down the Learn and Freeze buttons for about 2 seconds. Release them when the colors change.
3) Learn will be slowly flashing blue. Input a C2 into the Pitch jack and press the Learn button.
4) Learn will be quickly flashing blue. Input a C4 into the Pitch jack and press the Learn button.
5) Freeze will be slowly flashing blue. Input a C2 into the Root jack and press the Freeze button.
6) Freeze will be quickly flashing blue. Input a C4 into the Root jack and press the Freeze button.
7) If the calibration was successful, the lights will flash green and the module will return to normal operation.
The calibration results will be saved even after powering the module off.
If an error occurs, the lights will flash red and the procedure will be aborted without saving any calibration data.
One possible cause for an error is reading a value on a jack that's out of the acceptable range. The acceptable range is
between 0.7V/oct and 1.3V/oct. This means a C2 must be between 1.4V and 2.6V, and a C4 must be between 2.8V and
5.2V. There will also be an error if you have any cables patched into Root or Pitch when you enter calibration mode, or if
any of the other CV jacks are patched during the procedure.
Button RGB color balance adjustments
The two buttons have been color-matched at the factory, so there is usually no need to adjust the colors yourself. However,
the procedure is easy.
1) Power off the module.
2) Flip all four switches to the center position.
3) Turn all knobs to center.
4) Hold down the Freeze button and power up the module. The two buttons will turn white (or a hue close to white).
5) Use the knobs to adjust the red, green, and blue balance of each button. The center position makes no color adjustment;
left of center reduces the amount of a color; right of center boosts the amount of the color.
•
Scale: adjusts the amount of
•
Balance: adjusts the amount of
•
Twist: adjusts the amount of
•
Pitch: adjusts the amount of
•
Cross FM: adjusts the amount of
•
Warp: adjusts the amount of
6) If at any time you want to see how the current color adjustments appear with the default yellow button color, flip the
Scale switch up. Flip it back to center to go back to the white color.
7) When you're done, press the Freeze button to save the color adjustments.
To cancel without saving, power the module off.
Factory Reset
Performing a factory reset is an irreversible act. All custom scales, settings, CV jack calibrations, and color adjustments will
be erased. It cannot be undone. If you only wish to restore the factory scales, you can restore the selected scale by holding
down the Learn button for 4 seconds.
To perform a factory reset:
1) Power off the module.
2) Power on with both buttons down, and keep holding them down.
3) When you see the Learn button turn green, release Learn but continue holding down Freeze.
4) After about 10 seconds, the lights will blink rapidly. The memory is being erased. You can release Freeze.
5) When the memory is done being erased, the lights will slowly blink through a sequence of colors.
6) Power the module off. When you power it back on, the default scales and settings will be loaded.
If after erasing the memory the lights blink red (and no other colors), there was a memory error. Please contact 4ms
Company for assistance.
red
in the Learn button
green
in the Learn button
blue
in the Learn button
red
in the Freeze button
green
in the Freeze button
blue
in the Freeze button
Page
18
of
19
