DaytonAudio PMA800DSP Руководство пользователя - Страница 3
Просмотреть онлайн или скачать pdf Руководство пользователя для Усилитель DaytonAudio PMA800DSP. DaytonAudio PMA800DSP 4 страницы. 2-way plate amplifier 800w 2-channel with dsp and bluetooth

Thank you for purchasing the PMA800DSP. It was designed and built to provide years of high quality sound reproduction,
and is ideal for use for professional audio and DJ applications.
The amplifier includes features like efficient Class "D" technology, built-in Bluetooth receiver, DSP equalizer presets,
3,000 Hz crossover, independent amplifiers, auto on/off circuitry, and internal protection against shorted speaker loads,
thermal faults, and overload conditions.
SPEAKER CONNECTIONS:
There are two sets of speaker leads located at the rear of the amplifier.
The speaker leads color coded blue "+" and black "-", contain an active 12dB/octave high pass filter @ 3,000Hz for the high
frequency speaker connection.
The speaker leads color coded red "+" and black "-", contain an active 12dB/octave low pass filter @ 3,000Hz for the low
frequency speaker connection.
Note: Load on each output must have a nominal impedance of 4 ohm or higher.
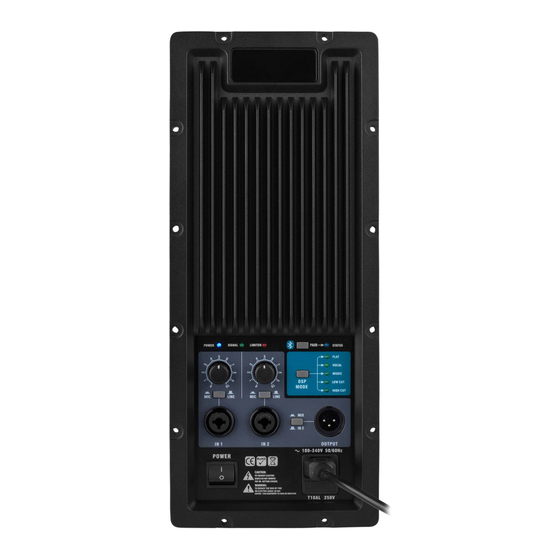
PANEL and INPUT/OUTPUT (I/O) DEFINITION
1. Power Indicator: Illuminates when the unit is
powered on.
2. Signal Indicator: Illuminates when signal is present
3. LIMIT Indicator: Illuminates just prior to the amp
clipping and distorting. Adjust input levels so that
this LED illuminates only briefly if at all, during the
loudest peaks in your program material. Operating
the system with this indicator on frequently or all the
time will result in degraded sound quality, and could
damage and/or significantly reduce the service life
of the components.
4. Bluetooth Pairing Button: Press this button to
pair your mobile device. Once paired, press again
to play. Press and hold for 2-3 seconds to cancel
pairing. STATUS indicator will flash rapidly when
pairing, illuminate solid when paired, and flash
slowly when playing.
5. Volume Control for INPUT 1
6. MIC/LINE Switch for INPUT 1: Engage when
using a microphone; disengage when using a line
level source such as a mixing console or other
audio device.
7. Combination Jack for INPUT 1: Balanced or
unbalanced XLR or 1/4" connector.
8. Volume Control for INPUT 2
9. MIC/LINE Switch for INPUT 2: Engage when using a microphone; disengage when using a line level source such as
a mixing console or other audio device.
10. Combination Jack for INPUT 2: Balanced or unbalanced XLR or 1/4" connector.
11. MIX/IN2 Selector Switch: Engage to send your mixed signal (1&2) to another powered speaker, powered subwoofer, or
other device. Disengage to send only the signal from INPUT 2.
12. OUTPUT Jack: XLR connector, line level output.
13. DSP MODE Selector: Press this button to cycle through the DSP equalizer presets. The adjacent LED indicators will
illuminate to indicate which preset is selected as the button is pressed.
14. Main Power Switch
15. IEC Power Jack: Use included AC power cable.
(3)
