Hiesbok Hawk Инструкции по строительству - Страница 2
Просмотреть онлайн или скачать pdf Инструкции по строительству для Игрушка Hiesbok Hawk. Hiesbok Hawk 3 страницы. Glider
Before gluing the veneer sidewalls (part 8) in place, sand the nose according to the plan (top view).
Ensure that the rear of the front section tapers down to the fuselage carbon tube as shown in the plan.
Now glue the outer veneer parts 8 onto each side of the nose assembly ensuring that they are centered.
If desired, apply several light coats of varnish or paint to the completed nose section and sand between
coats.
Chamfer the ends of the carbon fuselage rod and insert into the rear of the nose section. When happy
with the fit, glue into place.
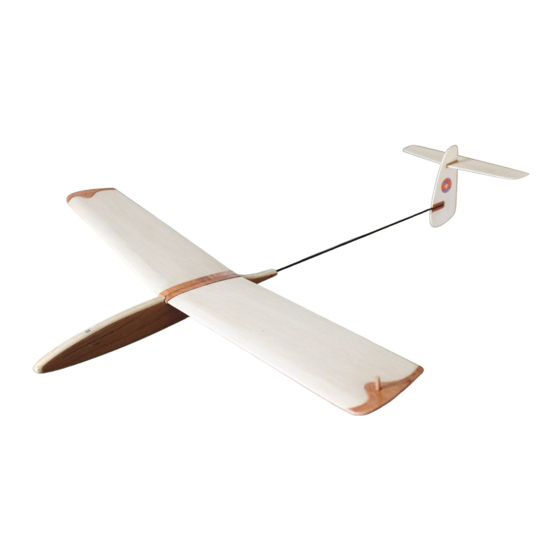
Carefully sand the slots in the vertical fin and the horizontal stabilizer to precisely fit into each other.
Now glue these parts together and pay careful attention to the perpendicularity of the glued surfaces.
The aim is to achieve a perfect 90-degree angle between the two surfaces for stable flight. Ensure that
the parts remain perpendicular whilst drying.
Once the joint has dried fully, fit and glue the two stiffeners part no.12 in place.
Apply one coat of varnish (or similar) to the finished joint, if desired.
Now glue the parts 10 & 11 into place to create the seat for the rear of the fuselage carbon rod. (see the
plans for their correct position).
For the time being we will NOT attach the tailplane to the rear of the fuselage carbon rod.
Construction of the main wing assembly:
Prepare the wing sections and shape them in accordance with the plans. To achieve the correct shape,
start by gluing the upper veneer part no. 2 to the upper surface of the wing tip in the position shown on
the plans. Use modelling pins to hold in place whilst the glue dries.
Once the glue has dried, trim the excess wing trailing edge as per the plans and cut/sand the wingtips to
the shape of the veneer part no.2.
On the underside of the wing draw a pencil line 1mm inside the line of the veneer part no. 2.
Chamfer the area from this pencil line to the wingtip down to a thickness of approximately 1mm.
Now fit and glue the bottom veneer part no. 2 so that it is flush with the wingtip.
The reinforcing veneer strip part no. 3 is now fitted and glued to the underside of the wing root. Once
the glue has dried, bend it around the leading edge of the wing and over the top of the wing. Glue it in
place and allow to dry. The veneer strips can be held in place whilst the glue dries using modelling pins.
Sand away any excess veneer.
Use a pencil to mark the position of the wing flaps and ailerons (according to the plans) and carefully cut
them out. Sand the edges of the flaps and ailerons to the required profile.
Cut 16 lengths of wire, each approximately 8mm long, to act as adjustable hinges for the control
surfaces.
Use a modelling pin to create holes in the trailing edge of the wing and in the control surface leading
edges to accept these wire hinges. The position of each wire hinge is shown on the plans. Fit each
control surface with hinges and ensure full movement of the surface. When ready, apply a few drops of
glue to wick down the wire hinge into the hole. Again, ensure full movement of the control surface.
If desired, apply a thin coat of varnish to the entire surface of the wing assembly. Lightly sand when dry.
Chamfer the wing roots to the correct angle to achieve the required dihedral as shown on the plans.