Galvin Engineering GalvinCare CP-BS Lead Safe 121.35.64.00 Установка продукта - Страница 2
Просмотреть онлайн или скачать pdf Установка продукта для Сантехническая продукция Galvin Engineering GalvinCare CP-BS Lead Safe 121.35.64.00. Galvin Engineering GalvinCare CP-BS Lead Safe 121.35.64.00 4 страницы.
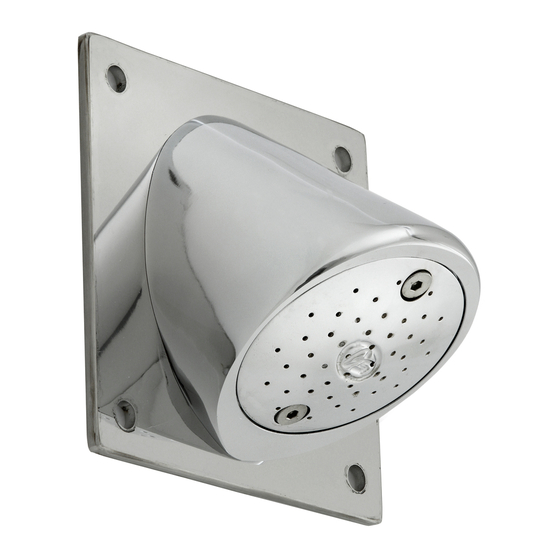
Product Installation Guidelines
PRE-INSTALLATION
MOUNTING DETAILS – HOLE CENTRES
−
The rough in details show correct fitment of the Vandal
Resistant Shower unit.
−
A 60mm X 60mm wall cutout with a depth of a least 12mm is
recommend to clear the 3/8" BSW cap screws.
−
Recommended installation height above floor
level is 2 metres (6'6").
8
INSTALLATION
INSTALLATION COMPLIANCE: Galvin Engineering products must be installed in accordance with these
installation instructions and in accordance with AS/NZS 3500, the PCA and your local regulatory requirements.
Water and/or electrical supply conditions must also comply to the applicable national and/or state standards.
Failing to comply with these provisions shall void the product warranty and may affect the performance of the
product.
IMPORTANT: Whilst our product designs take into account a broad range of installation types and surfaces,
it is important that surfaces which fixtures are mounted to are flat and free from defect. Additionally, ensure
any protruding connecting thread is square to the wall so that the outlet sits flat against the wall when installed,
ensuring that there are no gaps between the wall and outlet. This is especially important when installing
product ranges that have been designed for correctional and health facilities, where special attention is required
to minimise ligature points and areas for concealment of contraband. In addition to ensuring the products are
fitted securely and in accordance with the following instructions, consideration shall be given to the use of non-
pick mastics such as BASF Sonolastic "Ultra" to ensure a high quality and safe installation.
1. Fit rawlnuts
− Drill holes as detailed in the mounting details.
− Push the four supplied rawlnuts into the drilled
holes in the wall.
© Galvin Engineering Pty Ltd
8
6
W LL S
6
.
Version 3, 2 February 2022, Page 2 of 4
S /S 3 6
L
8
8
L
S
L
2. Align shower body and plate
Align the shower body and plate onto the holes.
-
Ensuring to apply sealant to create a water tight
seal between plate and wall.
Version 1, 2 February 2022, Page 2 of 4
S /S
B
S
S
W
3.
W LL
L
3/8 BSW
S S
S
W
/2
L
6
WL
S
WS