ENGLISH
The manufacturer is not responsible if
you do not follow the safety precau-
tions from the chapter "Safety Information".
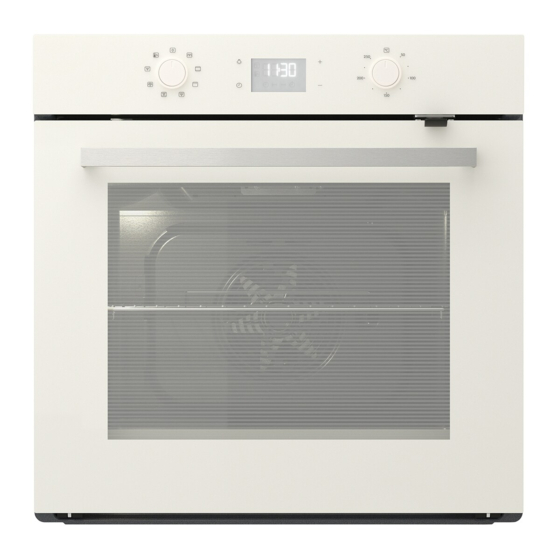
Product description
1
Knob for the oven functions
1
Electronic programmer
2
Knob for the temperature
3
Ventilation openings
4
Before first use
Warning! Refer to the Safety chapters.
Initial cleaning
• Remove all accessories and removable
shelf supports (if applicable).
• Clean the appliance before first use.
Important! Refer to the chapter "Care and
cleaning".
Setting the time of day
The display shows
es.
1. Press + or - to set the correct hour.
2. Press
to confirm. This is necessary
only when you first set the time. After-
wards, the new time value is saved au-
tomatically after five seconds.
The display shows
hour. 00 flashes.
3. Press + or - to set the correct minutes.
2
3
7
and 12:00. 12 flash-
and the set
This appliance is only supplied with a main
cable.
Grill
5
Oven lamp
6
Socket for the core temperature sensor
7
Fan
8
4
Rating plate
9
5
Oven accessories
6
• Wire shelf x 1
For cookware, cake tins, roasts.
8
• Baking tray x 1
9
For cakes and biscuits.
• Grill- / Roasting pan x 1
To bake and roast or as pan to collect
fat.
• Core temperature sensor x 1
To measure how far the food is cooked.
• Telescopic runners x 2 sets
For shelves and trays.
4. Press
only when you first set the time. After-
wards, the new time value is saved au-
tomatically after five seconds.
The display shows the new time.
Changing the time of day
You can change the time of day only if
the appliance is off.
Press
again and again until the indicator
for the time of day
To set the new time, follow the procedure
given in "Setting the time of day".
Preheating
Preheat the empty appliance to burn off the
remaining grease.
1. Set the function
temperature.
2. Let the appliance operate for one hour.
to confirm. This is necessary
flashes in the display.
and the maximum
8