Gardena 6000/4 Руководство по эксплуатации - Страница 5
Просмотреть онлайн или скачать pdf Руководство по эксплуатации для Водяной насос Gardena 6000/4. Gardena 6000/4 14 страниц. Submersible pressure pump
Также для Gardena 6000/4: Руководство по эксплуатации (9 страниц), Руководство по эксплуатации (14 страниц), Руководство по эксплуатации (9 страниц)
4. Operation
Automatic operation:
5
7
Manual operation:
5. Putting into Storage
Frost-free storage:
Disposal:
(in accordance with
RL 2012/19/EU)
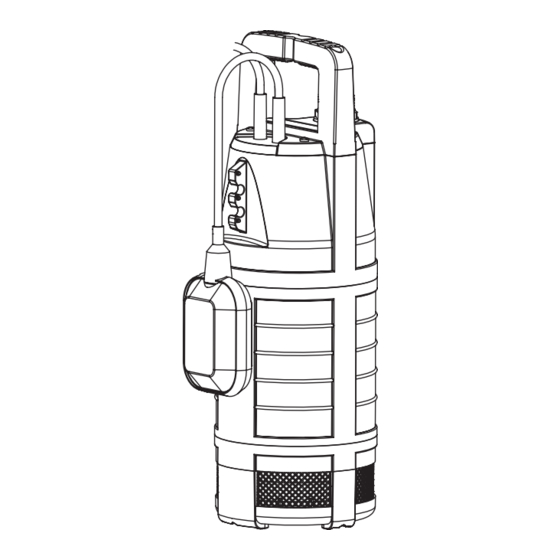
The float switch
water level exceeds the cut-in height and the water is pumped
out. The float switch
the water level falls below the cut-out height.
v During automatic operation, ensure that the float
6
switch
can move freely.
Adjusting the Cut-in and Cut-out Height:
The cable length between the float switch
7
lock
must always be at least 10cm.
1. Press the cable of the float switch
float switch lock
Do not select a cable length that is too long or short to ensure
6
that the float switch can turn on and off properly.
2. Plug the mains plug of the connection cable
socket.
• The higher the opening of the float switch lock
the cut-in and cut-out height.
• The shorter the length of cable between the float switch
and the float switch lock
higher the cut-out height.
The pump remains in constant operation when the float switch is
attached facing upwards so that the cable is pointing downwards.
v Attach the float switch
downward.
The residual water height of approx. 25mm is only reached
during manual operation since the float switch turns off
the pump during automatic operation before this water level
is reached.
The storage location must not be accessible to children.
v Store the pump away from frost before the first frost sets in.
The product must not be added to normal household waste.
It must be disposed of in line with local environmental regulations.
6
turns the pump on automatically when the
6
turns the pump off again as soon as
6
7
.
7
, the lower the cut-in height and the
6
to the top so that the cable points
6
and the float switch
into an opening in the
5
into a mains
7
, the higher
6
13