3. Initial Operation
Setting up your Garden Pump:
The site must be firm and solid in order to ensure safe and sturdy
operating conditions for the pump.
v Position the pump at a safe distance (min. 2 m) from the liquid
to be pumped.
The pump must be installed in a location with low air humidity
and sufficient ventilation in the area of the ventilation slots.
It must be at a distance of at least 5 cm from the walls.
No dirtcontamination (e.g. sand or earth) may be sucked in
through theventilation slots.
Connecting hose to
Don't use any hose connection system fittings on the
suction side:
suction side! A vacuum-resistant suction hose must be used,
e. g. GARDENA Suction Unit, art. no. 1411.
2
In order to reduce the suction time, it is advisable to use a suction
hose with backflow preventer avoiding automatic draining of the
suction hose when the pump is stopped.
1. Screw a vacuum-resistant suction hose
1
connector on the suction side of the pump
2. For suction heights exceeding 4 m also secure the suction
hose
1
This relieves the pump of the weight of the suction hose.
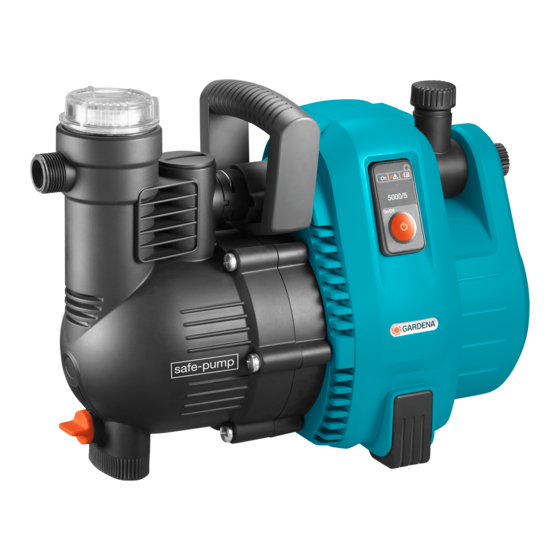
Connecting hose to
The pumps have 2 connections
delivery side:
The pump connection not in use has to be closed by the cap
which can be unscrewed for connecting 2 hoses.
5
The pump connections
thread which can be used to connect 13 mm (1/2"), 16 mm (5/8")
or 19 mm (3/4") hoses via the GARDENA hose connection system.
Optimised use of the pump capacity is achieved by connecting
19 mm (3/4") hoses with e.g. GARDENA Pump Connection Set
3
Art. 1752, or by connecting 25 mm (1") hoses with GARDENA
z
4
Quick Thread Coupling with female thread Art. 7109 / Quick
Coupling Hose Connector Art. 7103.
v Connect the pressure hose
3
side
If more than 2 hoses / accessories are connected simultaneously,
we recommend using the GARDENA 2- or 4-Channel Water
Distributor Art. 8193/8194, GARDENA Twin-Tap Connector
Art. 940 which can be screwed directly onto the connection
on the delivery side
14
1
airtight onto the
2
.
(e.g. by fastening it to a wooden post).
3
ß
/
3a
on the delivery side.
3
/
ß
are equipped with a 33.3 mm (G 1")
3a
5
to the connector on the delivery
ß
/
.
3a
3
/
ß
.
3a
4. Operation
Filling the pump:
6
5
8
7
1
5
4
,
1
DANGER! Electric shock!
Risk of injury due to electric shock.
v Disconnect from the mains before filling the
Garden Pump.
ATTENTION!
v Before each operation, slowly fill the pump with liquid
to be pumped until it overflows (approx. 2 to 3 l).
6
1. Open the cap
on the filler neck
2. Fill the pump via the filler cap
7
approx. 2 to 3 l of the liquid to be pumped.
3. Tighten the cap
6
of the filler cap
4. Open any shut-off valves in the delivery line (accessories,
water stop, etc.).
5. Drain remaining water in pressure hose
escape during the suction process.
6. Switching on pump 4000/5: Lift and hold the delivery hose
at least 1 m vertically above the pump, press the On/Off
8
switch
(On/Off switch shines) and wait until the pump has
primed.
v If the pump does not deliver after approx. 5 minutes,
switch off the pump (press On/Off switch
(see 7. Trouble-Shooting).
min.
6. Switching on pump 5000/5; 6000/6 inox:
1 m
5
Lift and hold the delivery hose
1 m vertically above the pump, insert the
power plug, press the On/Off button
(the LED shines green) and wait until the
pump has primed.
z
If the pump does not deliver within
approx. 20 seconds, the LED flashes
orange.
If the pump does not deliver: 5000/5
within approx. 5 minutes / 6000/6 inox
within approx. 6 minutes, the LED
shines red and the pump switches off
automatically (see "7. Trouble-
Shooting").
v If the pump does not automatically
switch off then manually switch
the pump off and check the hose
for leaks.
The specified maximum self-priming suction height of 8 m is
reached only if the pump is filled via the filler neck
overflow and if, while doing so and during the self-priming, the
delivery hose
5
is held up sufficiently high to prevent any flow
medium escaping from the pump via the delivery hose
7
by hand.
to overflowing with
7
by hand (do not use pliers).
5
so that air can
5
8
)
LED
at least
ß
8a
7
up to the
5
.
15