CVI SDX Руководство - Страница 6
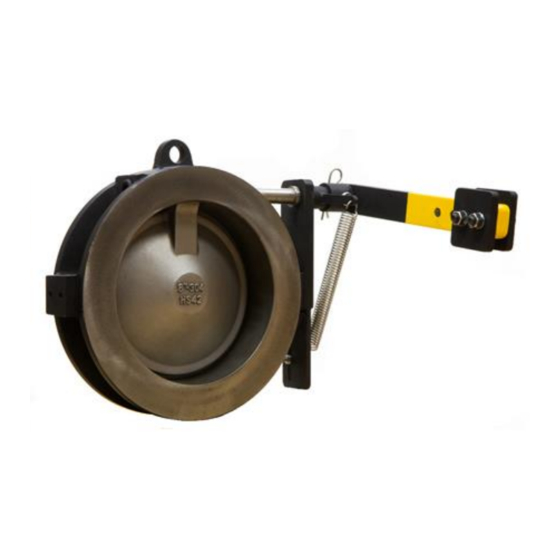
Просмотреть онлайн или скачать pdf Руководство для Блок управления CVI SDX. CVI SDX 7 страниц. Single disc external spring check valve
7. Place second bushing on opposite side of the disc as the first and push shaft through this
bushing and all the way through the remainder of the body of the valve.
8. Place new o-ring around gasket.
9. Position gasket up against the end of the shaft on the side opposite of the spring.
10. Wrap Teflon tape around the threads of the plug and install using an allen-wrench until the plug
is sufficiently tight.
11. Place flanged bushing over the spring-side of the shaft.
12. Install the bracket by placing the bore of the bracket over the shaft and bushing. If this proves to
be difficult, it may be necessary to first install the flanged bushing into the bore of the bracket
before sliding the bracket over the shaft.
13. Insert set screws into bracket and screw them into the body of the valve using the appropriate
allen-wrench.
14. Install eye bolt (part #10 in above drawing) into bracket and attach nut onto opposite side, as
shown above. The position of this may need to be altered later to change the valve's cracking
pressure. Make sure that this is installed very tight so that the spring doesn't cause the bolt to
move (if using the slotted bracket design).
15. Place spring adaptor over the shaft on the spring side of the valve so that the spring adaptor
arm extends in the down flow direction.
16. Line up the hole through the shaft with the hole through the spring adaptor, making sure that
the arm on the spring adaptor is pointing in the downstream direction. Place pin into the hole
on the spring adaptor, and gently hammer down into position until flush with the spring
adaptor.
17. Carefully install spring by looping one of the looped ends through the eye bolt at the bottom of
the bracket and then stretching the spring to loop the top loop through the arm of the spring
adapter. If this is too difficult, try loosening the eye bolt and repositioning to make the spring
length shorter. Be careful with the spring when it is loaded as releasing a loaded spring can
cause serious injuries. Make sure that the eye bolt and nut are tightened sufficiently.
18. Once the spring is installed, sit the valve upright and test the cracking pressure of the valve by
pushing against the disc in the downstream direction.
19. If the valve opens too easily, the spring needs to be stiffened. This can be done by detaching the
spring, and detaching the eye bolt and moving it downwards away from the spring adapter. Re-
tighten the eye bolt into place, and then reinstall the spring. Again be careful when installing the
spring as releasing a loaded spring can cause serious injuries.
20. If the valve is too hard to open, and it is clear that it is due to the spring being too stiff, the
spring needs to be loosened. This can be done by detaching the spring, and detaching the eye
bolt and moving it upwards towards the spring adaptor. Re-tighten the eye bolt into place, and
then reinstall the spring. Again be careful when installing the spring as releasing a loaded spring
can cause serious injuries.
P.O. B
12901, WILMINGTON, NC 28405
OX
P
: 910-794-5547 - F
HONE
W
:
.
EBSITE
WWW
WAFERCHECK
: 910-794-5581
AX
.
COM