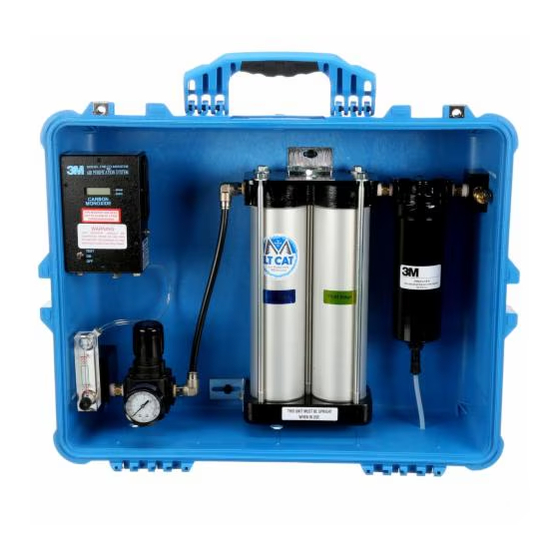
3M 256-02-00 Kullanıcı Talimatları - Sayfa 9
Su Filtrasyon Sistemleri 3M 256-02-00 için çevrimiçi göz atın veya pdf Kullanıcı Talimatları indirin. 3M 256-02-00 10 sayfaları.

REPLACEMENT PART INSTRUCTIONS
W WARNING
Always turn off air supply and bleed air pressure before disassembling the 3M filter and
regulator panel with CO filtration or serious injury could result.
To replace the filter cartridges, follow these steps. All three (3) filter cartridges should be replaced
each time the filter cartridges are changed.
Prefilter-Combined First and Second Stages
1. Pull plastic drain tube (1) up through the case.
2. Unscrew prefilter bowl assembly (2) from manifold (5) and clean bowl assembly in mild soap
and water, blowing dry with low pressure compressed air.
3. Remove two-stage prefilter element (3) by unscrewing end cap retaining nut (4) and pulling
prefilter element down over center rod of manifold.
4. Discard clogged prefilter element.
5. Inspect manifold for dirt and contaminants, clean as required, and inspect O-ring (6) located
inside manifold for any cuts or cracks. Replace O-ring, if required, to prevent air leakage.
6. Install new two-stage prefilter element by sliding new element over center rod on manifold so
that rod protrudes from end of element and element is squarely seated against manifold with rod
centered in element.
7. Screw end cap retaining nut onto threaded portion of rod until end cap retaining nut is seated
properly against end of prefilter element and element has come solidly against shoulder
in manifold.
Fig. 6
14
8. Apply a light film of petroleum jelly on beveled edge of prefilter bowl assembly and screw
bowl assembly into manifold until tight. NOTE: Be sure O-ring is properly seated in manifold
to prevent cutting O-ring. HAND TIGHTEN ONLY!
9. Guide drain tube back through hole in bottom of case.
Air Scrubber-Third and Fourth Stages
1. Loosen screw (7) from bracket (8).
2. Loosen five (5) manifold bolts (9) enough to allow the third and fourth stage filter tube
assemblies to move freely.
3. Remove front two (2) corner bolts with washers.
4. Slide out old third (10) and fourth (11) stage filter tube assemblies.
5. Remove old third stage filter cartridge (13) and cap gasket (12) from the third stage
aluminum tube.
6. Clean the aluminum tube in mild soap and water and wipe dry.
7. Refill the third stage aluminum tube by sliding the new third stage filter cartridge into the
aluminum tube from the bottom. Make sure that the flow direction arrow on the new third stage
filter cartridge is pointing DOWN for proper operation.
8. Remove sealing label (14) and install new cap gasket on the TOP of the third stage aluminum
filter tube assembly.
9. Slide the new third stage aluminum filter tube assembly into the air scrubber on the inlet side.
10. Remove old fourth stage filter cartridge (15) and cap gasket from the fourth stage
aluminum tube.
11. Clean the aluminum tube in mild soap and water and wipe dry.
12. Refill the fourth stage aluminum tube by sliding the fourth stage filter cartridge into the
aluminum tube from the top. Make sure that the flow direction arrow on the new fourth stage
filter cartridge is pointing UP for proper operation.
13. Remove sealing label and install new cap gasket on the BOTTOM of the fourth stage
aluminum filter tube assembly.
14. Slide the new fourth stage aluminum filter tube assembly into the air scrubber on the outlet side.
15. Tighten manifold bolts in sequence from center outward to 100 inch-pounds (11 Nm). (Fig. 6)
Repeat sequence and torque bolts to 250 inch-pounds (28 Nm). Recheck for proper torque limit.
16. Tighten screw on bracket to prevent any damage from occurring when transporting the filter
and regulator panel.
Remove any large volumes of oil/water from the supplied air line prior to connecting the system.
Purge air through the system for a minimum of five (5) minutes prior to use of the newly
installed filters.
NOTE: Dispose of used filter cartridges in landfill according to local, state and federal regulations.
Final Check and Calibration
Pressurize system and check for leaks. Re-tighten necessary parts to stop any leakage. Flush
system with compressed air for a minimum of five (5) minutes. Calibrate the carbon monoxide
monitor as outlined in the CO monitor User Instructions.
15
