CONWIN Duplicator 2 Talimat Sayfası
Kontrol Paneli CONWIN Duplicator 2 için çevrimiçi göz atın veya pdf Talimat Sayfası indirin. CONWIN Duplicator 2 3 sayfaları.
The Duplicator 2
Instruction Sheet
Automatic Balloon Sizer
Getting Started
•
To prevent the risk of electrical shock, do not use the
Duplicator 2 outdoors when weather conditions are wet.
Never operate unit on a wet floor or work area.
•
IMPORTANT - Before plugging Duplicator 2 into an outlet, refer
to electrical rating listed on back of unit to verify that voltage is
correct.
•
If the Duplicator 2 malfunctions or is damaged, discontinue use and
unplug unit from electrical outlet. Contact an authorized Conwin
Service Center for details on how to receive service.
•
Never attempt to repair the Duplicator 2 yourself. Opening the
Duplicator 2 case will automatically void manufacturer warranty.
Contact an authorized Conwin Service Center for all repairs.
1
Hand-tighten the regulator to a helium or
nitrogen cylinder. Make sure the cylinder is
properly secured in a safety stand or wall
bracket prior to attaching the regulator.
Note: Do not open the valve until Step 6.
4
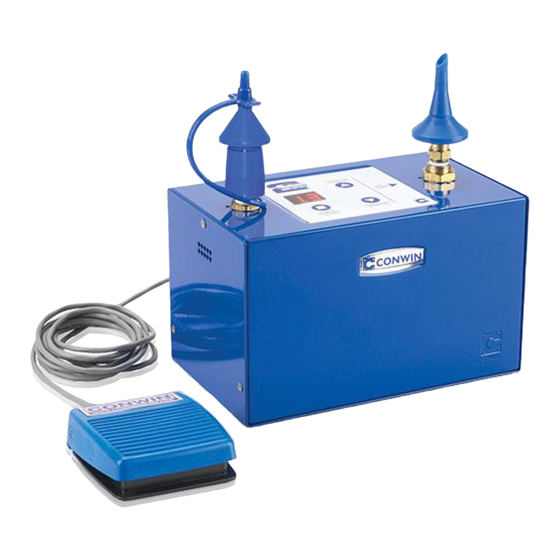
Plug the foot pedal into the side of the unit.
Duplicator 2 Includes:
• 1 Duplicator 2 Inflator
• 1 Adjustable Regulator
• 1 Primary Regulator & Supply Hose
• 1 SR Latex Outlet
Primary Regulator
Ribbon
Cutter
Disc
Tyer
Post
2
Press-Fit Connection
Connect the supply hose to the adjustable
regulator in the back of the unit.
5
Hand-tighten the SR Latex Outlet to the
Duplicator 2. See Accessory outlets featured
on the back page.
• 1 Extension Tip
• 1 Auto-Fill Foil Outlet
• 1 Foot Pedal
• 1 Power Cord
Extension
Tip
SR Latex
Outlet
Hand-tight
Connection
Foot
Pedal
3
Plug the power cord into the side of the unit and into
an electrical outlet. (A power strip with surge protector
is recommened.) The digital display will appear when
unit has power.
6
Slowly open the cylinder valve. Make sure the valve
is fully opened (5 full turns). The cylinder pressure
will read on the gauge located on the primary regulator.
The inlet pressure will read on the adjustable regulator
gauge located on the back of the unit.
Digital
Settings
Foil
Outlet
Back
Adjustable
Regulator