Jamara 038540 Talimatlar - Sayfa 2
Dronlar Jamara 038540 için çevrimiçi göz atın veya pdf Talimatlar indirin. Jamara 038540 12 sayfaları. 2,4 ghz
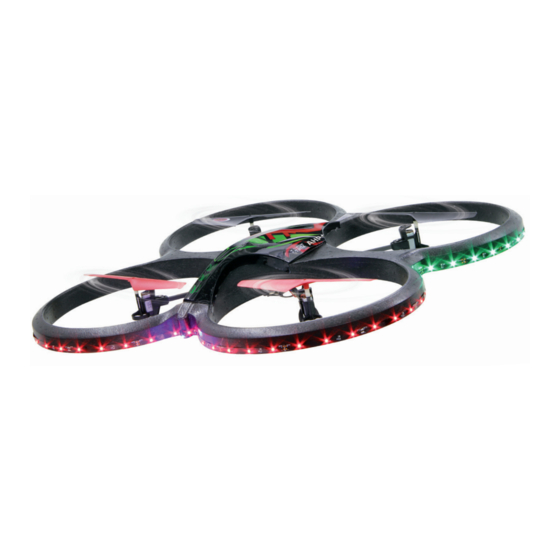
front
anti-
clockwise
clockwise
1
2
3
anti-
clockwise
clockwise
DE - Bezeichnung der Komponenten
GB - Component Description
1. Rotorblätter vorne (rot)
1. Front rotor blades (red)
2. Rahmen
2. Styrofoam shell
3. Rotorblätter hinten (schwarz)
3. Rear rotor blades (black)
4. Empfänger
4
5. Motor
5. Motor
6. Seitenausleger
6. Carbon fi ber
7. Hauptrahmen
7. Frame
8. Landegestell
8. Landing Skid
9. Kamera
9. Camera
1
2
3
4
5
6
DE - Bezeichnung der Komponenten
GB - Component Description
1.
Einsteiger-/Fortgeschrittenen-/
1.
Flip-Modus
Kompassfunktion
2.
2.
Gasknüppel /Gieren
3.
3.
Flybackfunktion
4.
4.
Giertrimmung (links/rechts drehen)
5.
5.
Ein-/Ausschalter
6.
6.
LCD Display
7.
7.
Mode 2/4 / LED ein/aus
8.
8.
Steuerhebel
(links/rechts, vorwärts/rückwärts)
9.
9.
Nicktrimmung (vor/zurück)
10.
10.
Rolltrimmung (links/rechts)
11.
11.
Photofunktion
12.
12.
Videofunktion
Fitting the transmitter batteries
Batterien in Sender einlegen
Observe the polarity.
Auf Polarität achten.
DE - Flugakku aufl aden
GB - Recharging the fl ight battery
Trennen Sie die Steckverbindung vom Mo-
Disconnect the connector from the model to
dell zum Akku. Schließen Sie das Stecker-
the battery. Plug the 12 V output from the
netzteil an eine Wechselsstromsteckdose
converter into the charger box. Both of the
an und stecken Sie die Ausgangsleitung
red (power) and green (charger) indicators
des 12 V Netzteils in die Eingangsbuchse
will illuminate indicating that the charger is
des Lagegeräts. Die rote (Power) und die
ready. The Power Indicator indicates that
grüne LED (Laden) leuchten auf, sie zeigen
the power supply is connected and the
Ladebereitschaft an. Die Power LED signa-
Charger Indicator shows the output voltage
lisiert, dass das Ladegerät Strom bekommt,
Connect the LiPo battery to the balancer
die Lade-LED zeigt an das der Ladevor-
socket (3 pole) of the charger. The charging
gang läuft. Schließen Sie den LiPo-Akku
indicator will change the color to show it is
mit seinem Balanceranschluss (3-polig) am
charging. Once the charging indicator chan-
Ausgang der Ladebox an, die Lade LED
gin the color again, charge has been com-
wechselt die Farbe. Wenn der Ladevorgang
pleted. In case the charging indicator on the
beendet wechselt die LED erneut die Farbe.
charger does not change the color once you
Sollte die Power LED beim Anschluss des
have connected the battery pack, then the
Akkus nicht die Farbe wechseln, ist der
battery pack is already fully charged.
Akku bereits voll aufgeladen.
The charging process should take approx.
Nach etwa 40 - 60 min. ist der Ladevorgang
40 - 60 min. and should give you approx.
abgeschlossen, die Flugzeit bei vollgelade-
5 - 10 min. fl ying time.
nen Akku beträgt ca. 5 - 10 Min.
Note:
Wichtige Hinweise:
If the battery heats up during charging,
Wenn sich der Akku während des La-
disconnect it. Failure to do so may de-
devorgangs erwärmt, trennen Sie ihn
stroy the battery. After fl ying the battery
bitte umgehend vom Ladegerät, damit
will be hot, allow it to cool for app. 30
der Akku nicht zerstört wird. Setzen
minutes before charging. Never allow
Sie niemals ein anderes Ladegerät ein,
batteries to come into contact with open
der Akku könnte zerstört werden Nach
fi re as this may cause the batteries to
einem Flug ist der Akku u.U. stark er-
explode.
wärmt. In diesem Fall muss der Akku
erst ca. 30 Min. lang abkühlen bevor er
Attention
wieder aufgeladen wird. Bringen Sie ei-
The model allows a very high payload.
nen LiPo-Akku niemals mit einer offenen
Various devices such as support de-
Flamme in Berührung, es besteht Explo-
vices, carriage supports etc can be
sionsgefahr.
assembled. The max. additional load
are up to 55 grams. The load should be
Achtung!
fastened to the underside of the model,
Das Modell ermöglicht eine sehr hohe
and must be well balanced. Note that the
Zuladung und kann mit verschiedenen
max. battery life will be reduced signifi ca
Geräten (Tragevorrichtungen etc.) be-
stückt werden. Die max. Zusatztraglast
beträgt bis zu 55 Gramm. Die Zuladung
sollte an der Unterseite des Modells
befestigt werden und muß gut ausbalan-
ciert werden. Beachten Sie dass sich die
max. Akkulaufzeit ansteigend zur Trag-
last deutlich verringert.
2
4
5
6
7
FR - Désignations des différentes pièces
1. Pales du rotor avant (rouge)
2. Cadre en polystyrène
3. Pales du rotor arrière (noir)
Receiver board
4. Récepteur
5. Moteur
6. Tige de fi bre du carbone
7. Cadre principal
8. Train d'atterrissage
9. Caméra
7
8
9
10
11
12
FR - Désignation des composants
Beginner/Advanced/Flip Mode
1.
Compass function
Speed control stick /Rudder
2.
Flyback function
3.
Rudder trim (rotation left/right)
4.
Power switch
5.
LCD display
6.
Mode 2/4 / LED on/off
7.
Direction control stick
8.
(left/right, forward/backward)
Nick trim (forward/backward)
9.
Roll trim (left/right)
10.
Photo function
11.
Video function
12.
Mise en place des piles dans l'émetteur
Respectant la polarité.
FR - Respectant la polarité.
Charge de l'accu de propulsion
Coupez le connecteur de l'modèle à l'accu.
Branchez l'alimentation du chargeur sur
une prise secteur. Branchez la sortie de
l'alimentation 12V sur l'entrée du chargeur.
La LED rouge (power) et la LED verte
(chargeur) s'allument, elles indiquent que le
chargeur est près. Branchez votre accu Lipo
sur le chargeur par la prise d'équilibrage (3
pôles). L'intensité lumineuse de la chargeur
LED change, celle-ci est plus ou moins
claire en fonction de l'état de charge de
votre accu. Le processus de charge est
terminé lorsque la LED de charge passe
à nouveau dans sa couleur initiale. Si la
couleur de la LED ne devait pas changée,
cela signifi e que l'accu est déjà complète-
ment chargé.
La charge est complète après environ 40 -
60 minutes et la durée de vol est de l'ordre
de 5 - 10 minutes.
Remarque importante:
Si votre accu venait à chauffer fortement
lors du processus de charge, séparez
celui-ci immédiatement du chargeur afi n
que l'accu ne soit pas détruit. Après un
vol, votre accu est chaud. Dans ce cas,
laissez le refroidir environ 30 minutes
avant de le recharger. N'utilisez jamais
un fl amme vive dans les environs im-
médiats de votre accu LiPo et surtout ne
rentrez pas en contact avec celui-ci, il y a
danger d'explosion.
Attention!
Le modèle permet une charge très éle-
vée et peut être chargé avec différents
dispositifs (chargement, etc.) La charge
maximale est de 55 grammes. La char-
ge doit être fi xée à la partie inférieure
du modèle, et doit être bien équilibré. A
noter que la durée de la batterie (auto-
nomie) diminue, en augmente la charge.
8
9
IT - Denominazione dei componenti
1. Pale des rotore anteriore (rosso)
2. Telaio di Styrofoam
3. Pale des rotore dietro (nero)
4. Ricevente
5. Motore
6. Tubo carbonio rettangolare
7. Telaio
8. Carello
9. Videocamera
4x AA
IT - Denominazione dei componenti
Mode débutant/confi rmé/fl ip
1.
Modalità Principianti/Avanzati/Flip
Fonction boussole
Funzione Bussola
Manche de gaz
2.
Stick del gas
Fonction Flyback
3.
Funzione Flyback
Trim Dérive (tourner à gauche/droite)
4.
Trim Direzionale
Interrupteur On/O
(girare a destra/sinistra )
Affi cheur LCD
5.
Interruttore ON/OFF
Mode 2/4 / LED On/Off
6.
Display
Manche directionnel
7.
Modo 2/4 / LED On/Off
(droite/gauche, avant/arrière)
8.
Stick direzionale
Trim Nick (avant/arrière)
(destra/sinistra, avanti/indietro)
Trim Roll (droite/gauche)
9.
Trim Nick (avanti/indietro)
Fonction photo
10.
Trim Roll (destra/sinistra)
Fonction vidéo
11.
Funzione foto
12.
Funzione Video
Montaggio delle pile nella trasmittente
Rispettando la polarità.
IT - Carica della batteria di potenza
Sconnettere il collegamento tra la batteria
e il modello. Collegate l' uscita dell' alimen-
tatore (12 V) sull' entrata del caricabatteria:
si illumineranno sia il LED power o che LED
carico, indicando così che il caricabatteria è
pronto. Il led rosso (power) indica che il ca-
ricabatteria è alimentato, mentre il ed verde
(carico) indica a tensione d' uscita. Collega-
te la vostra batteria LiPo sulla presa a tre
uscite dell'equilibratore di tensione, il LED
cambia colore . Il caricamento è completato
quando il LED cambia di nuovo il colore.
Se il LED non cambia colore, la batteria è
già carica.
La ricarica é completata in 40 - 60 min' e la
durata del volo é mediamente di 5 - 10 min.
Nota importate:
Se notate che la vostra batteria appena
collegata per la ricarica riscalda forte-
mente, staccatela immediatamente! Per
evitarne la distruzione. Lasciate raffred-
dare la batterie dopo un volo prima di
ricaricarle. Evitate di avvicinare fi amme
libere alle batterie LiPo evitando assolut-
amente di avvicinarle a forti fonti di caro-
re, perché potrebbero esplodere.
Attenzione!
Il modello consente un carico molto alto
e può essere caricato con vari disposi-
tivi (dispositivi di carico, ecc). Il carico
massimo aggiuntivo fi no a 55 grammi.
Il carico deve essere fi ssato alla parte
inferiore del modello, e deve essere ben
bilanciata. Si noti che la durata della bat-
teria (l'autonomia) diminuisce, aumen-
tando il carico.
ES - Descripción de las diferentes partes
1. Palas rotor delante (rojo)
2. Chasis
3. Palas rotor atrás (negro)
4. Receptor
5. Motor
6. Varilla de fi bra de carbono
7. Cuadro principal
8. Patin de aterrizaje
9. Cámara
ES - Emisora
1.
Modo Principiante/Avanzado/Flip
Función brújula
2.
Acelerador Joystick
3.
Función Flyback
4.
Equilibrio Dirección
(girar izquierda/derecha)
5.
Interuptor On/Off
6.
LCD
7.
Modo 2/4 / LED On/Off
8.
Palanca de mando de dirección
(izquierda/derecha, delante/atraz)
9.
Equilibrio Nick (delante/atraz)
10.
Equilibrio Roll (izquierda/derecha)
11.
Función de foto
12.
Función de vídeo
Montaggio delle pile nella trasmittente
Rispettando la polarità.
ES - Cargar la batería principal
Desconecte el conector del modelo a la
batería. Conecte el enchufe de alimenta-
cion en una toma de corriente y conecte
el alimentacion de 12 V en el enchufe de
entrada del cargador. La LED rojo (power)
y verde (carga) se iluminan, indicando que
está listo para cargar. El LED power indica
que la alimentación funciona, el LED car-
ga muestra que esta en funcion la carga.
Conecte la batería LiPo con su conexion de
equilibrador (3 polos ) a la salida de la caja
de carga, el LED de carga va a cambiar el
color. Cuando la carga se ha completado el
LED va a cambiar de nuevo el color. Si can-
do conecetes la bateria no cambia el color,
signifi ca que la bateria esta completamente
cargada.
Tempo de carga: 40 - 60 min.,
Tempo de vuelo: 5 - 10 min
Aviso importante:
Si la batería se calienta demasiado du-
rante la carga, desconéctelas rápida-
mente del cargador, así evitará que se
estropee. Normalmente, tras volar la ba-
tería se habrá calentado. En esto casos,
se debe dehar enfriar la batería durante
30 minutos antes de bolber a cargarla.
Nunca exponga una batería LiPo a una
llama, podría provocar una exprosión.
Atención!
El modelo permite una muy alta capaci-
dad de carga y pueden ser ensamblados
con diferentes aparaos (soporte, etc). El
max. carga adicional es 55 gramos. La
carga debe fi jarse a la parte inferior del
modelo y debe estar bien equilibrado.
Tenga en cuenta que la máx. duración de
la batería cada vez mayor reduce signifi -
cativamente la carga.