Gardena 14621 Operatör El Kitabı - Sayfa 6
Çim Biçme Makinesi Gardena 14621 için çevrimiçi göz atın veya pdf Operatör El Kitabı indirin. Gardena 14621 11 sayfaları.
Personal safety
DANGER! Risk of suffocation!
Small parts can be easily swallowed. There is also a risk that the poly-
bag can suffocate toddlers. Keep toddlers away when you assemble the
product.
Do not use the start levers alternately.
Do not disassemble the product further than the delivery status.
Use gloves, wear slip resistant shoes and wear eye protection.
Only start the mower with an upright standed handle.
Do not overload the mower.
Never operate the product when you are tired, ill or under the influence of alcohol,
drugs, or medicine.
2. ASSEMBLY
DANGER! Risk of injury!
Cut injury when the product starts accidentally.
v Wait for the blade to stop, remove the safety key and use
gloves before you assemble the product.
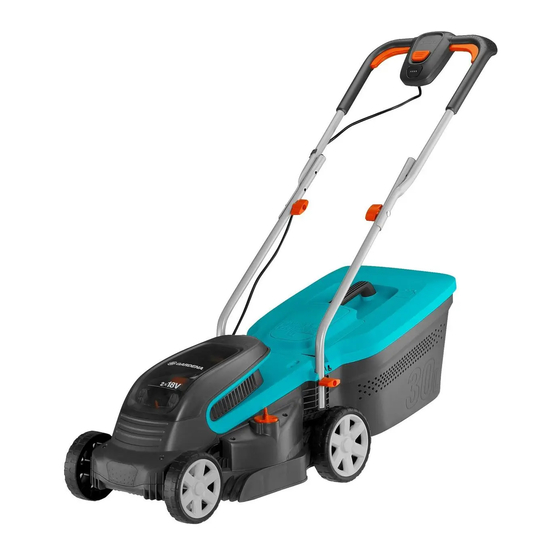
To assemble the lower handles [ Fig. A1 ]:
1. Push the lower handles
into the openings in the mower.
1
Make sure that the handles
1
holes are inline up with the holes in the mower.
2. Put the washer
on the wing screw
2
3. Put the wing screw
in the threaded hole in the mower.
3
4. Tighten the wing screw
.
3
To assemble the upper handle [ Fig. A2 ]:
1. Put the upper handle
on the lower handles
4
Make sure that the handles are completely in place and the handle
holes are inline.
2. Push the screws
through the holes.
5
3. Put the washers
and the wing nuts
2
4. Tighten the wing nuts
.
6
To attach the cable to the handle [ Fig. A3 ]:
v Attach the cable
to the handle with the clamps
7
Make sure that the cable is not locked between the lower and the
upper handle.
To assemble the grass box [ Fig. A4 / A5 ]:
1. Turn the cover
on the grass box.
0
Make sure that the cover aligns to the grass box.
2. Push the cover
on the grass box until the connections audibly
0
engage.
Make sure that all connections are engaged.
3. Push the handle
on the grass box until the connections audibly
q
engage.
4. Push the chute
into the grass box and pull the chute
9
until it audibly engages.
3. OPERATION
DANGER! Risk of injury!
Cut injury when the product starts accidentally.
v Wait for the blade to stop, remove the safety key and use
gloves before you adjust or transport the product.
To charge the battery [ Fig. O1 / O2 / O3 ]:
CAUTION!
v Note the mains voltage! The voltage of the power source must
match the voltage specified on the rating plate of the charger.
For the GARDENA Battery Mower Art. 14621-55 there is no battery
and no charger in the scope of delivery.
Thanks to the intelligent charging process, the charge condition of the
battery is automatically detected and then charged up with the optimal
charge current depending on battery temperature and voltage.
are completely in place and the handle
.
3
.
1
on the screws
.
6
5
.
8
forward
9
In this way, the battery is treated with care and remains permanently fully
charged when it is stored in the charger.
1. Open the cover
.
i
2. Push the locking buttons
and remove the batteries
>
battery holder
.
C
3. Connect the battery charger
X
4. Slide the battery
into the charging slot of the battery charger
Y
When the battery charge indicator
the battery is being charged.
When the battery charge indicator
permanently green the battery is completely charged
(Charging time, see 7. TECHNICAL DATA).
5. Examine the charge status regularly while you charge.
6. When the battery
is completely charged, disconnect the battery
Y
from the charger
and charge the second battery.
X
Meaning of the Indication Elements:
Indication on the charger:
The rapid-charging procedure is indicated by fast flashing of the
(Fast) Flashing of the
green battery charge indicator
Green Battery Charge
Indicator
å
Note: The rapid-charging procedure is only possible when the battery
temperature is within the allowable charging temperature range,
see 7. TECHNICAL DATA.
When the charging condition of the battery is 80 %, the green battery
(Slow) Flashing of the
charge indicator
Green Battery Charge
å
Indicator
å
The battery can be removed for immediate use.
Continuous lighting of the green battery charge indicator
Continuous Lighting
that the battery is fully charged.
of the Green Battery
Charge Indicator
å
When the battery is not inserted, continuous lighting of the battery
charge indicator
å
Full
socket outlet and that the battery charger is ready for operation.
Continuous lighting of the red battery error indicator
Continuous Lighting
that the temperature of the battery is not within the allowable charging
of the Red Battery
temperature range, see 7. TECHNICAL DATA.
Error Indicator
≈
As soon as the allowable charging temperature range is reached, the
battery charger automatically switches to rapid charging.
A flashing red battery error indicator
Flashing Red Battery
malfunction of the charging procedure, see 6. TROUBLESHOOTING.
≈
Charge Indicator
Battery charge status indication
After starting the product, the battery charge status indication
is displayed for 5 seconds.
Battery charge status
67 – 100 % charged
34 – 66 % charged
11 – 33 % charged
0 – 10 % charged
If the LED
flashes green, the battery must be charged.
«
If the error LED
is illuminated or flashing, see 6. TROUBLESHOOTING.
ç
To adjust the cutting height [ Fig. O5 ]:
The cutting height can be adjusted from 20 – 60 mm in 12 positions.
1. Push and turn the adjust wheel
2. Push and turn the adjust wheel
cutting height.
To use the mower with the grass box [ Fig. O6 ]:
DANGER! Risk of injury!
Cut injury when the blade turns or the mower starts
accidentally.
v Wait for the blade to stop, remove the safety key and use
gloves before you open the protective flap.
v Do not put your hands in the discharge opening.
1. Lift the protective flap
.
a
2. Put the grass box into the mower by the handle
Make sure that the grass box is securely connected.
3. Start the mower.
The level indicator
opens during mowing. When it closes during
s
mowing, the grass box is full.
from the
Y
into a mains socket.
X
at the charger flashes green
å
at the charger illuminates
å
.
å
flashes slowly.
indicates
å
indicates that the mains plug is inserted in the
indicates
≈
indicates a different
≈
on the product [ Fig. O4 / O7 ]:
N
Battery charge status indication
,
and
illuminate green
«
∑
€
and
illuminate green
«
∑
illuminates green
«
flashes green
«
clockwise to lower the cutting height.
p
counterclockwise to increase the
p
.
q
.
Y
N
11