CAMDEN Lazerpoint RF RX-90 Kurulum Talimatları Kılavuzu - Sayfa 2
Alıcı CAMDEN Lazerpoint RF RX-90 için çevrimiçi göz atın veya pdf Kurulum Talimatları Kılavuzu indirin. CAMDEN Lazerpoint RF RX-90 7 sayfaları. Advanced single relay receiver
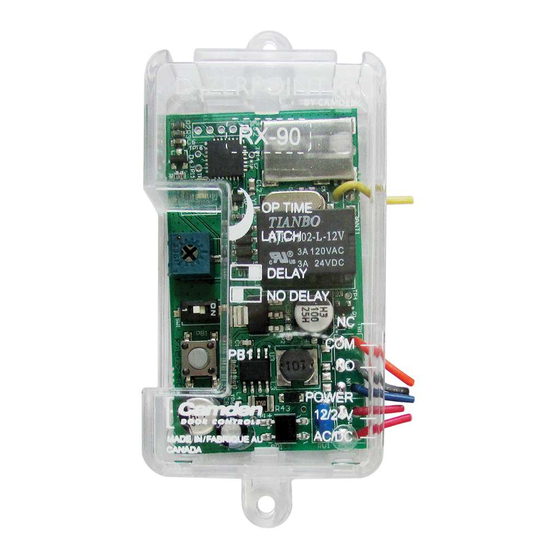
Lazerpoint™ RF RX-90 Advanced Single Relay Receiver Installation Instructions
Wire
Description
Red
Power In
Red
Power In
Blue
Normally Open
Grey
Common
Orange
Normally Closed
Section 4
Set-up Instructions
Step 1
Learning the Transmitter(s) to the Receiver
A receiver can have up to 40 transmitters paired with it. The
transmitter can be paired as delayed, non-delayed or a
combination of both, making RX-90 ideal for bi-directional
door sequencing.
ON
ON
1
POT1
SW1
Learning the Transmitter in Delayed Mode
Set SW1 to ON.
Press the PB1 button using a small blunt object such as a
small blade screwdriver or similar. Within 10 seconds, press
the switch connected to a TX-9 transmitter or a button on
a Lazerpoint FOB. The Green LED Array will flash to confirm
enrolment. Repeat with any additional transmitters. Pressing
the learned transmitter again will signal the receiver that
you are finished programming and the LED will flash rapidly.
Pressing the transmitter a third time will activate the relay
and the LED, and also the device connected to the relay
contacts after the delay time set by POT1.
If you wait longer than the 10 second period, the receiver
will time out of Learn Mode and revert back to standby.
Learning the Transmitter in No-Delay Mode
Set SW1 to OFF
Press the PB1 button using a small blunt object such as a
PB1
small blade screwdriver or similar. Within 10 seconds, press
the switch connected to a TX-9 transmitter or a button on
a Lazerpoint FOB. The Green LED Array will flash to confirm
enrolment. Repeat with any additional transmitters. Pressing
the learned transmitter again will signal the receiver that
you are finished programming and the LED will flash rapidly.
Pressing the transmitter a third time will activate the relay
and the LED, and also the device connected to the relay
contacts.
If you wait longer than the 10 second period, the receiver
will time out of Learn Mode and revert back to standby.
Step 2
Adjustments
The delay before operate and the relay On-Time are
controlled by POT1.
Delayed Mode
The RX-90 has a delay before operate timer.
Set SW1 to ON.
Adjust POT1 clockwise to increase the delay timer from 0 to
15 seconds. The LED will light and become brighter as the
delay time is increased and become dim as the delay time
is decreased. The LED starts to flash once the maximum
delay time has been reached. Back off the delay time until
the LED is solid again for maximum delay time.
No-Delay Mode
The RX-90 can be adjusted to activate the output relay
without a delay. The relay On-Time is adjustable from 1 to
30 seconds.
Set SW1 to OFF.
Adjust POT1 Clockwise/counterclockwise to adjust the relay
On-Time (1 to 30 Seconds). To increase the time, turn the
pot clockwise, or for minimum time, turn the pot counter-
clockwise. The LED will light and become brighter as the
Relay On-Time is increased. The LED starts to flash once
the maximum On-Time has been reached. Back off the POT
until the LED is solid again for maximum On-Time.
Latching Mode
The RX-90 has a latching mode. Activating the transmitter
will latch the output relay ON. Activating the transmitter a
second time will latch the Relay OFF.
SW1 can be set to either ON/OFF.
Page 2 of 7