ClearOne ClearOne RAV 900 Hızlı Başlangıç Kılavuzu - Sayfa 7
Konferans Sistemi ClearOne ClearOne RAV 900 için çevrimiçi göz atın veya pdf Hızlı Başlangıç Kılavuzu indirin. ClearOne ClearOne RAV 900 12 sayfaları. Complete conferencing system
Ayrıca ClearOne ClearOne RAV 900 için: Veri Sayfası (2 sayfalar), Broşür ve Teknik Özellikler (2 sayfalar), Tamamlayıcı Kılavuz (3 sayfalar), Hızlı Başlangıç Kılavuzu (12 sayfalar)
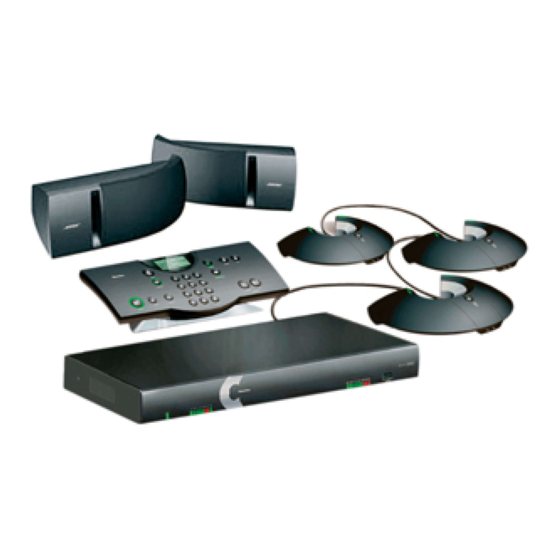
RAV Audio Mixer Connections
TELEPHONE
ANT
LINE
SET
9
6
• Connect the loudspeakers to the mixer.
• Branchez les enceintes au mélangeur.
5
• Verbinden Sie die Lautsprecher mit dem Mischpult.
• Collegate l'altoparlante al mixer.
• Conecte los altavoces con la mezcladora.
• Connect your computer to the mixer using either the USB port or the serial port (optional). You will need to install RAV-Ware to load the USB drivers.
• Branchez votre ordinateur au mélangeur par un port USB ou un port série (optionnel). Vous devrez installer le logiciel RAV-Ware pour charger les pilotes USB.
8
• Verbinden Sie Ihren Computer mit dem Mischpult, wobei Sie entweder den USB Anschluss oder den optipnalen Seriellen Anschluss benutzen. Um die
USB-Treiber zu laden, müssen Sie RAV-Ware auf Ihrem Computer installieren.
• Collegate il vostro computer al mixer usando sia la porta USB che la porta seriale (facoltativa). Avrete bisogno di installare RAV-Ware per caricare i driver del USB.
• Conecte el ordenador con la mezcladora mediante la utilización del puerto USB o el puerto de serie (opcional). Deberá instalar el RAV-Ware para cargar los
controladores del USB.
TELEPHONE
CAMERA
ANT
RS-232
CONTROL
LINE
SET
• Insert batteries into the controller.
• Insérez les batteries dans le contrôleur.
11
• Setzen Sie die Batterien in die Steuereinheit ein.
• Inserite le batterie nel dispositivo di controllo.
• Inserte las baterías en el control.
RAV Quick Start Guide — Setting Up Your System
CAMERA
MIC POD IN
RS-232
CONTROL
LAN
8
7
RECORD / PLAYBACK
LINE
L +
R +
L
IN
L
MIC POD IN
LAN
OUT
IN
L -
R -
R
R
OUT
SPEAKER
* RAV 900 only | RAV 900 seulement | gilt nur für RAV 900 | RAV 900 solo | RAV 900 únicamente
**See manual for instructions on verifying/changing the telco country configuration and for connecting to a digital telephone line
**Voir le guide d'instructions pour vérifier/modifier la configuration du pays de votre compagnie de téléphone et pour le
branchement sur une ligne téléphonique digitale
**Siehe Anleitung für Hinweise zur Überprüfung / Änderung der telco Länder-Konfiguration und zum Anschluss an eine digitale
Telefonleitung
**Controllate il manuale delle istruzioni per verificare/modificare la configurazione telco della nazione e per collegare ad una
linea telefonica digitale
**Vea el manual para obtener instrucciones sobre la verificación o el cambio de la configuración de telecomunicaciones del país y
para conectarse a una línea telefónica digital
SETTING UP YOUR SYSTEM
RECORD / PLAYBACK
L
L
OUT
IN
R
R
2
!
• The ceiling speakers must be set to 8 Ohms. Please refer to the
Bose user manual for instructions.
• Les enceintes de plafond doivent être réglées à 8 Ohms. Consultez
les directives du Manuel de l'usager de Bose.
• Die Impedanz der Decken-Lautsprecher muss auf 8 Ohm eingestellt
sein. Wie Sie diese Einstellung vornehmen, entnehmen Sie Ihrer
Bose Gebrauchsanleitung.
• Gli altoparlanti a soffitto devono essere regolati a 8 Ohm. Vi invitiamo
a fare riferimento al manuale dell'utente Bose per le istruzioni.
• Los altavoces del techo deberán instalarse a 8 ohmios. Por favor, para
instrucciones remítase al manual del usuario de Bose.
-
+
!
12VDC 2.5A
!
• If the microphones are connected backwards, the Mic LEDs will flash red.
• Si le branchement des microphones est inversé, les DEL des
microphones clignoteront en rouge.
• Wenn die Mikrofone falsch angeschlossen sind, leuchten die roten LEDs an den Mikrofonen.
• Se i microfoni sono collegati in senso contrario, le Mic LED lampeggeranno di rosso.
• Si los micrófonos se conectaran mirando hacia atrás, el DEL (diodo emisor de luz)
del Micrófono parpadeará en rojo.
LINE
L +
R +
IN
L -
R -
OUT
SPEAKER
5
-
+
!
12VDC 2.5A
10
5