Aseptico ADU-17A Kullanım ve Bakım Talimat Kılavuzu - Sayfa 5
Dişçilik ekipmanları Aseptico ADU-17A için çevrimiçi göz atın veya pdf Kullanım ve Bakım Talimat Kılavuzu indirin. Aseptico ADU-17A 12 sayfaları. Express air portable dental system
Ayrıca Aseptico ADU-17A için: Kullanım ve Bakım Talimat Kılavuzu (16 sayfalar)
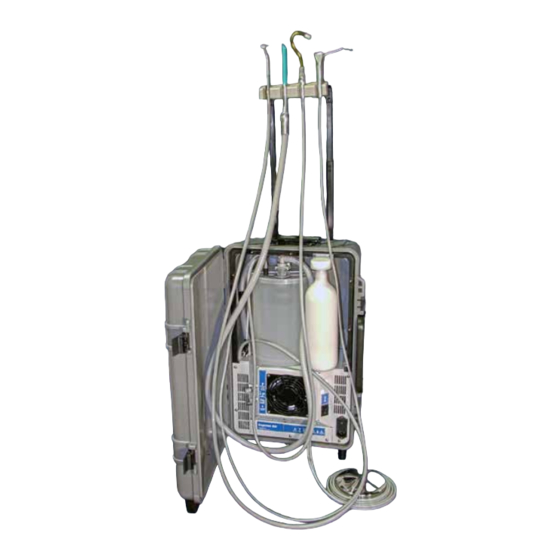
Fig. 3
Clip-On
Holder
HVE
Handpiece
4.
Attach a sterile handpiece to the ISO Type B (4-Line)
handpiece connector and place the handpiece in Holder
(Fig. 3).
5.
Remove the 3-way air/water Syringe from its travel clip
inside the Case and place it in the Holder.
6.
Position the Waste Tank in the Case with the large white
connection to the rear left of the instrument as shown
in Figure 4. Attach the hose connector coming from the
Vacuum Motor to this large white connection. Connect
the High Volume Vacuum (HVE) hose to the large gray
connector located on the front of the Waste Tank. Connect
the Low Volume Vacuum (Saliva Ejector) hose to the
black connector located on the front of the Tank.
Fig. 4
Bungee
Cord
Low
Volume
Connector
Waste Tank
Note: When attaching the Saliva Ejector hose to the top of
the Waste Tank, push in and rotate 1/4 turn (see Figure 5)
7.
Secure Waste Tank by running Bungee Cord from hooks
on bottom panel overtop Tank lid. Verify that the Waste
Tank and vacuum lines are properly installed. Hang the
High Vacuum and Saliva Ejector instruments on the Clip-
On Holder.
8.
Fill the Water Supply Bottle with clean water and connect
to the Water Reservoir Connector.
9.
Attach the foot pedal and place on the floor.
Handle
Saliva
Ejector
3-Way
Syringe
Vacuum
Motor
Connector
Water
High
Resevoir
Volume
Connector
Connector
Water
Supply
Bottle
Fig. 2a
120V Indicator
240V Indicator
Voltage Selector Module
Fig. 2c
Fig. 2e
Fig. 2b
Fig. 2d
5.