3M QUESTEMP 36 Посібник оператора - Сторінка 9
Переглянути онлайн або завантажити pdf Посібник оператора для Вимірювальні прилади 3M QUESTEMP 36. 3M QUESTEMP 36 14 сторінок. Thermal environment monitor
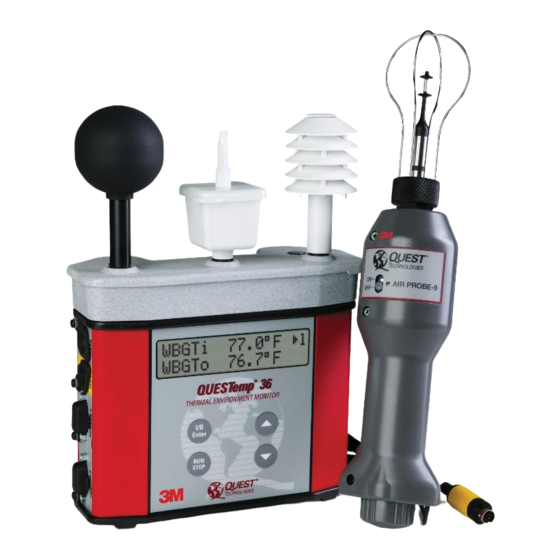
OPERATING SEQUENCE
1. Turn FLOW ON in the setup menu of the Questemp°36.
2. Plug the Air Probe into the port labeled FLOW on the side of the
Questemp°36 .
3. Turn on the Air Probe ON and make sure the green lamp is lit.
In the VIEW or RUN modes airflow is the fifth screen displayed.
DATA LOGGING AIRFLOW
To data log airflow in the Questemp°36, the following two conditions must
be met. First, turn FLOW ON in the setup menu. Second, make sure that a
temperature sensor bar is connected to the SENSOR 1 location (top) of the
Questemp°36. FLOW prints out with the SENSOR 1 data therefore airflow
data will only be reported if a sensor bar is plugged in. Airflow is recorded
during the run mode at the interval the Questemp°36 is setup for.
BATTERIES FOR AIR PROBE
The Air Probe uses a single NiMH Black&Decker VersaPak Gold
battery. Typical operating time of the battery is between 6 and 8 hours.
To change the battery, push in and twist, counterclockwise, the cap on the
bottom of the Air Probe. Pull out the battery. Insert a fully charged battery
and replace the cap.
To recharge the batteries, set the battery into the VersaPack charger. The
supplied charger accepts one or two batteries. A full charge takes 9 hours.
An indicator light shows that the battery is properly charging and it will
remain on as long as the battery is in the charger. Continuous charging is
not a safety concern.
12. REMOTE, SENSORS 2 AND 3
The top sensor bar (sensor 1) may be removed from the instrument and used
through a remote cable. Shelter the instrument and remote the sensor bar if the
measured environment is expecting heavy rain or if temperatures are above 60°C.
The sensor 2 and sensor 3 jacks on the side of the instrument allow simultaneous
monitoring of up to three sensor arrays using connecting cables.
Cable lengths of up to two hundred feet (61 meters) may be used without a decrease
in accuracy provided the environment does not contain strong electromagnetic
fields.
The data from these arrays may be viewed separately or combined into a weighted
average WBGT reading per ISO 7243. Change the displayed sensor bar by
pressing and releasing the enter key. The upper right corner of the display
shows the current sensor bar. 1 refers to the top sensor bar, 2 and 3 are labeled
on the side of the unit, W indicates the weighted average which only appears if a
WBGT is displayed and all three of the sensor bars are attached.
TRI-SENSOR WEIGHTED AVERAGE
Per the recommendations outlined in ISO 7243 : 1989, when the temperature
in the space surrounding a worker is not uniform, it is necessary to determine
the WBGT index at three heights corresponding to the worker's ankles,
abdomen and head and perform a weighted average on those values. It is
computed using the formula:
WBGT
The QUESTemp°36 always assigns the top sensor bar the double weighting.
This calculation is shown if a WBGT display has been selected and if 3 sensor
sets are connected.
13. OPERATIONAL CHECK
A verification module, Quest model 053-923, may be used to check the operation
of the QUESTemp. Remove the top sensor bar and plug the verification module
into the top of the unit. With the QUESTemp set to read in degrees Celsius, verify
that the displayed readings match those printed on the module within +/-0.5°C.
If the readings are not within the +/-0.5°C tolerance, then have the unit serviced and
calibrated.
14. POWER OPTIONS
There are 3 options for powering the QUESTemp: a 9 volt alkaline battery, a
NiMH (Nickel Metal Hydride) rechargeable 6-cell battery pack, and an AC
adapter. A door on the back of the unit allows the user access to the 9 volt
17
18
= (WBGT
+ (2 x WBGT
) + WBGT
w
head
abdomen
)/4
ankles