Garmin PN 906-2001-00 Основний посібник з експлуатації - Сторінка 5
Переглянути онлайн або завантажити pdf Основний посібник з експлуатації для Морське обладнання Garmin PN 906-2001-00. Garmin PN 906-2001-00 9 сторінок. Garmin marine instruments user manual

How to Setup Steering Patterns
(No GPS required)
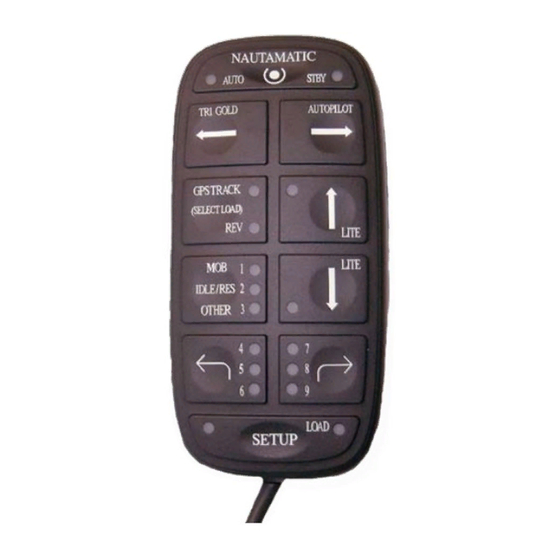
The following will lead through the following features step by step, Reverse, MOB, Idle/Resume, Zig-
Zags, Step Turns, Circles and Remote Steer.
Reverse: The Autopilot will attempt to perform any of it's steering functions when the boat is backing in
reverse gear. To engage the system in reverse; 1) Motor must me in reverse 2) Start from Standby 3) Press
and hold the GPS (Rev) button 4) Press and release the Auto/STBY 5) Release the GPS (Rev) button. The
reverse LED will stay lit until you go to Standby mode.
MOB: 1) Press and hold Setup button 2) Select and light up number 1 on handheld 3) Release Setup button.
When you want to do a MOB turn, press the Idle/Resume button once and it will make the turn. When the
maneuver is over the LED will go out. Remember if you want to use the Idle/Resume you will need to
change it back.
Idle/Resume: The Idle/Resume is set as default from the factory. If you need to change it back from MOB
or Zig-Zags; 1) Press and hold setup button 2) Select and light up number 2 on the handheld 3) Release
Setup button. Now when you press and release the Idle/Resume button the throttle will go to idle and when
pressed again will resume to your previous RPM's.
Zig-Zags: 1) Press and hold the setup button 2) Select and light up number 3 on the handheld 3) Release
setup button. To start your Zig-Zags press and release the Idle/Resume button on the handheld, the autopilot
will start the Zig-Zags. Factory default sets the Zig-Zags at 30 degrees per Zig-Zag and they cycle at 3
minutes. If you wish to change those setting refer to the table of setup codes #8 and #9.
Step Turns: 1) Press and hold the setup button 2) Select and light up number 4 on the handheld (First
number, left bent turn arrow) 3) Release the setup button 4) When you are ready to use step turns press
the bent arrows at the bottom of the handheld. Right bent arrow turns you right and left bent arrow turns
you left in the degrees per step you select from the table of setup codes. Factory default sets them at a 45
degree turn with each press of the bent arrows. Example : press the bent arrow 2 times and you will make
a 90 degree turn. To change the degrees per step refer to set up code #6. Remember that if you have step
turns setup you will not have remote steer. If you like the step turns setup better than remote steer you can
save them as factory defaults by lighting up the setup button, press and hold the Select Load button, press
and release the deckmount (of/off) button. This will keep the bent arrow buttons as step turns each time the
system is turned on. (Until you change them)
Circles: 1) Press and hold the setup button on the handheld 2) Select and light up number 5 on the handheld
3) Release the setup button 4) When you are ready to start your circles press the bent arrow button in the
direction you would like to turn. Example: to start your turns in a clockwise rotation, press the right bent
arrow button to start the turn. Factory default has the turns set up at 5 minute circles. If you would like to
change those settings refer to code 7 on the table of setup codes.
Remote Steer: Remote steer is setup as a factory default. If you wish to return to remote steer after using
Step Turns or Circles use these steps, 1) Press and hold setup button 2) Select and light up number 6 on
your handheld 3) Release setup button. You may now use remote steer by pressing the bent arrows on the
handheld. If you would like to lock this feature in as your new default setting; press and light up the setup
button on the handheld. Press and hold the select load button (GPS) on the handheld. Press and release the
deckmount button and then release the select load button.
5
