Miller XR-ALUMAFEED Посібник користувача - Сторінка 28
Переглянути онлайн або завантажити pdf Посібник користувача для Зварювальна система Miller XR-ALUMAFEED. Miller XR-ALUMAFEED 44 сторінки.
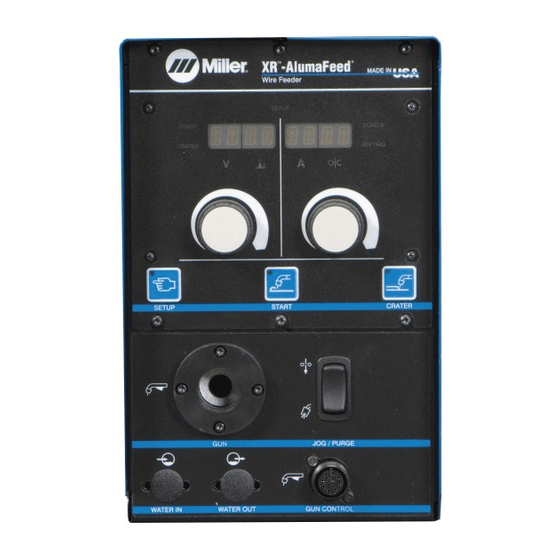
7-2. Setup Menu Level 2
To enter the SETUP MENU LEVEL 2 press
and hold the SETUP button. The SETUP
MENU INDICATOR and the SETUP
BUTTON INDICATOR will illuminate.
Rotate the LEFT ADJUST KNOB to select
different menu items shown in the LEFT
DISPLAY. Rotate the RIGHT ADJUST
KNOB to change menu item values shown
in the RIGHT DISPLAY.
To exit the SETUP MENU LEVEL 2 press
and release the SETUP button.
Items that can be adjusted in this menu are:
Parameter Lock (LOCK) − When set to
(ON), the Preflow, Postflow, Run−In, Start,
and Crater parameters are locked and can-
not be adjusted. Attempting to change a
locked parameter causes the display to mo-
mentarily display (LOCK).
Range Limits (LMTS) − When set to (ON),
the wirefeed speed and arc length or
voltage weld settings are limited to minim-
um and maximum adjustable ranges. The
minimum and maximum range settings ap-
pear next in the menu when (LMTS) is set
to (ON). When set to (OFF), range limits are
inactive and do not appear in the menu.
Wirefeed Range Limit (MIN) − Indicated in
the LEFT DISPLAY with the WIREFEED
SPEED INDICATOR illuminated. Sets the
minimum wirefeed speed. Range of this
setting is from 70 to 780 IPM.
Wirefeed Range Limit (MAX) − Indicated
in the LEFT DISPLAY with the WIREFEED
SPEED INDICATOR illuminated. Sets the
maximum wirefeed speed. Range of this
setting is from (MIN) setting to 780 IPM.
Arc Length Range Limit (MIN) − Indicated
in the LEFT DISPLAY with the ARC
LENGTH INDICATOR illuminated. Sets the
minimum arc length. Range of this setting is
from 0 to 100.
Arc Length Range Limit (MAX) − Indic-
ated in the LEFT DISPLAY with the ARC
LENGTH INDICATOR illuminated. Sets the
maximum arc length. Range of this setting
is from (MIN) setting to 100.
.
When the DISP option in the SETUP
MENU LEVEL 2 is set to (VOLT), the
Arc Length Range Limits are replaced
by Voltage Range Limits.
Voltage Range Limit (MIN) − Indicated in
the LEFT DISPLAY with the VOLTS
INDICATOR illuminated. Sets the minimum
voltage. Range of this setting is dependent
on the power source voltage range in the
MIG process, and varies with the selected
wire and gas program in the PULSED MIG
OM-239 210 Page 24
process. If the power source weld process
is set to PULSED MIG, the minimum
voltage range limit setting will change if the
wire and gas program selection is changed.
Voltage Range Limit (MAX) − Indicated in
the LEFT DISPLAY with the VOLTS
INDICATOR illuminated. Sets the maxim-
um voltage. Range of this setting is depend-
ent on the power source voltage range in
the MIG process, and varies with the selec-
ted wire and gas program in the PULSED
MIG process. If the power source weld pro-
cess is set to PULSED MIG, the maximum
voltage range limit setting will change if the
wire and gas program selection is changed.
Wire Size (Wire) − Set to the appropriate
wire size being used for optimal wirefeed
consistency and speed accuracy.
Gun Type (GUN) − Indicates the gun type
detected. This setting is for information only
and cannot be adjusted.
Gun Calibration (G.CAL) − Calibrates the
gun motor to improve wirefeed speed ac-
curacy. A gun calibration is recommended
during installation or when changing guns.
To perform a calibration, connect the gun to
the feeder and thread the wire thru the con-
tact tip. Set the drive roll tension setting to
3-4 (see Section 5-8). Press and hold the
gun trigger. The feeder will begin feeding
wire with the power source output off. The
display will show (G.CAL HOLD) while the
calibration is active. When the calibration is
complete, wire feeding will stop and the dis-
play will show (G.CAL DONE).
If the calibration was unable to complete
successfully, a diagnostic error message
will appear (see Section 8-3).
Power Source Synergic Mode (PWR.S) −
Sets the synergic mode to (AUTO) or
manual (MAN). When set to (AUTO), the
wirefeeder and a synergic capable power
source function as a synergic Pulsed MIG
system. When set to (MAN), the power
source and wirefeeder function as a non−
synergic MIG or Pulsed MIG welding sys-
tem.
S For proper operation, this setting should
be set to match the power source pulse
(PULS) mode setting.
Display (DISP) − Allows the preset weld
parameter adjustment to be set as voltage
or arc length. This setting effects only the
display appearance and will not effect oper-
ation. The (DISP) setting should be set to
match the power source display. When set
to (VOLT), the preset voltage set point will
be shown in the Left Display with the
VOLTS INDICATOR illuminated. When set
to (ARC.L), the preset arc length will be
shown in the Left Display with the ARC
LENGTH INDICATOR illuminated.
Dual Schedule Mode (SCHD) − Allows se-
lecting a pair of weld parameter settings
that can be used together. When set to
(OFF), dual schedule is disabled. When set
to (TRIG), the active schedule is selected
with the gun trigger.
.
The SCHD B INDICATOR is illumin-
ated when the active schedule is set to
schedule B. Setup, Start, Crater, and
parameter settings can all be set inde-
pendently within schedules.
.
When using Schedule B, wire feed
speed can only be set at the feeder us-
ing the Right Adjust Knob. Wire feed
speed adjustment at at the gun works
in Schedule A only.
Profile Pulse Menu (PROF) − Allows Pro-
file Pulse to appear in the Setup Menu.
When set to (NO), (PROF) will not appear
in the Setup Menu. When set to (YES),
(PROF) will appear in the Setup Menu.
Menu Lock Code (CODE) − Allows setting
a numerical password code to obstruct ac-
cess to the Setup Menu Level 2. By default,
(CODE) is (OFF) allowing access to the
menu without entering a password. The
password can be programmed to values
between 0 and 999. Once programmed, the
password must be re−entered each time
the menu is accessed. A failed password
attempt causes the display to momentarily
show (CODE FAIL). (CODE) will continue
to show on the display until the correct
password is entered or the power is cycled.
.
Anytime the menu is exited with
(CODE OFF), a special sequence is
required before a new password can
be set. With (CODE OFF) shown on
the display, press and hold the SETUP
button and rotate the RIGHT ADJUST
KNOB to set the password to (0123).
Release the SETUP button, the display
should read (CODE 0000). The pass-
word can now be set to a new value.
Product Version Information (INFO) −
Provides information about the firmware re-
vision levels for the Motor Control and the
User Interface PCB's. The default value is
(INFO NONE). To read the firmware ver-
sions rotate the Right Adjust Knob until the
display reads (INFO MOTR) or (INFO
FRNT). The corresponding firmware revi-
sion level will momentarily appear following
a short delay.