EPC EPC9085 Посібник із швидкого старту - Сторінка 2
Переглянути онлайн або завантажити pdf Посібник із швидкого старту для Материнська плата EPC EPC9085. EPC EPC9085 6 сторінок. Development board 40 v half-bridge with gate drive, using epc2049
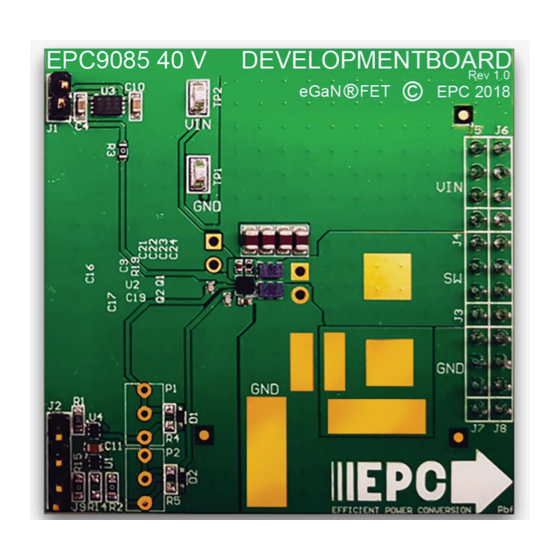
QUICK START GUIDE
DESCRIPTION
The EPC9085 development board is a 40 V maximum device voltage, 20 A
maximum output current, half bridge with onboard gate drives, featuring
the EPC2049 enhancement mode (eGaN®) field effect transistor (FET). The
purpose of this development board is to simplify the evaluation process
of the EPC2049 eGaN FET by including all the critical components on a
single board that can be easily connected into any existing converter.
The EPC9085 development board is 2" x 2" and contains two EPC2049
eGaN FETs in a half bridge configuration using the Texas Instruments
LM5113 gate driver. The board also contains all critical components
and layout for optimal switching performance. There are also various
probe points to facilitate simple waveform measurement and efficiency
calculation. A block diagram of the circuit is given in figure 1.
For more information on the EPC2049 please refer to the datasheet
available from EPC at www.epc-co.com. The datasheet should be read in
conjunction with this quick start guide.
QUICK START PROCEDURE
Development board EPC9085 is easy to set up to evaluate the performance
of two EPC2049 eGaN FETs. Refer to figure 2 for proper connect and
measurement setup and follow the procedure below:
1. With power off, connect the input power supply bus to +V
ground / return to –V
IN
2. With power off, connect the switch node (SW) of the half bridge OUT
(J3, J4) to your circuit as required (half bridge configuration). The
EPC9085 features an optional buck converter configuration, as shown
in figure 2, with unpopulated footprints for an output inductor and
output capacitors.
3. With power off, connect the gate drive input to +V
ground return to –V
DD
4. With power off, connect the input PWM control signal to PWM
(J2, Pin-1) and ground return to any of the remaining J2 pins.
5. Turn on the gate drive supply – make sure the supply is between 7.5 V
and 12 V range.
6. Turn on the controller / PWM input source.
7. Turn on the bus voltage to the required value (do not exceed the
absolute maximum voltage) and probe switching node to see
switching operation.
8. Once operational, adjust the PWM control, bus voltage, and load within
the operating range and observe the output switching behavior,
efficiency and other parameters.
9. For shutdown, please follow steps in reverse.
2 |
(J7, J8).
DD
(J1, Pin-2).
| EPC – EFFICIENT POWER CONVERSION CORPORATION |
Table 1: Performance Summary (T
Symbol
V
Gate Drive Input Supply Range
DD
V
IN
I
Switch Node Output Current
OUT
V
PWM
Minimum 'Low' State Input Pulse
(1) Maximum input voltage depends on inductive loading, maximum switch node ringing must be kept
under 40 V for EPC2049.
(2) Maximum current depends on die temperature – actual maximum current with be subject to
switching frequency, bus voltage and thermal cooling.
(3) Limited by time needed to 'refresh' high side bootstrap supply voltage.
(J5, J6) and
IN
(J1, Pin-1) and
NOTE. When measuring the high frequency content switch node, care must be taken
to provide an accurate high speed measurement. An optional two pin header (J10) is
included for switch node measurement. It is recommended to install measurement point
on backside of board to prevent contamination of the top side components.
For information about measurement techniques, please review the how to GaN series:
HTG09- Measurement
http://epc-co.com/epc/DesignSupport/TrainingVideos/HowtoGaN/
= 25°C) EPC9085
A
Parameter
Conditions
Bus Input Voltage Range
(1)
(2)
PWM Logic Input Voltage
Input 'High'
Threshold
Input 'Low'
Minimum 'High' State Input
V
PWM
Pulse Width
fall time < 10ns
V
PWM
Width
fall time < 10ns
(3)
EPC9085 development board
WWW.EPC-CO.COM
EPC9085
Min
Max Units
7.5
12
V
28
V
20
A
3.5
6
V
0
1.5
V
rise and
50
ns
rise and
200
ns
| COPYRIGHT 2018