Digital Acoustics IP7-MSR-BRD Посібник для початківців - Сторінка 2
Переглянути онлайн або завантажити pdf Посібник для початківців для Домофонна система Digital Acoustics IP7-MSR-BRD. Digital Acoustics IP7-MSR-BRD 2 сторінки.
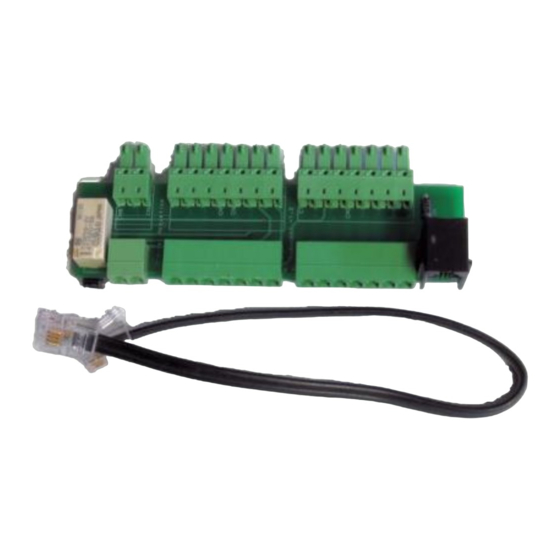
Installation
•
Plug the IP7-MSR
directly into the IP7-
SE8's J1, J2 and J3
connectors. (The IP7-
SE8's Microphone,
Speaker and Relay
connectors are used by
the IP7-MSR. All other
connectors are passed
through to the IP7-SE8)
•
Attach the included cable
to the RJ-10 port on the
IP7-MSR and the EXT
I/O port on the IP7
•
Using twisted shielded 18 AWG wire, connect the SPKR 8Ω+ (J2-6)
and SPKR 8Ω- (J2-7) of the IP7-MSR to a suitable speaker. The 8
Ohm speaker should be no more than 200 feet away from the IP7-
SE8
•
Connect the shield to the IP7's GND (J2-4) connector. Do not connect
the shield to the speaker
•
Power up the IP7-SE8 and connect it to the network
Configuration
•
When configuring the IP7-SE8 using the TalkMaster FOUCS
Administrator Console, open the IP Endpoints Options 1 tab.
Under the Relay Mode, select the Activate On... option and then
check MIC
IP7 and Digital Acoustics® are trademarks of Digital Acoustics LLC.
Other trademarks are the property of their respective owners.
INT-IP-2GangGSG - 2018-03-23 - All Rights Reserved ©2018
www.digitalacoustics.com/support