Galvanox PowerRail Schnellstart-Handbuch
Blättern Sie online oder laden Sie pdf Schnellstart-Handbuch für Batterieladegerät Galvanox PowerRail herunter. Galvanox PowerRail 2 Seiten.
PERFECTLY
PLACED
POWER
ALWAYS THERE, ALWAYS RIGHT!
THE POWERRAIL BY
Setup Preparation
1. Choose a smooth even surface as mounting location for your
PowerRail.
2. Place PowerRail in selected location to ensure proper fit.
3. Determine best mounting option using included adhesive or
screws.
Adhesive Installation
1. Ensure mounting surface is clean, dry and oil free
2. Remove backing from one side of adhesive strip
3. Affix adhesive strip to back of PowerRail
4. Remove adhesive strip backing from back of PowerRail
5. Place PowerRail in desired location and press into place
6. Insert included screw covers over screw openings
To remove: Use included wedge tool to separate adhesive from
mounting surface. Do not apply force to PowerRail as this may
cause damage.
2
Screw Installation
1. Place PowerRail in desired location
2. Mark each screw location using a thin tipped pencil or pen
3. Drill pilot holes using 1/16" drill bit and remove any debris
4. Place PowerRail in mounting location aligning with predrilled
holes
5. Using Phillips screwdriver to set screws in place ensuring
not to overtighten
6. Insert included screw covers over screw openings
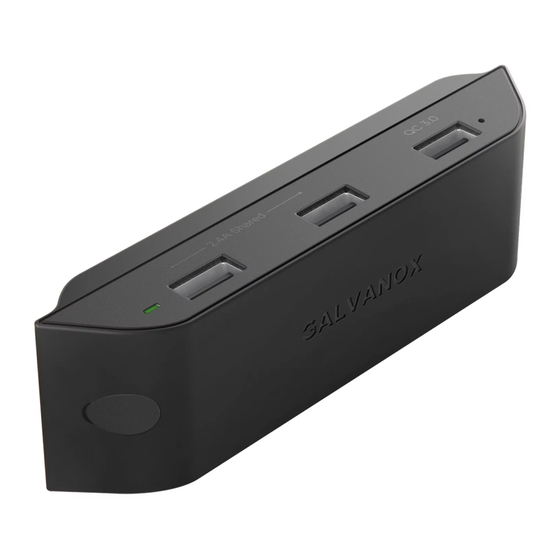
Powering Up
Connect included power adapter to power source and PowerRail;
the Green-Glow Power Indicator will illuminate.
Ensure power cord is fully inserted into PowerRail for optimal
performance.
The PowerRail PR400 features a dedicated Speed Port which
delivers constant highspeed QC power; The Blue-Glow Indicator
will illuminate when in use.
3