Comunello Automation CU 230V 1M Manual de inicio rápido - Página 3
Navegue en línea o descargue pdf Manual de inicio rápido para Unidad de control Comunello Automation CU 230V 1M. Comunello Automation CU 230V 1M 4 páginas.
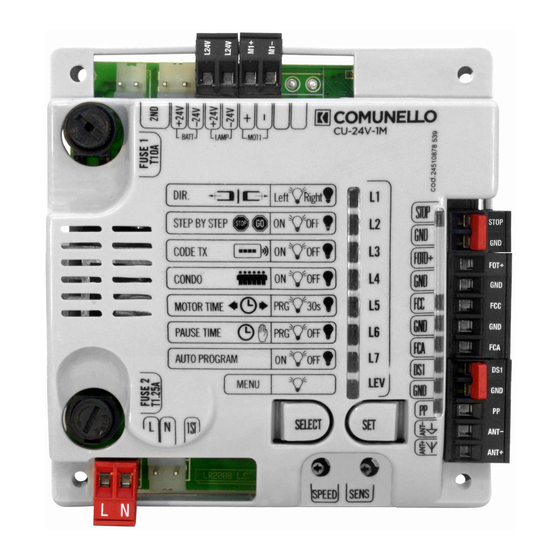
QUICK START GUIDE FOR INSTALLATION AND PROGRAMMING OF CONTROL UNITS:
Use the QR-CODE option to watch the "step-by-step" videos tutorials, available on the YouTube channel Comunello TV
This section will provide the essential information for the setting-up
of the control unit.
PROGRAMMING KEYS:
SELECT: this key allows you to select the type of function to be
enabled; the selection is indicated by the LED flashing.
By pressing the key, you can scroll through the menu and position
yourself on the desired function.
SET: this key allows the activation of the type of function chosen with
the SELECT key.
Programming enabled only in non-active safeties conditions.
Before starting the programming, it will be necessary to set up the
automation.
A) Make sure that the safety inputs N.C. are not open:
Photocell input DS1
1.
2.
Photocell input DS2
3.
Block input STOP
B) OPENING DIRECTION:
If the opening logic must be reversed, plea-
se proceed as follows:
1. By the key SELECT, position yourself on the blinking LED L1
"DIR";
2. Press the key SET to reverse the opening direction.
C) TRIMMERS ADJUSTMENTS:
CU 24V 1M
CU 230V 1M
The trimmer adjustments must be carried out in compliance
with the EN-12453 legislation, regulating the impact forces.
After the preliminary checks, the control unit programming can be
carried out.
D) MOTOR TIME: regulation of the stroke and of the deceleration points.
CU 24V 1M e CU 230V 1M
LED ON: it opens to the left.
LED OFF: it opens to the RIGHT
(default configuration).
Position the SPEED trimmer
all turned clockwise and the
SENS trimmer all turned coun-
ter-clockwise.
Position the FORCE trimmer all
turned clockwise and the SLOW
trimmer at the middle, turning
it counter-clockwise towards the
" - ".
Starting condition: gate leaf in closed position.
1. By the key SELECT, position yourself on
the blinking LED L5 "MOTOR TIME";
M1
2. Then press the key SET to start the pro-
cedure.
3. MOTOR 1 starts the opening phase;
4. When the desired deceleration starting
point is reached press the SET key (the leaf
continues its stroke at a decelerated speed);
5. Press SET key to determinate the ope-
ning end stop.
6. A MOTOR 1 starts the closing phase;
7. When the desired deceleration starting
point is reached press the SET key (the leaf
continues its stroke at a decelerated spe-
ed);
8. Press SET key to determinate the closing
end stop;
9. The configuration is completed.
E) AUTO PROGRAM - automatic setting of the stroke and of the
deceleration points (only available for CU 24V 1M)
With the function in LED L7 "AUTO PROGRAM"
it is automatically set the total stroke and the
deceleration points.
ATTENTION: the use of end stops is mandatory.
Please check the installation and user manual or the video with the
detailed programming tutorial.
F) STEP-BY-STEP OPERATING LOGIC
This function allows to switch the operating logic of input sent from
pushbuttons or remote controls from the "Step-by-Step" (enabled
as-shipped) to "Open-Close":
STEP BY STEP
LED ON
1st input --> OPEN
2nd input --> STOP
3rd input --> CLOSE
4th input --> STOP
To change the logic, proceed as follow:
1. By the key SELECT, position yourself on the blinking LED L2
"STEP BY STEP";
2. Press the key SET;
3. The LED L2 will turn off and programming will be completed.
LEAF IN OPENING PHASE
LEAF IN CLOSING PHASE
OPEN-CLOSE
LED OFF
1st input --> OPEN
2nd input --> CLOSE
3rd input --> OPEN
4th input --> CLOSE