Great Lakes MINISTAR S Panduan Pengoperasian - Halaman 12
Jelajahi secara online atau unduh pdf Panduan Pengoperasian untuk Peralatan gigi Great Lakes MINISTAR S. Great Lakes MINISTAR S 13 halaman.
Juga untuk Great Lakes MINISTAR S: Tips Pemecahan Masalah & Fabrikasi (2 halaman)
Material heating times will vary based on compound, color, and thickness. Recommended heating times are
identified on an easy-to-scan barcode strip inside each box of material. If proper adaptation is not obtained,
it may be necessary to extend or decrease the recommended heating times by 5-15 seconds.
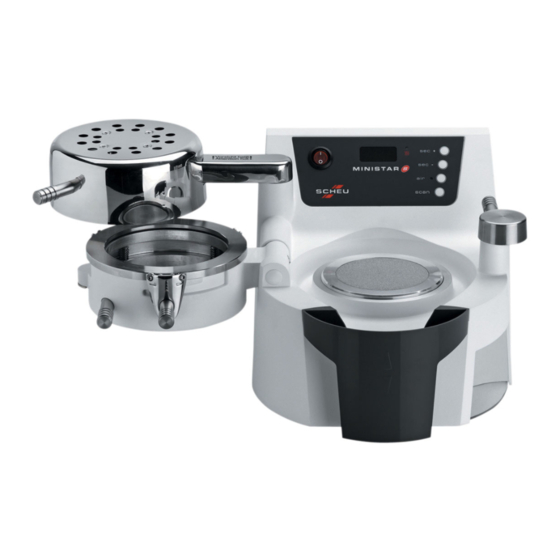
Pressure Molding Process
A
D
C
B
A
C
B
Swing the heating element from its rest position over the
material (white arrow) on the pressure chamber. When the
heater is placed over the material, the heating element
illuminates and the set heating time begins.
With
5
seconds remaining, warning beeps will sound.
Once heating time has elapsed, the beeping will be
continuous until the heater is removed from the material.
After the recommended time is reached, swing the heating
element (A) back to the rest position and flip the pressure
chamber (B) onto the cup so the material can be thermal
formed over the model. Turn the locking handle (C) from
the straight back rest position 180º toward the front of the
machine. This secures the chamber over the cup and allows
air pressure to enter the chamber. Once the pressure is turned
on, the digital clock on the control panel (D) will automatically
initiate a cool-down time.
At the end of the cooling time, short beeps will sound. Press
the air button marked on the control panel to release the air
pressure from the chamber. Short beeps will sound indicating
full pressure evacuation. If a shorter cooling cycle is required,
the programmed time can be erased by pressing and holding
the air button for
5
seconds. Once the time has been erased,
press the air button again to release the pressure.
To unlock the chamber, swing the locking handle (A) 180º
toward the back of the machine to the straight back rest
position. Unlock the material held on the chamber by
sliding the clamping frame arm (B) to the left. Flip the
chamber (C) open to the left and remove the model with
the formed plastic.
12