FLOJET 2840 Series Informazioni sull'installazione e sull'assistenza - Pagina 2
Sfoglia online o scarica il pdf Informazioni sull'installazione e sull'assistenza per Attrezzatura marina FLOJET 2840 Series. FLOJET 2840 Series 4. Rv/marine water booster system
GENERAL SAFETY INFORMATION
Protect yourself and others by observing all safety
information. Shut off power and drain pressure from
system prior to service.
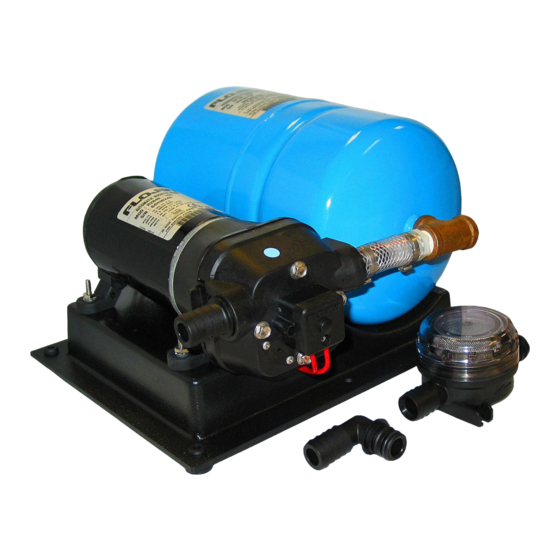
Mounting
The FLOJET 2840 Series Water Pressure System should
be mounted in a dry and adequately ventilated area.
Select a location where the plumbing is as direct as
possible and the inlet strainer is visible and accessible
for cleaning.
The unit can be deck or bulkhead mounted. If bulkhead
mounted, the pump head should be down or lower than
the motor.
Fasten base securely with the four rubber mounting feet
assembled to base as shown below.
Vertical
Plumbing
Fasten strainer in a visible and accessible location for
future cleaning. Use 3/4" (19 mm) I.D. hose between
pump inlet & strainer. Connect strainer inlet to water
supply line from tank and clamp all hose connections
securely to avoid air leaks.
City water supply may be connected at any location in
the pressurized cold water line.
City Water
Inlet
Autofill Tank Valve,
Plumb to Tank
Water
Tank
Do Not Plumb Autofill
to Pump Suction Line
Horizontal
Water
Heater
Check
Valve
Water Pressure
System
ELECTRICAL
W RNING
RISK OF AN ELECTRICAL SHOCK!
When wiring an electrically driven pump, follow all
electrical and safety codes, as well as the most recent
National Electrical Code (NEC) and the Occupational
Safety and Health Act (OSHA).
RISK OF PRODUCT DAMAGE!
Make certain the power source conforms to the pump
voltage. Be sure all power is disconnected before
installation or removal.
For 12 VDC, 24 VDC and 32 VDC models, the red wire is
positive and black is negative. Use the maximum
recommended fuse for pump protection. Recommended
fuse amp rating is located on pump label. Failure to
provide correct overload device may result in motor
failure.
For 115 VAC models plug AC cord into a conventional
115V AC outlet.
OPERATION
IMPORTANT - For correct operation, the tank must be
properly pressurized on the air side before pump is
started. Follow instructions on the tank label and check
air pressure after filling and before starting the pump.
The air valve is standard tire valve. Compressed air hose
or hand pump may be used to pressurize. Pressure can
be reduced by pressing the center pin in the valve.
To start up the Water Pressure System, make sure water
supply tank is at least 1/4th full and is open to pump
inlet. Open all valves or taps on outlet side to purge air
from the system. Turn power on to the pump, pump will
start up. Allow to pump for a minute or until all the air
has been purged from the system. Close all valves in the
system, the pump will pressurize the tank, shut off and
operate automatically to maintain pressure in the
system.
To completely fill the pressure tank for maximum
volume, shut off power to pump and open faucet (or
valve) closest to tank. Trapped air will be expelled. Turn
on power to pump.
W RNING
DO NOT USE PUMP IN A FLAMMABLE
ENVIRONMENT DO NOT USE TO PUMP
FLAMMABLE OR EXPLOSIVE FLUIDS
SUCH AS GASOLINE, FUEL OIL,
KEROSENE, ETC.