CAST Lighting Impressionist CIWL6 Manuale di avvio rapido
Sfoglia online o scarica il pdf Manuale di avvio rapido per Luce per esterni CAST Lighting Impressionist CIWL6. CAST Lighting Impressionist CIWL6 2. Led wall wash light
Anche per CAST Lighting Impressionist CIWL6: Manuale di avvio rapido (2 pagine)
Applies to CIWL6
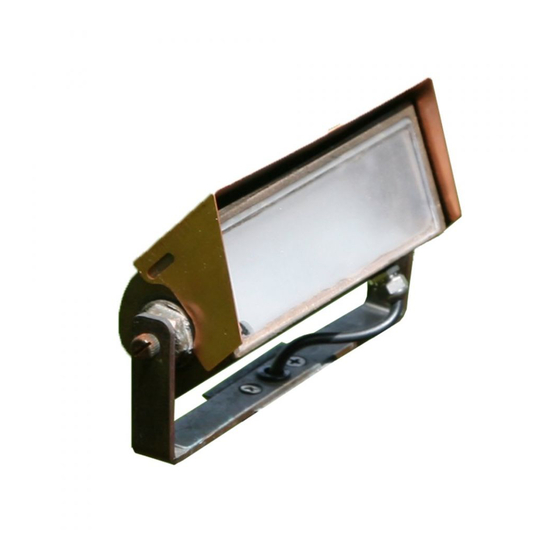
Wall Wash (CIWL6)
Impressionist Only!
Control Plug Assembly
After passing wire through bracket or
mounting kit:
1. Firmly insert green and
yellow pins into plug -
yellow pin must insert into pointed
end of plug.
2. Slip heat shrink tube over plug until
end is lined up with top of plug.
3. For best results, use 120V heat gun
(not torch - can damage connection)
to shrink tube on all sides until tight.
4. Insert Inner Cap into plug.
5. Place Outer Cap over Inner Cap.
Green
Yellow
Green
Yellow
CAST #18/4
No-Ox
to Fixture
Tool Required
Heat Gun
10-24V AC/DC Power -
Black & White Wires
(Polarity
Independent)
M OU N TI NG
Important. For CIWL6 Only: The lead wire for this fixture comes with Control Plug
detached. This allows the installer to pass wire through bracket and/or mounting
options such as Stake Mount (CWL8KIT) and Stake/Stem Mount (CWL9KIT). After
fixture is assembled with the selected mounting kit, installer attaches Control Plug
Assembly. Do not operate fixture with plug detached.
1. Bracket Mounting Instructions. (CIWL6 & CWL6LED1)
CAST Impressionist LED Wall Wash Light (CIWL6) includes copper mounting
bracket. Bracket can be used to mount fixture on any surface.
• Use provided (2) stainless steel flat Philips-head wood screws to secure bracket
to surface. If fixture lead wire interferes with flush-mounting then push bracket's
anti-chafing plug back towards fixture to release wire. Pull wire through bracket.
• Position fixture to ensure proper aiming. Mark screw hole locations with marker.
• Disconnect bracket from fixture by removing (2) thumb screws. Screw bracket
onto surface. Re-attach bracket to fixture. Tighten thumb screws.
2. Canopy Mounting Instructions. (CIWL6 & CWL6LED1)
Use Wall Wash Canopy Mounting Kit (CWL7KIT) (purchased separately) for mount-
ing fixture to any surface to provide an offset of about 6" from surface to fixture
body.
• Before attaching mounting kit to Wall Wash bracket, insert end of fixture lead
wire into kit stem and feed through to exit kit bottom. Pull wire completely
through until it stops.
Outer Cap
• Disconnect bracket from fixture by removing (2) thumb screws. Using provided kit
(Black)
screws, secure kit flange to fixture bracket. Re-attach bracket to fixture. Tighten
Inner Cap (Red)
thumb screws.
• Secure canopy to surface using provided screws.
Line up heat
3. Stake Mounting Instructions. (CIWL6 & CWL6LED1)
shrink with
plug top.
Use Wall Wash Stake Mounting Kit (CWL8KIT - short stem; CWL9KIT - long stem;
CWL9EXKIT - extendable stem) (purchased separately) for mounting in turf or
mulch bed regions.
• For all mounting kits, follow first three steps in Canopy Mounting instructions
(above).
3a. CWL8KIT Instructions: This kit comes with short stem and stake. Stake must
be installed in firm solid ground with top flange of stake level with ground. If
ground is not firm, then dig hole and backfill with mixture of pea gravel and soil.
• Stake can be removed from fixture so it can be driven into ground with rubber or
dead blow mallet. If stake is not removed, do not put pressure on fixture body
when inserting into ground (as this may bend the bracket).
Wire
®
3b. CWL9KIT & CWL9EXKIT Instructions: The CWL9KIT kit comes with a long
stem and Large Talon Stake. The CWL9EXKIT comes with a long extendable
stem and Large Talon Stake. For both kits, follow Large Talon Stake instructions
(next page).
Old world craftsmanship . . . tomorrow's technology
SAVE THESE IMPORTANT SAFETY INSTRUCTIONS
Impressionist
Wall Wash Light (CIWL6) &
Classic Series Mini Wash (CWL6LED1)
OUTDOOR USE ONLY!
Series LED
®
®