highwood Weatherly 조립 설명서 - 페이지 2
{카테고리_이름} highwood Weatherly에 대한 조립 설명서을 온라인으로 검색하거나 PDF를 다운로드하세요. highwood Weatherly 2 페이지. Porch swing
Before you start
This assembly can be done by one person alone,
however it is much easier when two people work as a
team. Also, do not over-tighten bolts, but ensure that a
firm and secure connection is made in every instance to
avoid excess movement in joints.
Step 1
Connect Swing Back to Swing Seat
Position and hold the Swing Back (A) and Swing Base (B)
together, and attach one side using two 2-1/4" Carriage Bolts (D)
and two Flange Nuts (G) as shown in Image #1 below.
Note: Holes are pre-drilled for the Carriage Bolts to pass through,
but use a hammer to firmly tap the bolt end several times so that
the square neck sinks into the highwood
Repeat for other side.
A
Image #1
Connect the two center braces using two 2-1/4" Carriage Bolts
(D) and two Flange Nuts (G) as shown in Image #2 below.
B
G
D
Image #2
For information on Care and Cleaning your highwood
Visit our Website and Facebook page to see more highwood
®
material.
B
G
D
G
D
www.highwood-usa.com • www.facebook.com/highwoodUSA
Step 2
Attach Arm Rests to Swing Seat and Back
With the swing resting on the swing back, position and hold Arm
Rest (C) to the assembled swing and attach the front support using
one Open-Eyed Eyebolt (F) and one 2-1/4" Carriage Bolt (D).
Note: Holes are pre-drilled for the Carriage Bolts to pass through,
but use a hammer to firmly tap the bolt end several times so that
the square neck sinks into the highwood
From the inside of the swing base, attach one Flange Nut (G) to
the Carriage Bolt to secure. Next, attach one Flat Washer (H) and
Lock Nut (I) to the Eye Bolt making sure the Eyebolt opening
faces down when fully tightened.
Finish attaching the Arm Rest to the Swing Back using one 3"
Carriage Bolt (E) and one Flange Nut (G).
Both steps are shown in Image #3 below.
Repeat for other side.
G H + I
F
D
Image #3
Step 3
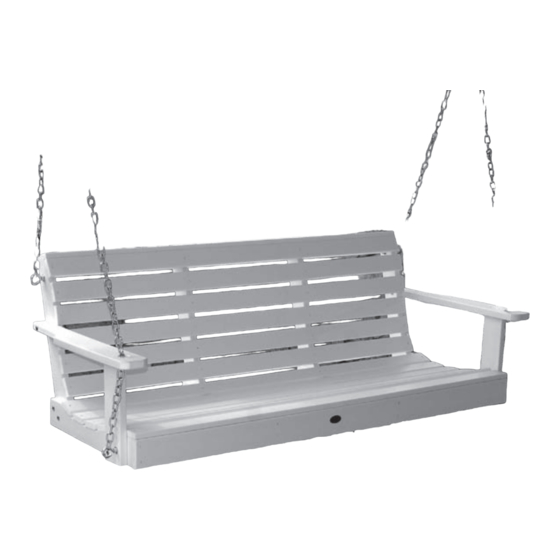
Attaching the Swing Chains
Using the supplied 7' Stainless Steel Chain (J), attach one end to
the eye bolt (F) and the other end to the pre-installed eye bolt on
the swing back as shown in Image #4 below.
Attach the Chain Connector (L) to center point of the chain and to
the 2' Stainless Steel Chain (K) as shown in Image #5.
Repeat on other side.
pre-Installed
J
F
Image #4
product visit www.highwood-usa.com/care.html
®
Image #4
®
material.
B
C
G
e
Image #5
products!
®
K
L
J