Miller 1014 운영자 매뉴얼 - 페이지 7
{카테고리_이름} Miller 1014에 대한 운영자 매뉴얼을 온라인으로 검색하거나 PDF를 다운로드하세요. Miller 1014 12 페이지. Arrow series fluid head with euro camera platform
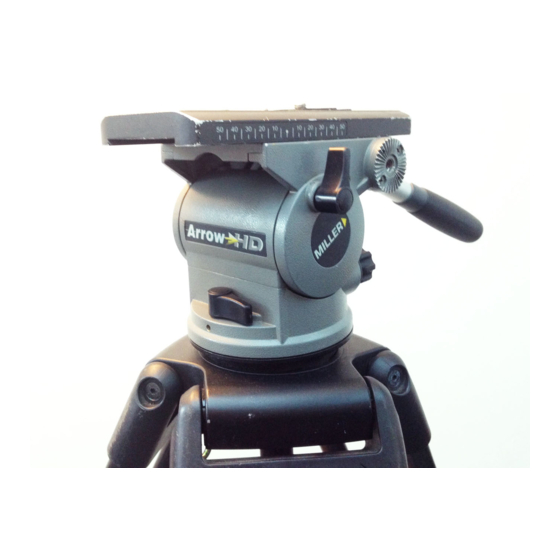
CAMERA PLATE
CENTRE AXIS
FIG 4
2 MOUNT YOUR CAMERA
Arrow is equipped with a sliding platform for balance fine
tuning, plus a quick-release camera plate and standard camera
mounting screws (Arrow and Arrow 30 have 70mm sliding
range, Arrow HD has 100mm sliding range). Please note that
best camera control can be achieved by balancing the camera
centre of gravity (C of G) over the centre axis of the head.
2.1 Lock the PAN and TILT LOCKS (rotate both levers clockwise
2.2 Remove the CAMERA PLATE by pulling downwards on the
2.3 With accessories and battery fitted, determine your
2.4 Attach the CAMERA PLATE over the C of G by fastening
SLIDING PLATFORM
7
until firm).
SAFETY TAB while rotating the QUICK RELEASE to the left
until it reaches the automatic stop position (the CAMERA
PLATE will pop up).
camera's C of G by the best method available (Eg: balance
the camera on a rod or similar to find balance point).
the 3/8" + 1/4" CAMERA SCREWS into your camera's base
or 'tripod adaptor plate'. These screws should be
tightened evenly and as far apart as possible to prevent
any movement between your camera and the fluid head.
N.B. Arrow 30 is also supplied with a 1/4" screw & pin
carriage (Cat#493) for direct attachment to MiniDV
camcorders which do not require a tripod adaptor plate.
When attaching the camera carriage to a camcorder,
ensure the carriage's locating pin fits comfortably into the
camcorder socket, then screw the 1/4" screw clockwise
until the camera plate is attached firmly to the camcorder.
Warning: If the carriage pin does not easily fit into the
camcorder socket, DO NOT force it. Contact Miller or your
nearest authorised dealer for specific advice relating to
your camcorder model.