Digicom HSUPA 사용자 설명서 - 페이지 11
{카테고리_이름} Digicom HSUPA에 대한 사용자 설명서을 온라인으로 검색하거나 PDF를 다운로드하세요. Digicom HSUPA 18 페이지. 3g modem usb internal
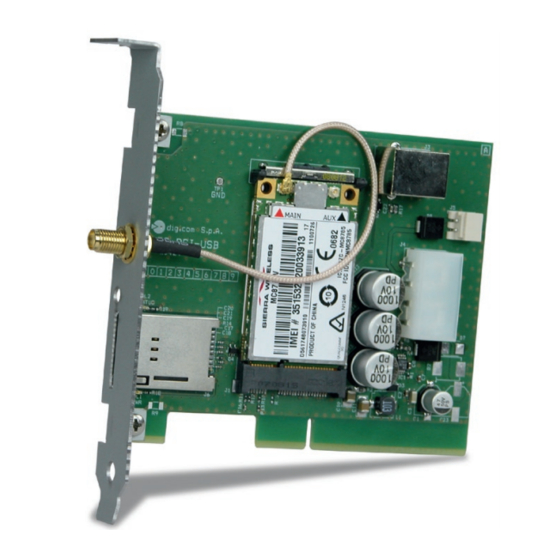
3G Modem USB Internal
2. INSTALLATION
The installation procedure divides into:
• Hardware installation
• Driver installation
NOTE: Windows requires the driver installation as first step, unlike Linux that wants the hardware installation
before.
2.1. HARDWARE INSTALLATION
The installation on a PCI card is used as example.
Go on with the following procedure with PC off.
• Remove the product from its package and verify it is ok.
• Before operating on your PC, disconnect the power plug.
• Remove the PC cover to access the internal slots.
• Find out a free PCI slot.
This slot is used for mechanical fixing only.
• Insert 3G Modem USB Internal and fix the card using the screw of the slot.
• Connect 3G Modem USB Internal to a USB port of your PCI card.
• Insert the SIM, we suggest to disable the PIN.
Attention: it is not possible to insert the SIM when the card is powered.
• Connect the power to 3G Modem USB Internal.
• Close the PC cover.
2.2. DRIVER INSTALLATION
2.2.1. Windows
• In the folder (\driver\windows) you find "3G_Watcher_Generic_Build1665.msi" file. When executed this file will automatically
install the driver and the Watcher utility to establish and manage the data connection.
• If your application requires the drivers only, go on with the manual installation as follows:
• Execute the "DriverInstaller" utility (\driver\windows\DriverInstaller), the driver installation will start.
• Once the procedure is over you can go on with the hardware installation.
• At restart the operating system will detect a new hardware and the installation will be automatically performed.
• Now 3G Modem USB Internal is ready for use.
Installation
2.1