Sharp XG-PH50X - XGA DLP Projector 설치 지침 매뉴얼 - 페이지 6
{카테고리_이름} Sharp XG-PH50X - XGA DLP Projector에 대한 설치 지침 매뉴얼을 온라인으로 검색하거나 PDF를 다운로드하세요. Sharp XG-PH50X - XGA DLP Projector 13 페이지. Xga native resolution system integration/large venue projector
Sharp XG-PH50X - XGA DLP Projector에 대해서도 마찬가지입니다: 설치 매뉴얼 (2 페이지), 운영 매뉴얼 (20 페이지), 사양 (2 페이지), 브로셔 및 사양 (4 페이지), 빠른 시작 참조 시트 (6 페이지)
INSTALLATION INSTRUCTIONS
STEP 3 DETACH THE POSITIONING ASSEMBLY FROM THE PROJECTOR ATTACHMENT
PLATE.
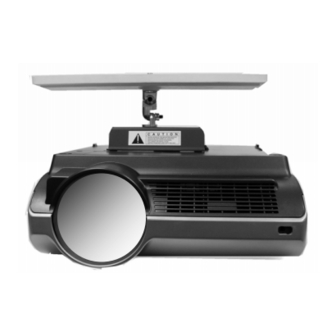
FIGURE 5
POSITIONING KNUCKLE ASSEMBLY
REMOVE NUT
LOWER KNUCKLE
STEP 4 INSTALLATION OF THE PROJECTOR ATTACHMENT PLATE
4.1
Place the attachment plate over the bottom of the projector (See Fig. 6)
and align the holes of the plate with the threaded fittings on the projector case.
4.2
Install the three M4 x 12mm long screws provided. Fasten these securely but
DO NOT overtighten. (See Fig. 7)
FIGURE 6.
NOTE: PLEASE LOOK OVER THE EXACT MANNER IN WHICH THE
POSITIONING ASSEMBLY AND THE ATTACHMENT PLATE GO
TOGETHER SO THAT YOU WILL BE ABLE TO REASSEMBLE THEM
WHEN YOU HANG THE PROJECTOR.
3.1 Using 9/16" box wrench, remove the nut and split lock washer from the lower
knuckle (vertical position) and slide the center and upper knuckle assembly apart
from the bottom knuckle which is part of the
attachment plate. (See Fig. 5)
SPECIAL NOTE TO INSTALLERS: The positioning knuckle is mounted to provide
correct static balance when the standard lens is used.
When any of the other lens options are used the lens is
heavier and in order to improve the static balance, move
the 3 piece knuckle
assembly to one of the other mounting holes on the at-
tachment plate. If the larger and heavier lens is selected,
use the furthest hole. All other mounting and adjustment
procedures remain the same.
FIGURE 7.
PAGE 6
CEILING BRACKET AN-PHCM20
M4x12mm screws