Disaster Area Designs SMARTClock Gen3 사용자 설명서 - 페이지 3
{카테고리_이름} Disaster Area Designs SMARTClock Gen3에 대한 사용자 설명서을 온라인으로 검색하거나 PDF를 다운로드하세요. Disaster Area Designs SMARTClock Gen3 9 페이지.
3
of
9
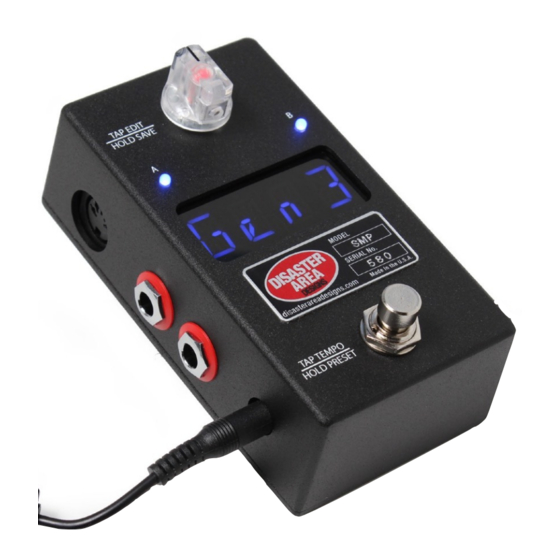
SMARTClock Gen3 Quick Start
Thanks for purchasing a Disaster Area Designs SMARTClock Gen3 controller. The SMARTClock Gen3 is a compact pedalboard clock
source and MIDI controller, designed to synchronize multiple time-based effects on your pedalboard.
At its heart, the SMARTClock has a master clock that operates at any tempo from 30 to 300 beats per minute. The SMARTClock will
send out this clock source over MIDI, and will also generate tap tempo signals to interface with your non-MIDI pedals. The
SMARTClock is capable of controlling most pedals and rack units that have a tap tempo input jack.
SETTING THE TEMPO:
Operating the SMARTClock is simple — tap its footswitch in time with your music to set the tempo of its master clock. Any connected
MIDI clock compatible devices will automatically follow along at this tempo, and the SMARTClock will generate a series of tap tempo
pulses to control your other tap tempo pedals. The SMARTClock counts taps in groups of two, so you must tap at least twice to set a
new tempo.
To set the BPM without tapping, turn the clear knob on the SMARTClock to specify the tempo in beats per minute. Once you have set
the tempo, the SMARTClock will automatically adjust its outputs to keep all of your devices in time.
CHANGING SUBDIVISIONS
To change the tempo subdivisions for each output, tap the Edit Knob once to move through each output. When the desired output is
displayed, turn the Edit Knob to select the subdivision. Available divisions are Qu - Quarter Note, 8d - Dotted 8th, 8th — 8th Note, or
Trp - Triplet.
SENDING MIDI PROGRAMS
Tapping the Edit Knob after the last available output will advance to the MIDI Program Output mode, if enabled in setup. In this mode,
the display shows U followed by the current output program. Turn the Edit Knob to select any MIDI program from 0-127 and the
SMARTClock will send this to your connected MIDI device.
Tap the Edit Knob again to return to the main tempo display — the SMARTClock will re-send the tap tempo messages to re-sync all of
your devices.
SAVING AND LOADING PRESETS
To save the current settings to a preset, hold the Edit Knob down. The SMARTClock Gen3 settings will be saved to the current preset
slot. If NAMES are enabled in the SMARTClock settings, the display will flash the current name before saving. Tap the Edit Knob to
choose a letter to edit, rotate the Knob to move from one letter or character to the next. Hold the Knob to save the preset and name.
To move to the next preset, hold the footswitch down. The next preset will load, and the outputs will activate to send out taps to your
devices.
To re-sync your devices without tapping in a new tempo, tap the footswitch ONCE and wait. After two seconds the SMARTClock will
send out new taps to your devices to re-synchronize them. This is useful if you have some devices which "drift" or change tempo
gradually over time.
TEMPO DISPLAY
The SMARTClock displays the current tempo in Beats Per Minute. Not all devices determine their tempo in the same way, so
sometimes you may experience differences between different pedals or devices - don't worry! The SMARTClock is sending
everything the exact same tempo, so even if their displays are off by a beat or two everything is okay.
Disaster Area Designs
SMARTClock
Gen3