Cypress PowerPSoC CY3268 빠른 시작 매뉴얼 - 페이지 4
{카테고리_이름} Cypress PowerPSoC CY3268에 대한 빠른 시작 매뉴얼을 온라인으로 검색하거나 PDF를 다운로드하세요. Cypress PowerPSoC CY3268 12 페이지. Lighting starter kit
Cypress PowerPSoC CY3268에 대해서도 마찬가지입니다: 빠른 시작 매뉴얼 (2 페이지)
4. Create a PSoC Designer Project
4.1 Install Software
To setup the software environment for developing firmware for PowerPSoC
Install PSoC Designer from the CD (or download the latest version from
■
www.cypress.com/design/SD1099).
Install PSoC Programmer from the CD (or download the latest version from
■
www.cypress.com/design/SD1062).
For Installation instructions do refer to the instruction in respective web page.
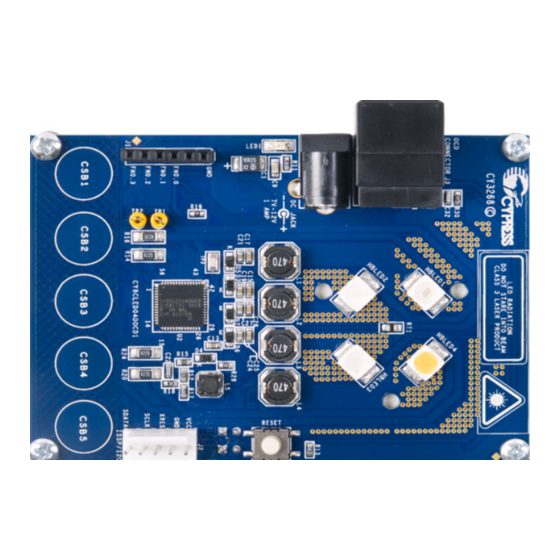
4.2 Hardware Setup
Attach the supplied power supply to a wall receptacle. Connect the other end of
■
the power supply to the main board.
Use miniprog (sold separately) or the ICE (sold separately) to download the firm-
■
ware to flash and to execute it.
To use the ICE, use blue colored cable (supplied with CY3215 Kit) to connect with the
board or a standard RJ-45 CAT5 cable.
4.3 Example PSoC Designer Project
The first example project demonstrates the ability of the PowerPSoC device to inte-
grate CapSense, LED driving capabilities in one chip. This project sets up the
CapSense buttons, initializes the power peripherals blocks, and enables them. It then
goes into an infinite loop scanning the buttons and performing the required functions.
The CapSense buttons are setup in the following way:
Button 1: selects HBLED1
■
Button 2: selects HBLED2
■
Button 3: selects HBLED3
■
Button 4: selects HBLED4
■
Button 5: Each tap on the button increases the brightness of the selected LED and
■
Downloaded from
Elcodis.com
electronic components distributor
http://
http://