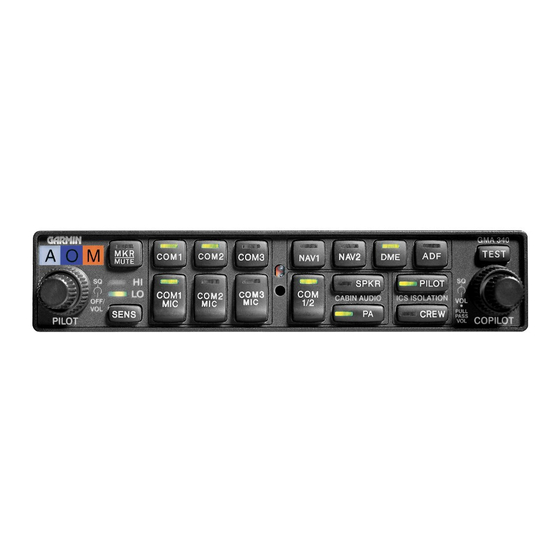
Garmin GMA 340 Pilot's Manual - Page 3
Browse online or download pdf Pilot's Manual for Avionics Display Garmin GMA 340. Garmin GMA 340 4 pages. Audio panel
Also for Garmin GMA 340: Pilot's Manual (12 pages), Supplemental Operation Manual (10 pages), Pilot's Manual (8 pages), Installation Manual (43 pages), Pilot's Manual (8 pages), Pilot's Manual (12 pages)

lf
the
CnM
radios utilize
a
"transmit
interlock"
systen, the
split
C1M
function
may
require that
this feature
is enabled.
Befer
to
the
radio
installation manual
for
guidance.
GABMIN nakes no
expressed
or
implied guarantees regarding
the suiability
of
the
split
C0M feature in
a
given
installatíon.
COM Swap
Function
The
GMA
340 allows the
use
o[
a
remote mounted
switch (typically on
the yoke)
to
alternately
transfer the active
microphone back and forth
between
COMI
and
COM2.
Pressing
the
remote
swirch
will
have
no effect
ifCO\,13
is
the active transceiver. Ask
your installing
agency for details.
Aircraft
Radios
ôr Navigation
Audio level is controlled by the selected
NAV
radio volume controL
Pressing
NAVI,
NAV2, DME, ADF (16),
or
MKR
(2)
(see
MKR
Beacon
Receiver)
selects each
audio source. A
second
button
press deselects
the
audio. ln addition,
the GMA 340 provides
inputs
for
an
unswitched aircraft radio
(TEL RINGER) and an
un-muted,
unswitched
aircraft radio
(ALT
WRN).
Speaker
Output
Pressing the
SPKR
button
(
I
2) selects the
aircraft radios
over the
cabin speaker.
The speak-
er
output
is
muted when
a
COM microphone
is
keyed.
The
GlvfA
340
speaker
output
level
can
be
adjusted by
your
installing
agency.
PA
Function
The
PA
mode is
activated
by presing
the
PA
button
(ll).
Then, when either the pilot's or
copilot's microphone is keyed, the corresponding
mic
audio is heard over the cabin
speaker.
If
the
SPKR
button
is
also
active, then
any selected speaker
audio
is
muted
while
the microphone
is
keyed.
The
SPKR
button
does
no¿
have
to
be previously active
in
order to
use
the
PA
function.
Pilot
and
copilot
PA
microphone speaker
levels are
adjustable
by
your
installing
agency.
Auxiliarv
Entertainment
Inputs
The GMA 340
provides
two
stereo
entertainment inputs:
MUSICI
and
MUSIC2. MUSICI
is
soft-muted during all aircraft radio activity and normally
during
ICS
activity
MUSIC2
is a
non-
mured
input.
These
inputs
are
compatible
with popular
portable entenainment
devices
such
as
cas-
seue tape
or
CD players.
The
headphone
outputs
of
these devices
are
used
and plugged into
MUSICT
or MUSIC2.
Two 3.5
mm
stereo
phone jacks
should
be
installed
in
a
convenient location
for this
purpose. MUSICI
and MUSIC2
have
characteristics that
are affected
by the active intercom
mode.
Refer
to
the table on
page 5.
Intercom
Svstem
(ICS)
Intercom volume and squelch
(VOX)
are
adjusted using the
following front
panel knobs:
.
LEFT SMALL
KNOB-Unit
ON/OFF power
control
and Pilot
ICS
volume. Full
CCW detent
position
is
OFF
.
LEFT
tltRGE KNOB-Pilot
ICS
mic
VOX
squelch
level.
CW ¡otation
increases
the amount
of mic audio (VOX
level)
required to
break
squelch.
Full
CCW
is the
"HOT
MlC"
position
(no squelch).
.
RIGHT SMALL
KNOB-IN
position: Copilot ICS volume.
OUT
position:
Passenger ICS
volume.
.
RIGHT
LIIRGE
KNOB-Copilot
and
pasenger
mic
VOX
squelch
level.
CW
rotation
increases
the
amount of mic audio (VOX
level)
required to
break
squelch. Full
CCW
is the
"HOT MIC"
position.
Each
of
rhe
six microphone inputs
have dedicated
VOX circuits to
ensure
that only
the active
microphone(s) iVare heard
when
squelch is
broken.
This
represens
a
vast improvement over the
panyline
systems
and reduces the
amount
of background noise
in
the headphones
during cockpit
communications. After
the operator
has
stopped
talking,
the inte¡com channel remains momentar-
ily
open
to
avoid closure between words
or normal
pauses.
The GMA
340
provides three intercom modæ:
PILOI
CREW
and
ALL.
Mode
selection is
accompìished using the PILOT and/or CREW
buttons.
Presing
a
mode
button
activates
the
cone-
sponding
ICS
mode.
Pressing
again deactivates the
mode.
The
ALL mode
is active
when
neither
PILOT nor
CREW LEDs
are
lit.
To
switch from PILOT
to
CREW mode,
press
the CREW
button;
from
CREW
to
PILOI
press
the PILOT
button.
An
LED
ON
indicates the isolation mode
is active.
il
I
T
