CYKLOP C25 User Manual - Page 7
Browse online or download pdf User Manual for Dispenser CYKLOP C25. CYKLOP C25 8 pages. Electronic gummed paper dispenser
Also for CYKLOP C25: Operating Instructions Manual (13 pages)
E N G L I S H
TABLE OF CONTENTS
Technical data
Attention!
General remarks
Machine description
Preparation
Mounting and filling the bottle
Control of moistening and water level
Loading of the tape roll
Operating instructions
Maintenance and care
TECHNICAL DATA MAIN FEATURES
Dimensions of machine:
45x29x25 cm. approx.
Weight of machine: 13 Kgs. approx.
Voltage and frequency: see machine label
Control circuit in DC 24 Volts
Electrical power: 100 W
Dispensing velocity: 55m./min.
Length: min. 100 mm./ max. 1150 mm.
Sound level measured in room: less than
70 dB(A)
TYPES OF GUMMED TAPE All
PAPER FEATURES
Width: min. 20 mm./ max. 100 mm.
Maximum roll diameter: 200 mm.; with device
for bigger rolls (supplied on request) 300 mm.
ATTENTION!!
- Before using this machine carefully
read the operating instructions. They
contain important indications on instal-
lation safety, use and maintenance.
- Keep this booklet with care for any further
reference. It's customer responsibility to
make sure that the personnel who will use
the machines reads and understands this
booklet.
- The builder cannot be made responsible
for eventual damage to people, animals or
things deriving from non observation of the
safety norms and the warnings here
contained.
GENERAL REMARKS
- Follow the safety and prevention rules for
accidents
and fires
issued
by the
competent
authorities, such
as the
eventual recommendations of industrial
associations and trade unions in terms of
personnel safety.
- This tape dispenser is designed and
manufactured only to dispense gummed
tape. A different use from that advised is
not considered specific. CYKLOP will not
assume any responsibility following an
improper use of the machine.
- After unpacking check the integrity of the
machine. In case of doubt do not use the
machine and enquire directly to the
reseller.
- Verify that the voltage of the machine is
the same as the one you are about to use.
Otherwise do not use the machine and
enquire directly to the reseller.
- The electrical safety of this machine is guar-
anteed only when it is correctly connected to
a grounded electrical system as prescribed
by the present electrical safety rules.
- When you disconnect the machine from
the electrical plug, always pull by seizing
the plug not the cable.
- Never touch or operate the machine with
wet hands or barefoot.
- Do not leave the machine on for long
periods of time. Turn off the main switch of
the machine when it is not being used.
- Keep the machine away from children
and from personnel who are not authorised
or adequately instructed in the use of it.
- The use of the machine, as prescribed by
the builder, also includes the respect of the
rules of inspection, maintenance and
repair.
- Some parts of the machine reach
dangerous temperatures and therefore they
should NEVER be touched with the hands.
The top heater, if functioning, can reach a
high temperature (100°C).
- Keep the machine always in good status,
clean and dry.
- The machine performs better in a rather
dry environment, therefore we discourage
usage in damp places. Working with
gummed paper in humid places can create
problems; it performs better in dry places.
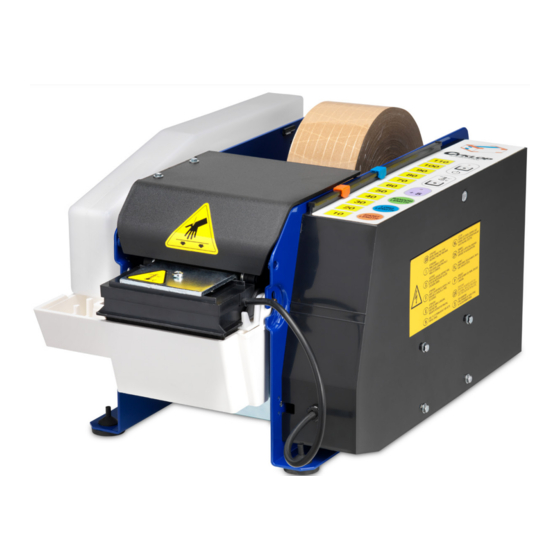
MACHINE DESCRIPTION
ASSEMBLY (Fig. 1)
A
Main cable and plug
B
Side cover
C
Main light switch
D
Switch-board
L
Top Heater
M
Water tank
I
Top heater switch
N
Water bottle
•
OPERATING ELEMENTS
E
Green pushbutton 'free length' - it
dispenses
tape
continuously
until
released.
F
Pushbuttons for dispensing 11 pre-set
lengths of tape
G
+5 pushbutton: it increases pre-set
lengths by 5 cm.
H
'SHORT LENGTH' sets one short length
of tape - 'LONG LENGTH' sets one
length of tape longer than the first one
Q
Colored indicators.
PREPARATION
Brush.
- Before using a new dispenser, wash the
moistening brush with water and soap.
Rinse it with water.
- After inserting the brush in the water tank,
proceed to mounting the water tank itself
following the operations below.
Switching the machine on.
- Insert main plug into proper outlet and
switch the machine on.
Loading of water tank (Fig. 2).
- With the right hand keep the green button
pressed.
- Take the water tank with the left hand and
insert the pivot in the proper seats as
indicated by the arrow.
- Turn the water tank following the arrow
direction on picture 2 till it touches the back
part of the machine.
- Lower the water tank till it locks into
position. Release green button.
- To remove the water tank keep the green
button pressed with the right hand and lift it
with the left one and, by rotating it remove
it from its seat.
Mounting of top heater.
- Place the top heater (L) in the water tank,
above the moistening brush, in its proper
housing.
MOUNTING AND FILLING THE BOTTLE
(Fig. 3 and 4)
- Mount the bottle holders (black plastic
U-shaped parts) on the left side of the
machine, inserting at first the upper tooth in
its housing and then the lower one until it
locks into position as shown in fig. 3.
- Fill the bottle through the hole with clean
water. Put a finger on the hole and place the
bottle in its housing with hole on the tank.
SUGGESTION: the machine works with
drinkable water. Do not use water with
carbonates; for safeguarding some parts
we suggest demineralised water.
In case drops of water fall on the machine
immediately wipe it dry.
CONTROL
OF
MOISTENING
AND
WATER LEVEL (Fig. 4)
- Before removing the bottle, make sure
that it does not contain water, otherwise