Aseptico AHP-85MB-X Operation And Maintenance Manual - Page 9
Browse online or download pdf Operation And Maintenance Manual for Medical Equipment Aseptico AHP-85MB-X. Aseptico AHP-85MB-X 16 pages. Dental implant systems
Also for Aseptico AHP-85MB-X: Instructions For Use (2 pages)
Customizing Presets
The Preset segment
of the screen will flash if you have made any
adjustments to the settings of the current preset:
To clear any adjustments made to the current preset, simply press
and immediately release the flashing Preset segment
screen.
To save the adjustments that you have made (to customize the
current preset), press and hold the flashing Preset segment
the screen until you hear a beep. You may write down the settings
for your custom presets in the blank tables on page 15.
Factory Restore
To restore all presets to their factory settings:
1 .
Press the Torque segment
2 .
Press and hold the "CAL" button that appears between the
and buttons until you hear a beep.
3 .
Press and hold the flashing "RECALL" button that appears in the
Preset segment
of the screen until you hear another beep.
The factory settings have been restored for all presets (all user
customized presets have been erased).
4 .
To cancel the factory restore procedure, press anywhere on
the right side of the screen before completing step 3 above.
Calibrating Handpieces
Because the mechanical condition of motors and handpieces
changes over time, it is recommended that you calibrate hand-
pieces every time you power up the unit and especially when you
change handpiece models:
1 .
Confirm that the correct handpiece ratio is selected for the
current handpiece in use. See the Speed / Ratio section
(page 8) to change the ratio setting, if necessary.
2 .
Insert a drill, bur or file into the handpiece.
3 .
Position the handpiece in the cradle so that the drill/bur/file
can rotate freely without touching anything.
4 .
Press the Torque segment
5 .
Press the "CAL" button that appears between the and
buttons to start the calibration process. The CAL button will
flash and the motor will run through several speed changes,
then stop.
6 .
If calibration is successful, the CAL button will stop flashing
when the motor stops.
If the CAL button continues to flash after the motor stops,
calibration has failed. Try calibrating again. Repeated
failures can indicate a dirty, damaged or defective
handpiece and/or a motor in need of repair or replacement.
7 .
Press anywhere on the right side of the screen to return to the
home screen.
AEU-1070-70V / AEU-1070
of the
of the home screen.
of the home screen.
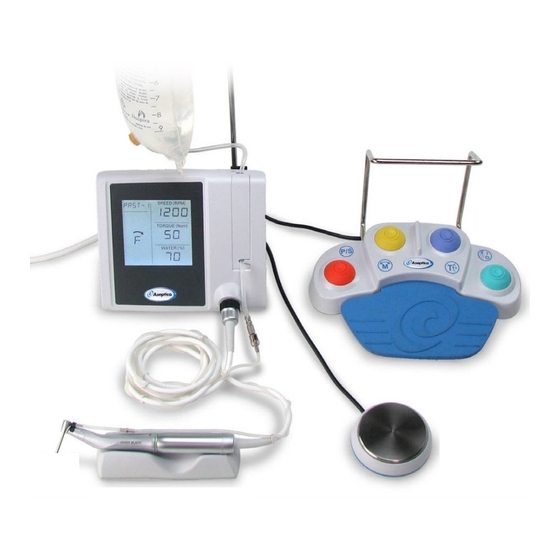
This section explains how to operate the unit using either the AE-70V2
or AE-7PM foot controller.
AE-70V2 Foot Controller
The AE-70V2 foot controller provides multiple-function control of
the system.
of
VARIABLE SPEED PEDAL — This pedal activates the motor and
irrigation pump simultaneously. The motor speed varies (up to
the current Speed setting) in proportion to how far down you
press the pedal. The irrigation pump activates at the current
water setting, regardless of how far down the pedal is pressed.
PRESET — Press repeatedly to step through each of the
presets sequentially. This provides the same function as
pressing the Preset segment
the touch screen.
MOTOR DIRECTION — Press to alternate between
forward and reverse. This provides the same function as
pressing the Motor Direction icon
on the touch screen.
HANDLE — Use to manually position the foot
controller. Install the handle by inserting the
handle prongs into the holes on the rear of the
foot controller.
TORQUE STEP-INCREASE — For 20:1 handpieces,
press to increase the torque setting in 2 Ncm steps for a
maximum of 5 consecutive steps (or until the maximum
torque setting is reached). On the sixth press (or the press after
the maximum torque setting is reached), the torque setting
will return to the original, lowest setting.
WATER ON-OFF / STEP-INCREASE — Press to switch
the irrigation pump on-off. When the pump is switched
off, the Water segment
display "— —" instead of 0%. Press and hold this button to
step through the water settings in +10% increments; the steps
occur at 1-second intervals with a beep sounding to signal
each step.
OPERATION
(page page 8) on
(page page 8)
(page 8) of the screen will
9