Nikon FSB-5 Gebruiksaanwijzing - Pagina 2
Blader online of download pdf Gebruiksaanwijzing voor {categorie_naam} Nikon FSB-5. Nikon FSB-5 2 pagina's. Fieldscope digital camera bracket
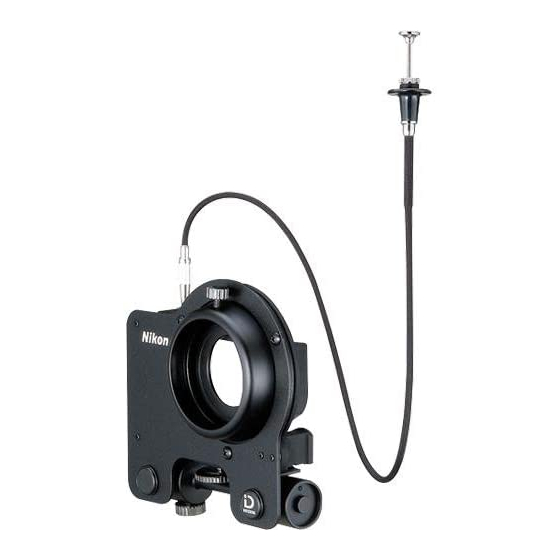
Thank you for purchasing Nikon's Fieldscope Digital Camera Bracket for the COOLPIX
S series. Using your digital camera in combination with a Fieldscope enables you to
take super-telephoto digital pictures. Furthermore, when used in combination with a
Nikon EZ-Micro Fieldmicroscope this bracket enables photomicroscopy.
Items supplied
• Bracket x 1
• Cable release (50cm) x 1
• Bracket ring FSBR-5 x 1 (comes attached to the bracket)
Note: Bracket ring FSBR-5 cannot be used with other brackets.
1 Cable release socket
2 Bracket fixing screw
3 Eyepiece lens socket
4 Bracket ring (FSBE-5)
5 Body
6 Light interception hood
Attaching the FSB-5 to a digital camera
1. Setting up the digital camera
• Preparations for use (Fig. A)
1) Adjust the positioning block (7) to fit your particular COOLPIX digital camera.
a) Pull up the positioning block (7) to allow it to be rotated. (Fig. a)
b) Referring to the "Number and COOLPIX digital camera" information shown
immediately below, rotate the positioning block to adjust the number. (In Fig. b, it
is set to "1".)
c) Push back the positioning block (7) to complete the setting.
Number and COOLPIX digital camera
1: S6, S7, S7c
2: S9
2) Push the shutter button (8), as shown in Fig. d.
• Setting up
1) Slide the COOLPIX to the left, then lightly fasten the camera mount screw (!w) to secure
the position. The camera mount (!p) should remain movable. (Fig. B)
2) Adjust the position of the camera mount (!p), then, while keeping the COOLPIX pressed
against the positioning block (7), fit the projection on the mount into the base of the
COOLPIX. (Fig. C)
3) While keeping the COOLPIX pressed against the positioning block (7), tighten the
camera fixing screw (!w). (Fig. D)
4) Press the COOLPIX against the positioning plate (9) and tighten the camera mount screw
(!q) to secure the COOLPIX in place. (Fig. E)
2. Removing the digital camera (Fig. F)
1) Release the camera mount screw (!q).
2) Next, release the camera fixing screw (!w) until it leans as shown in the photo.
3) While taking care to avoid touching the shutter button (8), remove the COOLPIX from
the camera mount (!p).
3. Removing bracket ring FSB-5
1) Remove the FSB-5 by inserting a finger in the ring from the side of eyepiece lens socket
(3) and pulling.
2) The FSB-5 can be removed by pushing the area marked ★ in Fig. F.
Notes:
• Do not tighten the camera mount screw (11) or the camera fixing screw (12) excessively.
• Even when the shutter button is not placed over the center of the COOLPIX shutter release
button of, you can shoot. If you are unable to do so, realign your COOLPIX with the FSB-5.
1 Screw the eyepiece (A or B) into the eyepiece
socket.
2 Attach the assembly in C to the eyepiece or the EZ-
Micro Fieldmicroscope.
* While fixing it in place, keep the bracket pressed.
With the 16x/24x/30x Wide DS Eyepiece, attach the
bracket ring FSBR-5 to the bracket FSB-5.
• Press the bracket ring against the bracket until the
black rubber ring snaps into the groove on the
bracket.
• If the bracket ring is not attached or not attached
securely, shade may appear in the four corners of the
image.
With other eyepieces, remove the bracket ring FSBR-5.
• The bracket ring can be removed by inserting a
finger in the ring and pulling. (It may be tight due to
resistance from the rubber.)
• If the bracket ring is not removed, the four corners of
the image will appear more shaded.
A Wide MC or MC II Zoom Eyepiece with FSA-1
and FSA-2 attached.
B Fieldscope Eyepiece (16x/24x/30x, 27x/40x/50x,
40x/60x/75x) Wide DS.
C COOLPIX S series (except S2, S4, S10) with
Digital Camera Bracket FSB-5 attached.
[Focal length (35mm [135] format equivalent) with FSB-5] = [Focal length (35mm [135] format equivalent) of the COOLPIX S series (except S2, S4, S10)] x [magnification of eyepiece]
Nomenclature
7 Positioning block
8 Shutter button
9 Positioning plate
!p Camera mount
!q Camera mount screw
!w Camera fixing screw
3: S5, S8
4: S1, S3
Fieldscope
Use the following COOLPIX settings. Keep other settings at their original default positions.
• With [MENU]
Image mode
Continuous
AF area mode
Sensitivity (ISO)
• With [SET UP]
AUTO OFF
AF assist
Blur warning
• Focusing
Focus first using controls on the Fieldscope or EZ-Micro, then make fine adjustments with the
camera's AF function.
• Shooting
Use the cable release, depressing it gently.
• Camera zoom setting
When shooting with the zoom at a wide-angle setting, depending on the type of eyepiece you
are using, the four corners of the image may appear shaded, giving it a rounded appearance.
With the MC or MC II Zoom Eyepiece, we recommend using the maximum telephoto setting.
• When the AF lamp does not turn on
After locking the focus by pressing the shutter release button halfway, set the focus by
adjusting the focus ring on the Fieldscope or the focus knob on the EZ-Micro while viewing the
LCD monitor. This turns on the AF lamp.
Notes for shooting
• Use a solid tripod during super-telephoto or super-closeup shooting to ensure steady images.
• Beware of camera shake as small vibrations at high magnification can ruin a photograph.
• With super-telephoto or super-closeup shooting, it may be difficult to obtain a precise focus
with the camera's AF function. We recommend that you take a series of pictures of the same
subject in sequence, to ensure that you capture the desired image.
If vignetting occurs
• If vignetting occurs at the right edges of your images or in the camera's LCD monitor, the
camera may not have been correctly attached to the equipment. Re-attach the camera and
confirm proper camera alignment while viewing the LCD monitor.
• In wideangle, vignetting may occur with any COOLPIX digital camera.
Note for carrying
• For carrying or transport, we recommend that you remove the bracket from the lens or EZ-
Micro Fieldmicroscope.
Fig. a
7
Fig. b
Fig. A
!p
Fig. C
!q
Fig. E
Attachment
A
Wide MC or MC II Zoom Eyepiece +
FSA-1&-2
1
B
Fieldscope Eyepiece
16x / 24x / 30x Wide DS
27x / 40x / 50x Wide DS
EZ-Micro
40x / 60x / 75x Wide DS
Camera settings
FINE
Continuous
Manual (Not available on some COOLPIX models.)
50
5 minutes
OFF
OFF (Not available on some COOLPIX models.)
Setting for shooting
8
(Fig. c) When
the button is
not pushed.
(Fig. d) When
the button is
pushed.
!w
!w
!w
C
COOLPIX S series (except S2, S4, S10)
+
Digital Camera Bracket FSB-5
2
Bracket ring FSBR-5 for
16x/24x/30x Wide DS
Eyepiece
Fig. B
Fig. D
8
!q
Fig. F