Aquatec OCEAN XL Руководство по эксплуатации - Страница 6
Просмотреть онлайн или скачать pdf Руководство по эксплуатации для Инвалидное кресло Aquatec OCEAN XL. Aquatec OCEAN XL 10 страниц. Commode
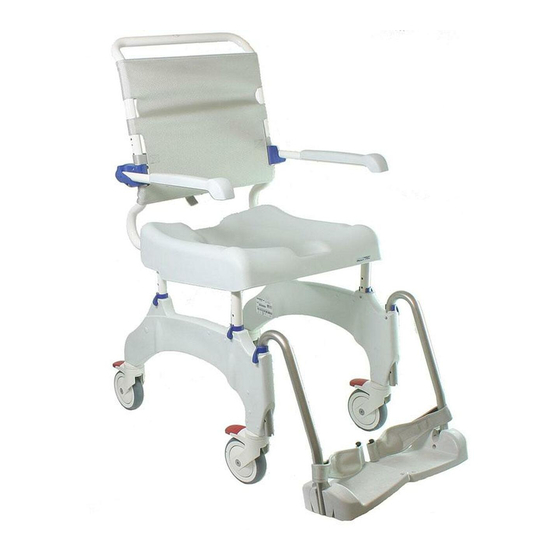
5.1.2
Fitting the backrest
1.
Lock all four casters. To do this, push down the
red foot pedal for the casters.
Important!
When folded up, the armrests must face for-
ward.
2.
Push the backrest (4, fig. 4) down into the seat
frame (5, fig. 4) until the collar (3, fig. 4) touches
the seat frame tube (6, fig. 4).
Important!
P
The round section of the curved washers
must touch the seat frame tube.
P
Tighten the screws using the Allen key sup-
plied.
3.
Push a washer (2, fig. 4) onto each screw (1,
fig. 4) and fasten the backrest with two screws on
either side.
5.1.3
Fitting the footrests
Important!
The procedure is the same for the right and the
left footrests.
1.
Push the footrest (2, fig. 5) and the footplate (4,
fig. 5) inwards to the guide (7, fig. 5) on the front
of the side section (8, fig. 5) until the groove (1,
fig. 5) catches the pin on the clip (6, fig. 5). The
footrests can no longer be turned to the sides.
5.2
Fitting and removing the grip wheels
(optional)
Important!
P
When the grip wheels are fitted, the rear
casters must be locked.
P
The procedure is the same for the right and
the left wheels.
P
The hubs and locking brakes for the grip
wheels must have been fitted.
1.
Align all four casters to the front.
2.
Lock all the casters.
3.
Push the axle (4, fig. 6) on the grip wheel inwards.
(The grip rings must face outward.)
4.
Push in the button (5, fig. 6) on the outside of the
axle.
This releases the locking balls (3, fig. 6) on the end of
the axle.
5.
Slightly raise the commode.
6.
Push the axle into the hub (2, fig. 6) and push on
the grip wheel (6, fig. 6) as far as it will go.
7.
Release the button.
12
The locking balls are pushed outwards and should be
behind the hex nut (1, fig. 6).
8.
Pull out the grip wheel to check that it is securely
locked.
The wheels can be removed in the reverse order.
6
Operation
6.1
Adjusting the seat height
Important!
P
The seat height must be adjusted to suit the
user. As a rule, the seat height is correctly
adjusted when the user is sitting on the
commode and both feet touch the ground.
P
The height must be adjusted by the same
amount on both sides.
P
Do not adjust the seat height of the com-
mode when someone is sitting on it.
1.
Hold the seat frame and slightly lift the commode
to one side.
2.
Take out both clips (6, fig. 3) on that side.
3.
To adjust the seat height, pull the seat frame out
of the side section or push it in (10, fig. 1).
4.
Push in both clips completely.
5.
Raise the other side and repeat the procedure so
that the seat height is the same.
6.2
Adjusting the height of the footrests
1.
Pull up the footrest (2, fig. 5) slightly.
2.
Pull out the clip (6, fig. 5) and put it in again at the
required position. Pull out the footrest slightly fur-
ther if necessary.
3.
Push down the footrest until the groove (1, fig. 5)
catches the pin of the clip (6, fig. 5).
4.
Set the other footrest to the same height as de-
scribed.
6.3
Adjusting the backrest cover
The backrest tension can be individually adjusted.
Tensioning:
Tighten the belts (1, fig. 7) of the backrest cover.
Loosening:
1.
Open the belt locks (2, fig. 7) by pressing the lugs
(arrow, fig. 7).
2.
Push the belt back through the lock.
3.
Close the belt locks.
4.
Slightly tension the belt.
EN