Pioneer A-607R Servis Kılavuzu - Sayfa 26
Amplifikatör Pioneer A-607R için çevrimiçi göz atın veya pdf Servis Kılavuzu indirin. Pioneer A-607R 29 sayfaları. Stereo amplifier
- 1. Table of Contents
- 2. Safety Information
- 3. Exploded Views and Parts List
- 4. Schematic Diagram
- 5. Pcb Connection Diagram
- 6. Pcb Parts List
- 7. Adjustment
- 8. General Information
- 8. IC Information
- 8. Block Diagram
- 9. Specifications
- 9. Panel Facilities and Specifications
- 9. Front Panel
- 9. Remote Control Unit
A-607R
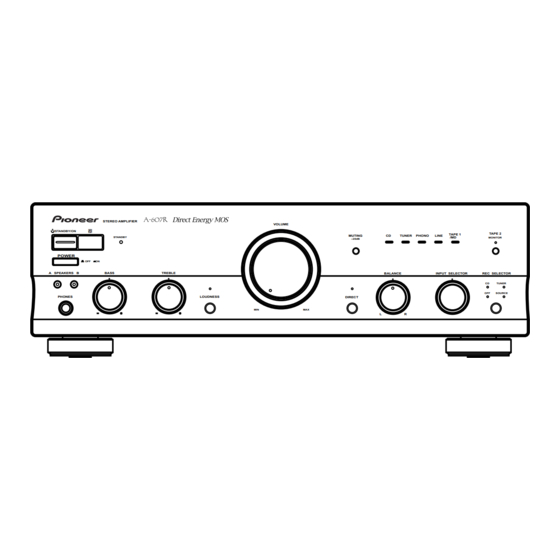
8.2 FRONT PANEL
3
STEREO AMPLIFIER
Î
STANDBY/ON
2
1
POWER
OFF
ON
A SPEAKERS B
BASS
#
@
PHONES
!
~
1
POWER (
OFF/
Press to turn power to the unit ON and OFF.
2
STANDBY/ON switch/indicator
This is the switch for electric power.
This switch does not function unless the POWER
ON switch is set to ON.
ON
: When set to the ON position, power is supplied
and the unit becomes operational.
STANDBY : When set to the STANDBY position, the main
power flow is cut and the unit is no longer fully
operational. A minute flow of power feeds the unit
to maintain operation readiness.
When the STANDBY indicator lights, the unit is
in STANDBY.
NOTE:
When performing timer recording with this unit, be sure to set
the POWER and STANDBY/ON switch to ON.
3
Remote control sensor window
4
VOLUME control
Use to adjust the volume level.
NOTE:
The TONE effect functions regardless of volume levels.
5
MUTING button/indicator
Use to temporarily lower sound volume.
On
: The VOLUME indicator flashes. The sound volume is low-
ered to one-tenth (–20dB).
Off
: The VOLUME indicator lights. The sound will return to its
previous volume.
26
STANDBY
TREBLE
LOUDNESS
VOLUME indicator
=
-
ON) switch
OFF/
5
4
VOLUME
MUTING
CD
–20dB
BALANCE
DIRECT
MIN
MAX
L
9
0
6
INPUT SELECTOR knob/indicators
Turn the knob clockwise or counterclockwise so that the indica-
tor lights for your desired input source. Turning the knob clock-
wise causes the lit indicator to right. Turning counterclockwise
causes it to left.
CD
: For compact disc playback with a CD player.
TUNER
: For AM or FM broadcast reception with a tuner.
PHONO
: For record playback with a turntable.
LINE
: Set to this position when listening to a program
TAPE 1/MD : For playback with a cassette deck or MD re-
7
TAPE 2 MONITOR button/indicator
Use when there is an adaptor component (graphic equalizer,
etc.) or cassette deck connected to the TAPE 2 MONITOR ter-
minals.
Off : Indicator goes out when not in use.
On : Indicator lights when using the adaptor component or
listening to the cassette deck.
NOTE:
When no connections are made to the TAPE 2 MONITOR ter-
minals, or when they are not in use, be sure to set this switch to
the off position. (No sound will be heard if it is set to the on
position.)
6
TAPE 2
TAPE 1
TUNER
PHONO
LINE
/MD
MONITOR
INPUT SELECTOR
REC SELECTOR
CD
TUNER
OFF
SOURCE
R
from a component connected to the LINE ter-
minals.
corder connected to the TAPE 1/MD terminals.
7
8