Free The Tone FF-1Y Посібник користувача - Сторінка 8
Переглянути онлайн або завантажити pdf Посібник користувача для Обладнання для запису Free The Tone FF-1Y. Free The Tone FF-1Y 12 сторінок. Rf phase modulation delay
Також для Free The Tone FF-1Y: Посібник із швидкого старту (2 сторінок), Процедури оновлення прошивки (10 сторінок)

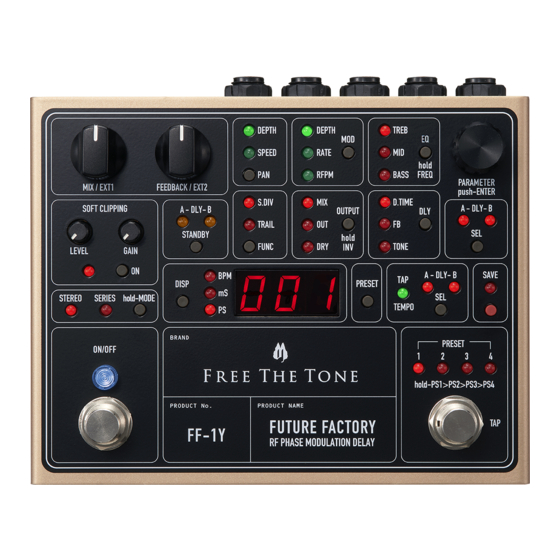
Modulation Function
The FF-1Y can apply a modulation effect to the delay sound to make it more spacious.
1. Press the A-DLY-B SEL switch to select the delay (A, B, or A+B) to which you want to apply the modulation effect.
2. Press the MOD switch to flash the DEPTH, RATE, or RFPM LED.
3. Turn the PARAMETER encoder to adjust the parameter.
4. Press the PARAMETER encoder to accept the change.
NOTE
In general, the phase of a low frequency oscillator (LFO) used in modulation circuits changes regularly at a preset frequency. However in
the FF-1Y, we succeeded in creating a new modulation sound with a unique method — RFPM (Random Fluctuating Phase Modulation) —
in which the signal's phase changes at random when the signal crosses a certain attenuation level. This creates an unprecedented effect in
which a fluctuating spacious sound seems to float in the air. (This function works best when used in Stereo mode.)
By increasing the RATE value, the modulation speed is increased. By increasing the DEPTH value, the modulation is applied more deeply
(strongly).
3-Band Equalizer Function
The FF-1Y implements a frequency-selectable 3-band equalizer for the delay sound. This allows you to create delay
sounds suitable not only for guitars/basses but also various other instruments.
When Delay Units A and B are in Stereo Connection Mode (EQ is applicable to both A and B)
1. Press the A-DLY-B SEL switch to select the delay (A, B, or A+B) whose EQ you want to set.
2. Press the EQ switch to flash the TREB, MID, or BASS LED.
3. Turn the PARAMETER encoder to adjust the parameter.
4. Press the PARAMETER encoder to accept the change.
When Delay Units A and B are in Series Connection Mode (EQ is applied to B)
1. Press the A-DLY-B SEL switch (LED status can be A, B, or A+B).
2. Press the EQ switch to flash the TREB, MID, or BASS LED.
3. Turn the PARAMETER encoder to adjust the parameter.
4. Press the PARAMETER encoder to accept the change.
Selecting Frequency to be Adjusted by 3-Band Equalizer
1. Press the A-DLY-B SEL switch (LED status can be A, B, or A+B).
2. Press the EQ switch for about 2 seconds.
3. Press the EQ switch to flash the TREB, MID, or BASS LED.
4. Turn the PARAMETER encoder to adjust the parameter.
5. Press the PARAMETER encoder to accept the change.
NOTE
The frequency setup is stored as an entire setting, not stored in each preset.
14
Useful Features
Tap-Preferred Mode
In Tap-Preferred mode, the preset is recalled by applying the tempo information lastly entered via the footswitch. Even
if presets are switched after entering a tempo by tapping, the tempo information remains the same.
1. Simultaneously press the ON/OFF and PRESET SELECT/TAP switches for about 2 seconds.
2. Release the switches when the display shows "TAP."
NOTE
In Preset-Preferred mode (factory default), the BPM value and delay time stored in the recalled preset are recalled. By performing the
above-mentioned operation, Tap-Preferred and Preset-Preferred modes switch alternately. In Tap-Preferred mode, your tempo change is
applied to the delay unit (A, B, or A+B) selected by the A-DLY-B TAP SEL switch, within the recalled preset.
Assigning Functions to MIX/EXT1 or FEEDBACK/EXT2 Knob
Various functions can be assigned to the MIX/EXT1 and FEEDBACK/EXT2 knobs to change their parameters.
1. Press the A-DLY-B SEL switch (LED status can be A, B, or A+B).
2. Press the switch for the function you want to assign to flash its LED.
3. While holding down the PRESET switch, turn the MIX/EXT1 or FEEDBACK/EXT2 knob.
NOTE
When a function is assigned to the MIX/EXT1 or FEEDBACK/EXT2 knob, the knob controls the parameter of the delay unit (A, B, or A+B) selected
by the A-DLY-B SEL switch. Functions can be applied to each preset.
List of Assignable Functions p.20
Assigning Functions to EXT Terminal
After assigning a function to the EXT terminal and connecting an expression pedal or external footswitch (momentary
type) to it, you can change FF-1Y's parameters by using that external controller.
1. Press the PRESET switch for about 2 seconds.
2. The display shows the function assigned to the EXT terminal.
3. Turn the PARAMETER encoder until the desired function is shown in the display.
4. Press the PARAMETER encoder to confirm.
List of Assignable Functions p.20
Calibrating Expression Pedal Connected to EXT Terminal
The expression pedal connected to the EXT terminal can be calibrated. By calibrating it, you can control the operation
precisely from the minimum to maximum values. Please use an expression pedal with the resistance value ranging
from 10kΩ to 50kΩ.
1. Turn on the power the unit while holding down the PRESET switch.
2. Release the switch when the display shows "CLb."
3. Press the PARAMETER encoder to execute the calibration.
4. When "Hi" is shown, set the pedal to its toe side end (max.) position and press the PARAMETER encoder to confirm.
5. When "LO" is shown, set the pedal to the heel side end (min.) position and press the PARAMETER encoder to confirm.
NOTE
When "Err" is displayed, check the expression pedal or connecting cable.
15
