CRU Dataport RTX430-3QR Посібник користувача - Сторінка 4
Переглянути онлайн або завантажити pdf Посібник користувача для Корпус CRU Dataport RTX430-3QR. CRU Dataport RTX430-3QR 9 сторінок.
Також для CRU Dataport RTX430-3QR: Посібник із швидкого старту (2 сторінок)

3.2 Connecting and Powering the RTX430-3QR
The RTX430-3QR has one USB3 port, one eSATA port, two FireWire
800 ports, and one configuration switch on the rear of the unit.
a. Choose one of the connection types and connect the applicable
cable from your computer to the corresponding port on the RTX.
b. Connect the power cord to the unit and the other end to a grounded
electrical outlet.
c. If you're using USB, make
sure the USB Mode Switch is
set to USB 2.0 or 3.0 to match
the USB connection type used
to connect the RTX enclosure
to your computer.
d. With the hard drives in the unit, flip the power switch to turn on the
RTX enclosure.
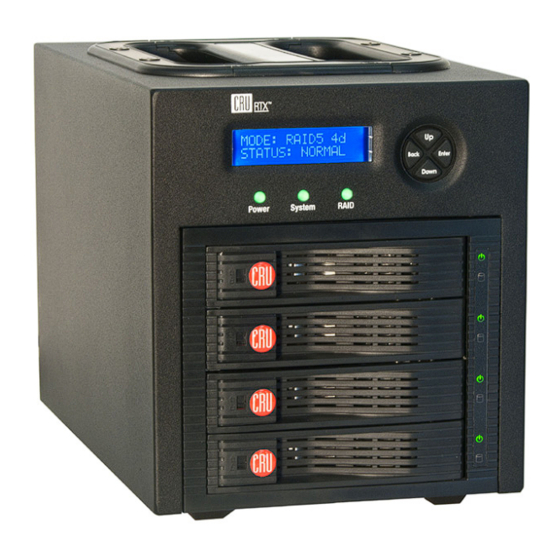
4 LED Behavior
LED
Unit Power
Glows green when the power switch is in the "on" position.
System
• Glows green when system is performing as expected.
• Glows amber when a drive or the enclosure interior reaches the
preset warning temperature.
• Glows red when a drive or the enclosure interior exceeds the
preset warning temperature.
RAID
• Glows green when system is performing as expected.
• Glows amber when the RAID is degraded or is being rebuilt.
• Glows red when the RAID has failed or is invalid.
Drive Power
Glows green when the drive is in the unit and receiving power.
Drive Activity
Glows amber* when the drive is being accessed, either reading or
writing from the drive.
* The Drive Activity LED is controlled directly by the hard drive. When certain models of
hard drives are used, the amber glow may remain constant or will not light. This is consid-
ered normal operation.
5 LCD Menu Screens
Use the Navigation Buttons to change screens.
Screen
Mode
Shows the RAID level used.
Status
Indicates the overall health of the RAID. Available status messages
are Normal or Degraded.
Disk#
Indicates the status of the individual disk in the numbered hard drive
slot:
•
OK: Indicates that the hard drive is in use or ready to use
•
No Disk: Indicates that the hard was removed or not installed
(continued, next column)
Behavior
Description
Screen
Disk#,
Indicates the status of the individual disk in the numbered hard drive
continued...
slot:
•
Unused: A new drive was installed and is not used by the RAID
•
Failing: Indicates the drive is malfunctioning. Possible causes
of a failure message include an inability to recognize the drive,
a compatibility problem, or damaged sectors.
Disk# Temp
Displays temperature of the individual disk in the numbered slot.
Sys Temp
Displays overall temperature inside the system.
Fan Status
Indicates whether the fan is operating normally or has failed and is in
need of a replacement. Contact Technical Support if the fan has failed
to arrange for a repair.
Change RAID
Allows you to change the RAID level (see section 6.2).
Mode
6 RAID Configuration
You may skip this section if you purchased the RTX430-3QR pre-config-
ured with drives. The RTX430-3QR ships with RAID 5 as the default mode.
The RTX430-3QR offers four options for RAID configuration. See section
2.1 for details on the available options. Stop all data transfers before set-
ting or changing RAID types or rebuilding a degraded array. Failure to do
so can result in the loss of data. To set up or change the RAID type,
disconnect all data cables and reboot the RTX enclosure. After the unit
has initialized, the LCD will display the drives' mode and status.
6.1 Creating a New RAID
Use the LCD and menu selection buttons to complete these steps if
you did not purchase your unit pre-configured. Changing RAID levels
will erase any data on the drives. Make a backup copy of any
data you wish to keep before changing the RAID.
a. Disconnect the RTX enclosure from the computer.
b. Insert four hard drives (preferably all the same make, model, and
capacity) into the RTX enclosure and flip the power switch on the
rear of the unit.
c. After the RTX enclosure boots up, it will begin alarming and the
LCD will display the error "Error: Not a RAID Set". Press the Enter
button to silence the alarm.
d. Press the Enter button a second time and the LCD screen will ask
"Make New RAID?" Press Enter to confirm.
e. The LCD will display "Select RAID Type". Press Up or Down to
cycle through to your desired RAID type and press Enter.
f. The screen will display "Will Erase all Data OK?" Pressing Enter
will result in the loss of all data on the drives. Ensure all data
is backed up, then press Enter.
g. The new configuration will be selected and the RTX enclosure will
reboot. The RAID is now created.
Description
Page 4
