Distech Controls IO-R-34 Посібник - Сторінка 5
Переглянути онлайн або завантажити pdf Посібник для Блок управління Distech Controls IO-R-34. Distech Controls IO-R-34 19 сторінок. Remote module
Installation and Start-up Outline
WEEE (Waste of Electrical and Electronic Equipment)
Recycling of Electronic Products: (International Installations):
In 2006 the European Union adopted regulations (WEEE) for the collection and recycling of all waste electrical and
electronic equipment. It is no longer allowable to simply throw away such equipment. Instead, these products must
enter the recycling process. To properly dispose of this product, please take it to a local recycling center. If a local
recycling center cannot be found, please return it to one of these offices:
http://www.distech-controls.com/Contact/Contact.html
Installation and Start-up Outline
If installing the EC-BOS-8 and IO-R-34s at the same time, please refer to the appropriate installation
Note
document.
The major steps to installing and starting the IO-R-34, are outlined as follows:
Physically mount the module with the EC-BOS-8. See
1.
modules, ensure that the 5-position end connector(s) are properly seated into the end connector(s) of the other
units. Note the previous
Make wiring connections for grounding, 24Vac power, and I/O wiring. See
2.
Apply power and perform an initial checkout. See
3.
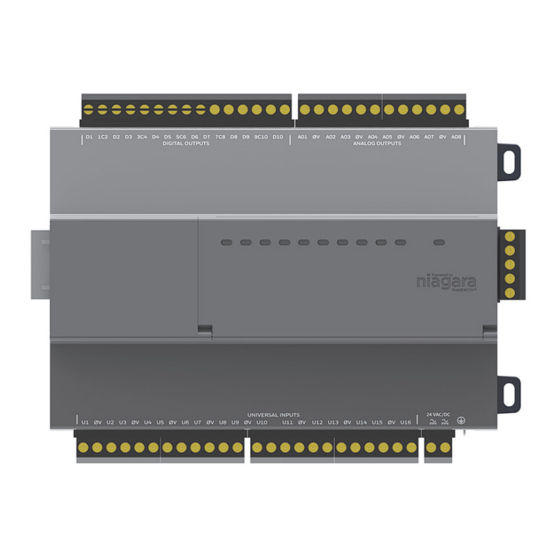
Physical Mounting
The following applies to mounting an IO-R-34 module with an EC-BOS-8:
Horizontal mounting is strongly recommended to achieve maximum heat dissipation and meet the operating
Note
temperature upper limit. Any other mounting orientation reduces this upper limit.
Mounting on a 35mm wide DIN rail is recommended. The IO-R-34 unit base has a molded DIN rail slot and
•
locking clip, which simplifies mounting with other modules. Mounting on a DIN rail ensures accurate alignment
of connectors between all modules.
If DIN rail mounting is not practical, you can use screws in mounting tabs on the IO-R-34.
•
Procedure 1
To mount IO-R-34 on existing installed DIN rail.
Pull or pry down the plastic locking clip until it snaps into the open (down) position.
Step 1
Position the IO-R-34 module on the rail, tilting to hook the top DIN rail tab over the upper edge of the DIN
Step 2
rail
(Figure
1). Rotate the module flush against the DIN rail and then press the locking clip upward to
release it and secure the module to the rail.
Slide the IO-R-34 module along the DIN rail to its intended location. If connecting to an IO-R-16 module,
Step 3
seat the 5-position plug into that module's connector socket.
Carefully install DIN rail end clips to secure the assembly. Make sure that the DIN rail stops do not press
Step 4
against the end connectors on the IO-R-34 or other modules.
Do not mount hardware on both a DIN Rail and with tab mounts to another surface. This causes
Caution
•
physical stress on equipment and prevents good connections between controller and modules.
Do not mount DIN rail stops so that they press against module end connectors. If possible, use
•
low-profile rail stops to eliminate possibility of contact and damage to the connectors.
Remote IO-R-34 Module Mounting and Wiring Guide
"Module Connection Precautions"
WEEE (Waste of Electrical and Electronic Equipment)
"Physical Mounting."
on page 4.
"Power up and Initial Checkout"
August 2, 2017
If directly attaching to other
"Wiring Details,"
page 7.
on page 15.
5