A-M Systems 2200 Gebrauchsanweisung - Seite 6
Blättern Sie online oder laden Sie pdf Gebrauchsanweisung für Kontrolleinheit A-M Systems 2200 herunter. A-M Systems 2200 19 Seiten. Analog stimulus isolator

applications requiring the highest voltages (for example, trying to push "large" currents
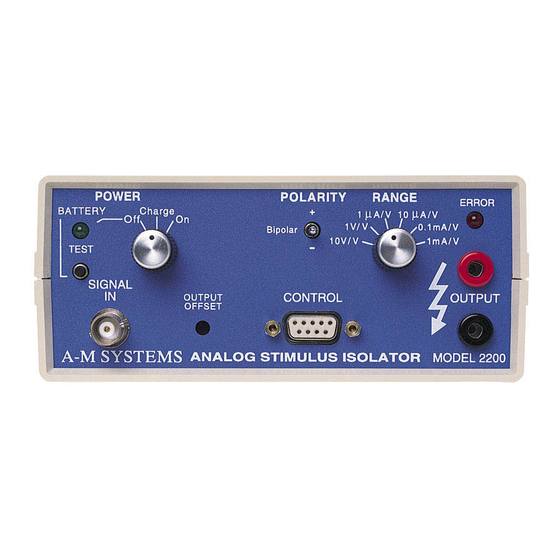
through high resistance electrodes), it may be necessary to set the Polarity switch to the
dominant polarity of your signal. For most users, it should be necessary to set the Polarity
switch to the dominant polarity of you signal. For most users, it should be adequate to leave
the switch set to Bipolar, giving equal range for both positive- and negative-going signals.
For the most challenging cases, you may double the output power by combining two units.
For users requiring the lowest possible offset voltage or current, it maybe necessary to
readjust the Offset. Use the small insulated screwdriver (supplied with the Model 2200) to
zero the output while the input voltage is set to zero. It is best to do this with the Range
switch set to the desired position.
Battery Testing and Maintenance
There are two batteries: a small 9V "transistor" NiMH battery used to power the input section;
and a larger gelled-electrolyte 12V battery used to power the output. Both are rechargeable.
The internal batteries are designed to last at least 8 operating hours from a full charge. Brand-
new batteries often have a slightly reduced capacity, which improves after a few charge-
discharge cycles.
There are two methods to test the state of the batteries. From the front panel, simply turn the
Power to Off, and push the Battery/Test push-button. The Battery/OK LED will light if both
battery voltages are sufficiently high. Warning: this light does not indicate how long the
charge will remain high It is up to the user to maintain the battery charge properly.
To preserve maximum battery life, use the full battery capacity. Do not routinely discharge the
battery completely as the gelled-electrolyte (12V) battery life will eventually deteriorate if you
discharge it too far. At the other extreme, do not frequently discharge the batteries to a small
fraction of their capacity: shallow discharging of the unit may lead to diminished charge life of
the input-side (9V) battery.
If battery charge life is a problem, the simplest solution is to keep on hand a supply of one or
more sets of fully charged replacement batteries in addition to the internal set. - It is easy to
change the batteries: turn the Power switch Off, turn the unit upside-down, and unscrew the
two recessed Phillips head bolts (see figure 1). While holding the unit together, turn the unit
right-side up. The top side of the case comes off with an easy vertical pull. The 9V battery is
in a battery holder on the horizontally-mounted circuit board; simply pry the discharged unit
out (pull on the attached tab), and replace with another battery. Disconnect the wire from the
larger 12V battery at the connector to the circuit board. Now pull the battery from the Velcro®
pad that it is sitting on. Replace the battery, making sure that it is firmly pressed into the pad.
Reconnect the new battery to the circuit board, making certain that the keyed connector is
locked together with the correct orientation! If the connector does not go together easily, you
may have it upside-down. Reinstall the top cover and tighten the two bolts. Pushing the Test
push button should now light the Battery OK LED.
A-M Systems
PO BOX 850, Carlsborg, WA 98324 USA
Telephone: 800-426-1306 * 360-683-8300 * FAX: 360-683-3525
E-mail: [email protected] * Website: http://www.a-msystems.com
3
