- ページ 4
プロジェクター Sharp XG-PH50X - XGA DLP ProjectorのPDF 取付説明書をオンラインで閲覧またはダウンロードできます。Sharp XG-PH50X - XGA DLP Projector 13 ページ。 Xga native resolution system integration/large venue projector
Sharp XG-PH50X - XGA DLP Projector にも: インストレーション・マニュアル (2 ページ), 操作マニュアル (20 ページ), 仕様 (2 ページ), パンフレット&スペック (4 ページ), クイック・スタート・リファレンス・シート (6 ページ)
INSTALLATION INSTRUCTIONS
1.1
a.
Select straddle beam or single beam installation.
b.
Use the ceiling bracket as a template to mark the location where the pilot holes
should be drilled.
c.
Drill the pilot holes for the support screws using a 1/8" drill bit into the center of
the beam. (See Figs. 2 and 3).
1.2
Screw the ceiling plate to the beams. Use at least 6 screws and metal washers
supplied with the unit. These screws should be tightened firmly to insure a
vibration-free support. (See Figs. 2 and 3).
Two sizes of hex head lag bolts are provided. Use shorter screws for sheet rock
surfaces and use the longer screws if the ceiling surface is constructed of a wood
lath and plaster.
CAUTION: THE BRACKET MOUNTING SCREWS MUST GO DIRECTLY
INTO THE BEAMS. SHEETROCK OR LATH AND PLASTER WILL NOT PRO-
VIDE A SUFFICIENTLY SECURE SUPPORT.
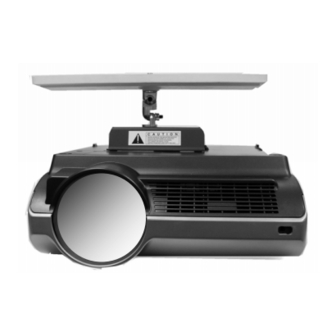
FIGURE 2. ILLUSTRATION OF STRADDLE BEAM CEILING BRACKET INSTALLATION
Sheetrock or lath
and plaster ceiling
Ceiling Mounting
Bracket
Plastic Ceiling
Bracket Trim Cover
NOTE: THE OUTER ROW OF HOLES ARE 16" BETWEEN CENTERS WHICH
IS THE MOST COMMON BEAM SPACING IN RESIDENTIAL WOOD FRAME
CONSTRUCTION.
Velcro
Security
Bushing
PAGE 4
CEILING BRACKET AN-PHCM20
Washers
Velcro
1/4 X 10 Lag Bolt
Security Option Label
Ceiling Beam