2gig Technologies Vario 빠른 설치 매뉴얼 - 페이지 7
{카테고리_이름} 2gig Technologies Vario에 대한 빠른 설치 매뉴얼을 온라인으로 검색하거나 PDF를 다운로드하세요. 2gig Technologies Vario 18 페이지. Voice module
2gig Technologies Vario에 대해서도 마찬가지입니다: 설치 지침 매뉴얼 (6 페이지), 빠른 사용 설명서 (10 페이지)
2GIG Vario Quick Install Guide
Maximum Current Flows
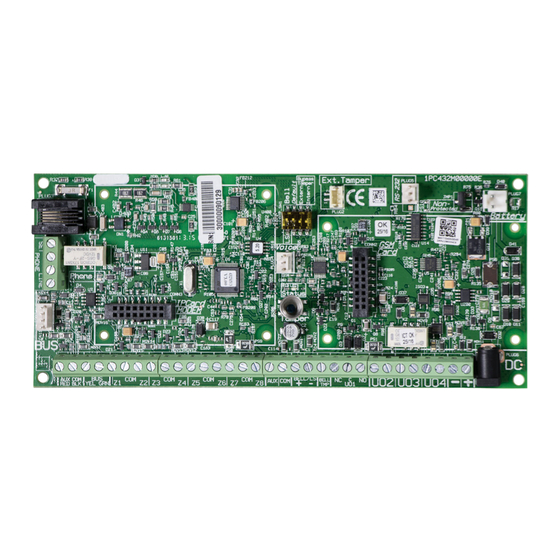
3. Wire Auxiliary Devices
Use the Auxiliary Power AUX (+) COM (–) terminals to power PIRs, glass-break detectors (4-wire types), smoke detectors, audio switches,
photoelectric systems and/or any device that requires a 12VDC power supply.
4. Wire the Internal Bell
The Bell/LS terminal provides power to the internal siren. When connecting an internal sounding device, pay attention to the polarity.
It is important to position the BELL/LS DIP switch SW1 correctly. The position varies depending on the type of internal siren.
To avoid bell loop trouble, if no connections are made to an internal siren, use a 2.2KΩ resistor in its place.
5. Wire the Bell Tamper
Connect the bell tamper to the BELL TMP and COM terminals on the main panel using 2.2KΩ resistors.
IMPORTANT:
If you DO NOT use the terminal TMP BELL, remember to connect a 2.2KΩ resistor (resistor colors: red, red, red) between
the TMP and COM.
6. Wire Utility Output 1 to Activate Self-Powered Devices
Utility output 1 can be used to activate a self-powered siren or any other self-powered device.
Copyright © 2016 Nortek Security & Control LLC
7